
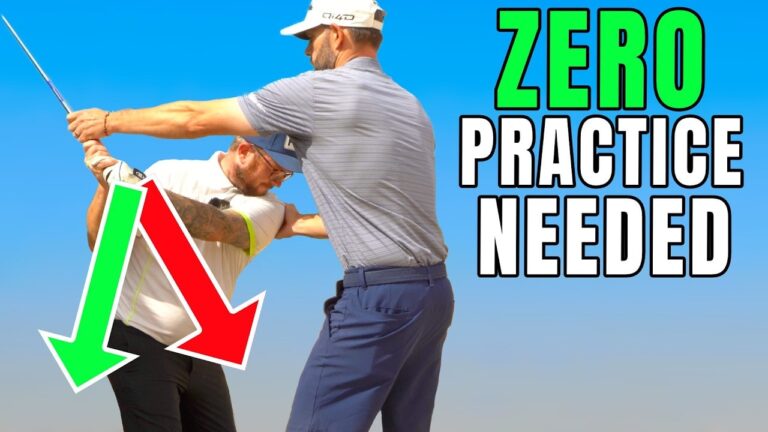

An over-the-top golf swing can feel frustratingly stubborn. You may strike the ball solidly, yet see it start left, peel right, or produce a weak fade that costs distance and accuracy. The usual reaction is to work harder at dropping the club, holding the release, or changing the grip. Often, that only makes the golf downswing more complicated.
A simpler route is to identify what is actually creating the steep, out-to-in path. In this golf lesson, the solution comes down to two connected priorities: a better setup and a better sequence in transition. Once those pieces improve, the club can approach the ball from a more neutral direction without forcing a complete backswing rebuild.
Table of Contents
- Step 1: Diagnose Your Golf Ball Flight Before Changing Anything
- Step 2: Build a Golf Setup That Does Not Force an Over-the-Top Move
- Step 3: Understand the Two Parts of a Functional Golf Backswing
- Step 4: Change the Golf Downswing Sequence, Not Every Movement
- Step 5: Match Your Golf Clubface to the New Path
- Step 6: Add Speed to Your Golf Swing in Stages
- Step 7: Use Your New Golf Path to Control Shot Shape
- Step 8: Keep Your Golf Practice Focused and Repeatable
Step 1: Diagnose Your Golf Ball Flight Before Changing Anything
Start by looking for patterns, not isolated golf shots. If you hit 20 shots with a 7 iron, ask what you would expect most of them to do. Do they begin right? Do they begin near target and curve right? Do they pull left? A repeatable pattern provides a much more useful starting point than one excellent strike or one poor shot.
The common pattern explored here is a ball that starts close to target or slightly left, then curves right. This often reflects an out-to-in club path paired with a relatively open clubface. The club is traveling left of the target line through impact, while the face is open relative to that path. The result is a fade or slice shape.
Your ball flight is valuable feedback, but it should not be judged in isolation. A golf swing measurement system can also identify where the club, hands, and chest are positioned during the downswing. In this case, the club and hands were measured as too steep halfway down and at delivery. That steepness helped send the club out toward the ball and then across it.
A strong grip was also present, with both hands rotated more to the right than neutral for a right-handed golfer. A strong grip can encourage a more closed face and left-curving golf shots, but it did not need immediate adjustment. Because the player’s typical shot curved right, changing the grip first could have added another variable without addressing the central issue.
Key lesson: Do not change every visible feature of your golf swing at once. Identify the ball-flight pattern, determine the club path tendency, and focus first on the movement most likely to improve both.
Step 2: Build a Golf Setup That Does Not Force an Over-the-Top Move
Your setup has a direct influence on what movements are available during the swing. If your chest begins too far toward the target, your body turn and arm motion must adapt around that starting position. That can make an out-to-in golf swing more likely before the club has even moved away.
Here, the chest was positioned forward of the preferred setup range. Rather than immediately trying to manipulate the club in motion, the first correction was simply to move into a more balanced address position.
To improve your golf setup, use this short process:
- Address the ball with your normal stance width and club position.
- Check your upper body position relative to your feet and ball.
- Avoid allowing your chest to drift noticeably toward the target.
- Settle into a balanced posture that allows you to rotate naturally.
- Only then make a swing.
This may sound basic, but setup is one of the highest-impact parts of golf instruction. If your starting position makes rotation difficult, you will likely create compensations during the takeaway or transition. A better setup does not guarantee a perfect shot, but it removes an obstacle that can make the downswing needlessly difficult.
When practicing, separate the setup from the strike. Take several rehearsals where your only objective is to establish a balanced chest position. Once it feels repeatable, hit short shots without trying to change anything else. This approach makes it easier to recognize whether a golf swing adjustment is coming from the intended source.
Step 3: Understand the Two Parts of a Functional Golf Backswing
A useful way to simplify the golf backswing is to see it as two motions working together:
- Arm lift: Your arms lift as the club moves upward.
- Body turn: Your shoulders and torso rotate away from the target.
Every effective golf backswing includes some combination of these motions. Your left arm can remain relatively straight while the trail arm folds naturally. The arms lift, and the shoulders turn. The exact amount will vary between golfers, but the basic components remain the same.
This matters because the downswing is not about inventing completely new movements. It uses the same two broad components in reverse: the arms lower and the body turns back toward the target. The trouble is that the order and rate of those actions can completely change the club path.
If your body starts turning aggressively toward the target before your arms have had time to lower, the club can be thrown outward and steepened. From there, it often travels left across the ball. That is the classic over-the-top golf move.
The movement is not wrong because you are turning your body. Nor is it wrong because your arms are lowering. The issue is that the body turn has overtaken the arm drop too early.
Step 4: Change the Golf Downswing Sequence, Not Every Movement
The central adjustment is straightforward: allow your arms to lower before you fully turn through.
At the top of the backswing, an over-the-top pattern can happen when you turn your chest toward the target first and attempt to lower your arms afterward. Even though both actions occur, their sequence sends the club outward. The club then approaches on a steep path and cuts across the ball.
A more efficient golf downswing begins with a brief feeling that the arms are working down behind you while your chest remains oriented away from the target. After the arms have lowered, you can rotate through and strike the ball.
Use this sequence as your simple swing thought:
- Make a controlled backswing.
- Pause at the top.
- Keep your chest facing away from the target for a moment.
- Let your arms lower behind you.
- Turn your body through and clip the ball.
This is not a recommendation to freeze the body during a real golf swing. It is a rehearsal that exaggerates the correct order. In a full-speed motion, arm drop and body turn overlap. The purpose of the drill is to stop the turn from racing ahead and pulling the club over the top.
The visual contrast is clear. Turning first with the arms still high produces the familiar steep delivery. Lowering the arms first gives the club more room to approach from inside the target line. The same components are present, but a small change in timing creates a dramatically different golf swing.
Use the Chest-Stays Drill
For your first repetitions, make a small backswing rather than a full one. At the top, feel as though your chest stays facing away from the target while your hands and arms soften and lower. Then use your body turn and trail wrist to make a gentle strike.
Initially, do not chase a full finish, maximum distance, or a perfect target line. Your only goal is to experience the arms lowering before the body rotation takes over. Short, controlled golf shots give you a better chance of learning that sensation.
Step 5: Match Your Golf Clubface to the New Path
Club path and clubface work together. This explains why a clubface that was useful with your old golf swing may become problematic when your path changes.
Imagine your club swings left of target through impact. For the ball to finish anywhere near the target, the clubface generally needs to be somewhat open relative to that leftward path. If the face were closed relative to the path, the ball would begin farther left and likely stay there.
That open face is often a compensation, not necessarily a standalone fault. It can help an out-to-in golfer turn a severe pull into a playable fade. Therefore, an open face may be exactly what your current golf pattern requires.
However, once you improve the path and begin swinging more from the inside, that same open clubface can send the ball right. This is why you should expect ball flight to evolve as your golf swing sequence improves.
Do not panic if early practice shots start farther right than expected. It may simply show that the club is no longer traveling sharply left. Continue to improve the sequence, then gradually learn how much face control is needed for the shot shape you want.
Step 6: Add Speed to Your Golf Swing in Stages
Once you can create a shallow, more neutral path with short swings, increase speed gradually. Going immediately from a slow rehearsal to maximum effort can cause your old sequence to return. The body may rush from the top, the arms may stay high, and the club may again move over the top.
Build your golf practice through three stages:
- Slow rehearsal: Pause at the top, lower the arms, then turn through without hitting a ball.
- Short strike: Use a compact backswing and make a gentle shot with the same order.
- Flowing swing: Remove the pause, retain the sensation of arm drop first, and increase speed gradually.
As the motion improves, aim for a club path close to neutral. A path around zero is a practical reference for straight golf shots, although exact numbers are less important than repeatable contact and predictable ball flight.
In the lesson, the club path improved from consistently out-to-in to close to neutral and slightly in-to-out. The golfer also became less steep through delivery. Those changes appeared quickly because the correction was focused: better chest position at setup, then better arm-and-body sequencing in transition.
Step 7: Use Your New Golf Path to Control Shot Shape
Once you can approach the ball from a neutral or slightly in-to-out path, you have more choices. For most golfers, a straight shot or a small, repeatable curve is the most useful stock pattern. You do not need to manufacture a dramatic draw to play better golf.
If you want a straighter shot, keep the arm drop and body turn balanced. Avoid exaggerating the inside approach. If you want to produce a larger draw, you can work more deliberately on the new sequence and allow a slightly more in-to-out path, while also managing the clubface appropriately.
The important gain is awareness. When a fade, hook, or push appears, you have a clearer idea of what may be contributing:
- A fade can be linked to a path moving too far left or a face that is too open.
- A hook can appear when the face closes too much relative to the path.
- A push can occur when the path is too far right with a face that also points right.
- A pull can occur when the club travels too far left with a face that is also left of target.
This does not mean you should diagnose every golf shot with complex technical thoughts. It means you can respond calmly to a trend. Instead of making random changes, return to your setup, rehearse the arm drop, and restore the correct sequence.
Step 8: Keep Your Golf Practice Focused and Repeatable
The fastest way to make the downswing harder again is to pile on multiple swing thoughts. Avoid trying to change your grip, backswing length, shoulder turn, wrist angles, clubface, and transition all in one session. The golf improvement described here came from leaving a good backswing largely alone and focusing on the factors that directly influenced the steep path.
Use a focused practice routine:
- Begin with several setup checks.
- Make slow arm-drop rehearsals without a ball.
- Hit a small number of half shots.
- Increase to fuller swings only when the strike and path remain controlled.
- Assess the pattern after several shots, not after one ball.
Your goal is not to force the club dramatically from the inside. It is to make the golf downswing easier by allowing the arms to lower before your body turn accelerates. With a balanced setup and a better sequence, the club has a better chance to approach on plane, the strike can improve, and straighter shots become more attainable.
Golf Downswing FAQ
Why do I come over the top in my golf swing?
An over-the-top golf swing often occurs when your upper body turns toward the target before your arms have lowered from the top of the backswing. This sends the club outward, makes the delivery steeper, and encourages an out-to-in path.
Should I change my grip to fix an over-the-top golf swing?
Not necessarily. A strong or weak grip may affect clubface control, but it may be compensating for your current path. Improve your setup and downswing sequence first, then reassess your ball flight before making grip changes.
What is the simplest drill for a steep golf downswing?
Make a short backswing, pause, keep your chest facing away from the target briefly, and let your arms lower behind you. Then turn through and hit a gentle shot. This exaggerates the arm-drop-before-body-turn sequence.
Should I try to swing in-to-out on every golf shot?
No. A neutral club path is generally a useful target for straight golf shots. Use a slightly in-to-out path only when it helps create a controlled draw, rather than forcing an exaggerated inside approach.
0 Comments