
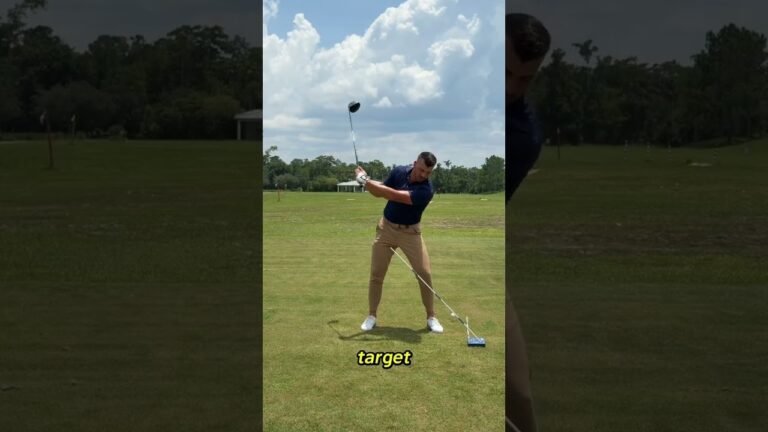

Shallowing the club is one of the most discussed moves in golf, especially for players fighting a slice, steep downswing, or weak contact with the driver. Yet many golfers make the problem worse by trying every shallowing cue at once.
A shallower golf downswing is not about forcing the club dramatically behind you. It is about creating enough room for the club to approach from the inside while preserving control of your swing path. For most players, the answer is found in one of three places: your trail elbow, your spine tilt, or the height of your hands in transition.
Use this step-by-step guide to identify the one adjustment that best fits your golf swing, practice it with feedback, and avoid trading a slice for a hook.
Table of Contents
- Step 1: Understand What It Means to Shallow the Club in Golf
- Step 2: Check Whether Your Trail Elbow Is Trapped
- Step 3: Improve Your Golf Spine Tilt in Transition
- Step 4: Bring Your Hands Down Before You Rotate
- Step 5: Choose Only One Golf Shallowing Fix First
- Step 6: Use an Alignment Stick for Golf Swing-Path Feedback
- Step 7: Match Your Golf Practice to Your Ball Flight
- Step 8: Avoid These Common Golf Shallowing Mistakes
- Step 9: Build a Simple Golf Shallowing Practice Plan
- Step 10: Take the Middle Ground for a Better Golf Swing Path
Step 1: Understand What It Means to Shallow the Club in Golf
To shallow the club means that, during the early downswing, the shaft and clubhead move onto a less upright approach into the ball. In practical terms, the club approaches more from the inside rather than cutting steeply across the target line.
For a right-handed golfer, a steep, over-the-top downswing commonly sends the club out toward the ball and left through impact. That pattern can produce slices, pulls, weak fades, and inconsistent strikes. A more shallow golf swing path can help you deliver the club from the inside and create a more powerful, controlled draw pattern.
However, shallow does not mean as far under the plane as possible. If you force the club too far behind you, the likely result is an excessively in-to-out path and hooks. The goal is a balanced delivery position, not an extreme one.
A useful principle: You do not need every shallowing fix. You need the fix that addresses the reason your club is steep.
Step 2: Check Whether Your Trail Elbow Is Trapped
For many right-handed golfers, the right elbow is the first place to investigate. At the top of the backswing, the trail elbow needs enough space away from your side to move down and in front of your torso during the downswing.
When your right elbow is pinned tightly against your side, it can become trapped behind you. From there, the elbow may flare outward in transition, which encourages the club to move over the top. The club then has little room to fall into a shallower golf swing path.
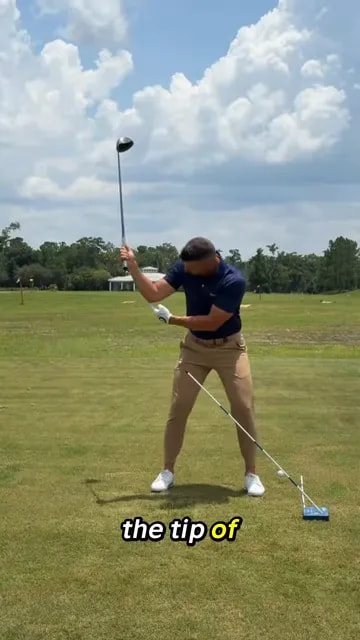
Create space at the top of the backswing
Rather than squeezing the upper right arm tightly into your chest, allow a noticeable amount of room between the tip of your right elbow and your side. A higher hand position can naturally make this space easier to create.
This does not mean your elbow should fly far behind your body. The point is simply to give it room to work down in front of you. During the early downswing, feel the tip of the right elbow moving in front of the side seam of your shirt instead of moving outward behind you.
Golf drill: trail elbow in front of your side
Make a slow backswing and pause at the top.
Check that your right elbow has space from your ribcage.
Begin down slowly and feel the elbow move down and forward in front of your right side.
Stop before impact and check whether the club is approaching from inside the target line.
Make several rehearsals before adding a ball.
A common golf mistake is using a towel under the trail armpit too aggressively. Connection drills can be useful, but if the towel forces the arm to stay overly jammed against your side, it can prevent the elbow from working correctly in transition.
Step 3: Improve Your Golf Spine Tilt in Transition
The second major shallowing issue is spine tilt. If your upper body tilts toward the target in the downswing, you may have little choice but to spin left and send the club on a leftward, steep path.
This often happens with a reverse weight shift, where you stay too much on your back foot while your spine points toward the target. From that position, the club is more likely to travel across the ball instead of approaching from the inside.
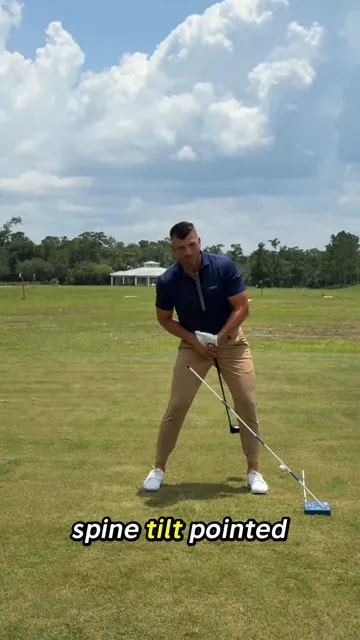
Use a modest tilt away from the target
For a right-handed golfer, the useful feel is a positive spine tilt that points slightly away from the target as you transition down. This creates room to deliver the club more from the inside.
Do not exaggerate it. An extreme tilt away from the target can send the club too far underneath the desired path and lead to hooks. In golf, the best movement is usually a measured correction rather than a maximum correction.
Golf drill: compare two spine positions
Set up without a ball and make a backswing.
Rehearse a downswing with your chest and spine leaning toward the target. Notice how easily the club wants to cut left.
Reset and rehearse with a modest spine tilt away from the target.
Feel how the club now has more room to approach from the inside.
Use the middle ground, not either exaggerated position, for your full golf swing.
If your usual shot starts left, pulls left, or slices despite feeling as though you are swinging hard from the top, checking your spine tilt can be especially valuable.
Step 4: Bring Your Hands Down Before You Rotate
The third problem appears when your trail elbow and spine tilt are reasonably sound, but your hands remain too high in transition. If you immediately rotate hard from the top while leaving the hands high, the club tends to stay steep and travel left.
For a shallower golf downswing, your hands need to lower before your rotation fully blends in. This is not a command to stop rotating. It is a sequencing feel that helps the club find a better delivery angle.
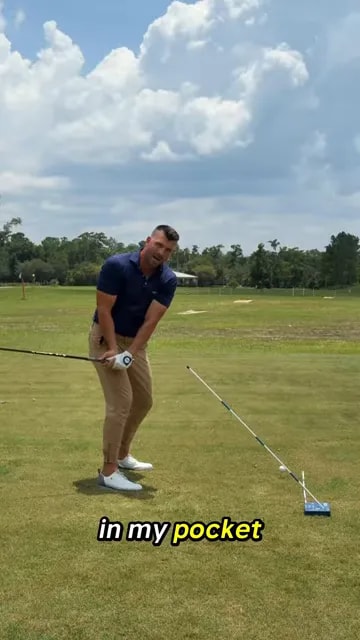
The trail-pocket hand feel
From the top of your swing, rehearse the feeling of bringing your hands down toward your trail-side pocket. For a right-handed golfer, that means the right pocket. Make this a slow, deliberate move first, then gradually blend it with body rotation.
As your hands lower, the club can begin to approach from the inside instead of immediately moving outward over the plane. When rotation is added after that initial lowering motion, the club can shallow naturally without needing to force the shaft behind you.
Golf drill: rehearse, blend, then swing
Take the club to the top of your backswing.
Pause briefly and lower your hands toward the trail pocket.
Allow the club to fall into a shallower position.
Blend in rotation through the ball.
Start with half-speed golf swings and increase speed only when the path remains controlled.
This drill is particularly useful if your hands seem to stay near your shoulder line while your body starts unwinding. That pattern commonly produces a steep, leftward golf path.
Step 5: Choose Only One Golf Shallowing Fix First
The biggest mistake is attempting to fix your elbow, spine tilt, and hand height at full intensity in the same swing. Each adjustment can help a steep golf swing, but combining all three aggressively may push the club too far under the plane.
That can turn a slice into a hook. While some golfers may prefer seeing the ball curve left rather than slice right, a hook is not the final destination. It is simply a sign that the correction may have gone too far.
Start with the issue that most clearly describes your swing:
Choose the trail elbow fix if your elbow is jammed against your side or flies outward behind you in transition.
Choose the spine tilt fix if your upper body leans toward the target and you spin left from the top.
Choose the hands-down fix if your hands stay high while you rotate immediately.
Work on one feel for a practice session. Once your golf ball flight becomes more neutral, reduce the intensity of that feel instead of adding more shallow.
Step 6: Use an Alignment Stick for Golf Swing-Path Feedback
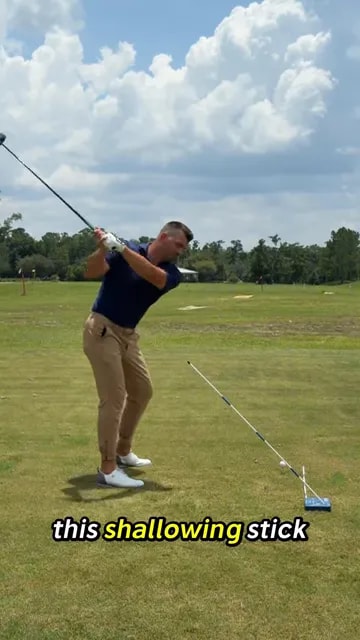
It is difficult to change your golf swing based on feel alone. A visual obstacle can help you tell whether the club is still approaching too steeply or beginning to move from the inside.
Place an alignment stick in a stable training aid or secure holder so it rises diagonally in front of the ball and outside your intended swing path. The club should pass underneath the stick during the downswing without striking it.
How to use the obstacle safely
Set the stick far enough from the ball that it does not interfere with impact.
Begin with slow rehearsal swings, not full-speed drives.
If you strike the stick, your club is likely still moving too steeply or too far out.
If you pass excessively far beneath it, you may be over-shallowing the club.
Adjust only one of the three golf swing elements at a time.
The alignment stick is feedback, not a target to manipulate. Your goal is not merely to miss the stick. Your goal is to develop a repeatable golf delivery that produces centered contact and a manageable shot shape.
Step 7: Match Your Golf Practice to Your Ball Flight
Your ball flight can help you judge whether a shallowing adjustment is moving in the right direction. Use it alongside your practice feedback rather than relying on one poor shot.
Common result |
What it may indicate |
Practical response |
|---|---|---|
Slice or steep contact |
The club may still be moving over the top. |
Test one shallowing feel, beginning with elbow space, spine tilt, or lower hands. |
Pulls and shots far left |
Your path may be moving left, often with the upper body tilted toward the target. |
Check your spine tilt and avoid spinning out early. |
Hooks after a new drill |
You may be approaching too far from the inside. |
Reduce the shallowing feel and return toward a middle-ground path. |
Solid shots with a gentle draw |
Your golf path may be approaching from a more useful inside position. |
Keep the same simple feel and avoid adding extra corrections. |
Do not expect every golf shot to become perfect immediately. A new movement can temporarily change your start line and curve. The key is to notice trends across several controlled swings.
Step 8: Avoid These Common Golf Shallowing Mistakes
Trying to lay the shaft down with your hands
Forcing the club behind your body can make the swing overly inside. The club should shallow because your elbow has room, your spine is in a useful position, and your hands lower properly in transition.
Keeping the trail elbow glued to your ribcage
Too much arm connection can remove the space your elbow needs to move down in front of you. Keep the arm organized, but do not trap it.
Spinning before the club has time to lower
Early rotation with high hands commonly creates the steep, leftward pattern many golfers are trying to escape. Rehearse the hands-down motion before blending in rotation.
Overcorrecting a slice into a hook
A hook can be a sign that your golf swing path has become too far from the inside. Do not respond by adding more shallowing. Reduce your chosen feel until the path returns closer to neutral.
Changing several things at once
When you change everything, you cannot tell which movement helped. Commit to one adjustment, use a slow rehearsal, then measure the result with a ball flight pattern or alignment-stick feedback.
Step 9: Build a Simple Golf Shallowing Practice Plan
Use this short practice sequence whenever your golf swing starts feeling steep:
Make five slow rehearsals. Choose one focus only: trail elbow space, positive spine tilt, or hands down.
Make five practice swings with an obstacle. Use an alignment stick and learn whether the club is still moving over the top.
Hit five half-speed shots. Prioritize centered contact and a controlled start line.
Hit five normal swings. Keep the same simple feel rather than adding a second correction.
Evaluate the pattern. If the ball starts curving too far left, lessen the shallowing move. If it continues to slice, retain the one adjustment and rehearse it more slowly.
The most productive golf practice is specific. One clear movement, repeated with feedback, is more useful than cycling through several swing thoughts on every ball.
Step 10: Take the Middle Ground for a Better Golf Swing Path
Shallowing the club can help you move away from an over-the-top golf swing and toward more solid, powerful drives. But the best result comes from moderation. Create room for your trail elbow, maintain a modest spine tilt away from the target, or lower your hands before rotating.
Choose the one correction that matches your current pattern. Practice it slowly. Use an alignment stick to confirm the club is not moving steeply over the plane. Then blend the motion into your normal golf swing until you can produce centered contact and a repeatable, controlled draw or straight shot.
Golf Shallowing FAQ
What does shallowing the club mean in golf?
Shallowing the club means moving the club into a less upright downswing position so it can approach the ball more from the inside rather than cutting steeply across the target line.
Why can’t I shallow the club?
Three common reasons are a trail elbow that gets trapped behind the body, spine tilt that points toward the target, and hands that stay too high as the body begins rotating in the downswing.
Can shallowing the club fix a slice?
A shallower golf swing path can help a player who slices because it may reduce an over-the-top approach. However, overdoing the correction can create a hook, so use one change at a time.
Should my right elbow stay tucked in golf?
Your trail elbow should stay organized, but it should not be jammed tightly against your side. It needs enough room at the top of the swing to move down and in front of your body in transition.
How can I practice shallowing the golf club at home or on the range?
Make slow transition rehearsals using one feel, then use a safely positioned alignment stick as a visual obstacle. The club should travel beneath the stick without moving excessively far underneath it.
0 Comments