


Clean fairway-wood contact is one of the most useful skills in golf, yet it can feel difficult when the ball sits on a tight lie. Thin shots, heavy shots, and contact behind the ball often make a fairway wood, hybrid, or long iron feel far less reliable than it should.
The answer is not to try to lift the ball into the air. For solid golf shots off the ground, you need a repeatable low point, a controlled shift toward the lead side, and enough rotation to move the club through the ball rather than into the turf behind it.
This five-minute practice sequence combines an athletic throwing motion with a simple tape-feedback drill. It gives you a clear process for improving ground contact with fairway woods, hybrids, and long irons.
Table of Contents
- Step 1: Understand Why Fairway Woods Are Difficult in Golf
- Step 2: Build the Golf Motion With a Tennis-Ball Throw
- Step 3: Replace the Hip Slide With a Bump and Turn
- Step 4: Learn the Ground-Contact Goal for Better Golf Strikes
- Step 5: Use the Tape Drill to Measure Your Golf Contact
- Step 6: Transfer the Drill to Fairway Woods, Hybrids, and Long Irons
- Step 7: Avoid the Common Fairway-Wood Golf Mistakes
- Step 8: Follow a Five-Minute Golf Practice Plan
- Step 9: Make Clean Contact the Priority
Step 1: Understand Why Fairway Woods Are Difficult in Golf
A fairway wood is designed to strike a ball from the turf, but it has a longer shaft and less loft than many other golf clubs. That makes inconsistent ground contact more noticeable. If the club reaches its lowest point too far behind the ball, it can hit the turf early and lose speed. If you try to help the ball into the air, you may also catch it thin.
The goal is not necessarily to take a deep divot with a fairway wood. Instead, you want the club to arrive at the ball with a stable, predictable low point. The club can lightly brush the turf as it reaches the ball, then continue forward.
For this practice routine, focus on three outcomes:
- Shift: Begin moving pressure toward your lead side before the arms release.
- Turn: Rotate through the strike instead of sliding excessively.
- Contact: Make the first meaningful ground contact close to the ball, not several inches behind it.
These fundamentals apply across golf clubs hit from the ground. A fairway wood, hybrid, and long iron may look different at address, but each benefits from a controlled low point.
Step 2: Build the Golf Motion With a Tennis-Ball Throw
Before using a club, rehearse the movement with a tennis ball. This is useful because throwing encourages a natural athletic sequence without the urge to steer a golf ball.
Stand a safe distance from a wall with a tennis ball in your trail hand. If you play right-handed, use your right hand. If you play left-handed, reverse the directions.
How to perform the throw
- Start in a balanced, athletic stance.
- Move your throwing hand back to roughly chest height as you load slightly into your trail leg.
- Make a small shift toward your lead side while the throwing arm is still back.
- Begin opening your hips toward the target.
- Throw the tennis ball toward the wall only after the shift and rotation have started.
The sequence matters more than throw speed. Your body begins moving forward, then rotates, then the arm releases. That same order helps the clubhead reach the golf ball with less effort and better contact.
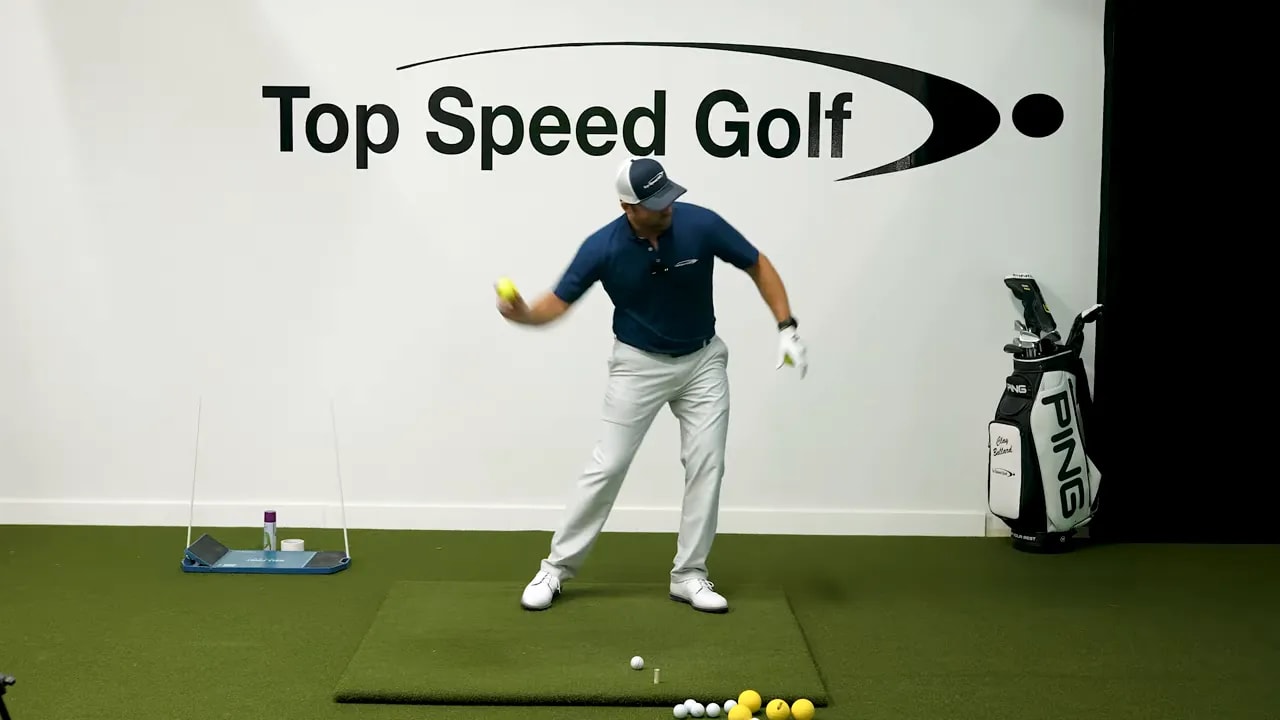
Do not turn this into a complicated technical exercise. Make 10 to 15 comfortable throws. Your goal is to feel a smooth rhythm rather than force a large step or an aggressive hip turn.
What the tennis-ball drill teaches
The throw trains a key sensation: your arms can remain back while your lower body begins moving toward the target. Many poor fairway-wood strikes happen when the body hangs back or when the arms rush down before the body has shifted and turned.
When you throw naturally, you are less likely to remain trapped on your trail side. You also have a clearer sense of releasing forward, which is exactly what helps the club travel through the ball in golf.
Step 3: Replace the Hip Slide With a Bump and Turn
A small amount of lateral movement is part of a functional golf swing. The problem is excessive sliding. If your hips move too far away from the target in the backswing, you create too much distance to recover during the downswing. That can make it hard to return the club to the ball consistently.
Use this simple pattern instead: bump, turn, bump, turn.
Backswing movement
As you start back, allow a modest shift into your trail side and turn. Your trail leg should remain angled and stable instead of drifting dramatically away from the target. Think of loading into the trail leg, not sliding over it.
Downswing movement
Before your arms fully release, make a modest bump toward the lead side. Then rotate through. This is the same order you felt during the tennis-ball throw: shift first, turn, and then release.
You can practice this with no training aid at all. Make slow rehearsal swings and pause when your hands are around chest height in the backswing. Check that your trail hip has turned but not slid excessively. Then rehearse moving toward the lead side before rotating through.
If you have alignment sticks, place one outside the trail side and another near the lead side to create boundaries. Avoid contacting the trail-side stick during the backswing. On the way down, feel as though you move toward the lead-side boundary while the arms remain back, then rotate through the strike.
Signs your lower body is moving too much
- Your trail hip drifts well outside your trail foot in the backswing.
- You feel as though you must lunge forward to reach the ball.
- Your chest and arms fall behind your lower body at impact.
- You strike the turf well behind the ball.
- Your contact changes dramatically from swing to swing.
A bump and turn is controlled, not exaggerated. In golf, reliable contact comes from reducing unnecessary motion, not from trying to create the biggest possible weight shift.
Step 4: Learn the Ground-Contact Goal for Better Golf Strikes
Your divot is not the same thing as the first point where the club touches the surface. With a ball struck from the ground, the club can lightly contact the turf near the ball, strike the ball, and then produce a divot in front of it.
The important standard is consistency. Better players tend to contact the ground in a much tighter area near the ball, while inconsistent strikes can occur several inches behind it.
For practical golf practice, aim to get your initial turf contact within about an inch of the ball. That is a demanding standard. Being within a couple of inches is still a meaningful improvement, especially if you currently hit several inches behind the ball.
Do not misread this as an instruction to chop down sharply. The intention is to move the low point forward enough that the club meets the ball cleanly. Your fairway wood should sweep through with forward motion, not dig straight down.
Step 5: Use the Tape Drill to Measure Your Golf Contact
The tape drill turns feel into measurable feedback. You need only a piece of tape, a ball, and an area where you can safely hit shots.
Set up the drill
- Place a short strip of tape on the ground behind the ball position.
- Set the ball so its back edge is about two to three inches in front of the tape.
- Hit shots while trying to strike the ball cleanly without touching the tape.
- Use the same shift, turn, and release sensation learned in the tennis-ball drill.
The tape gives immediate feedback. If the club brushes or moves the tape, your low point was too far behind the ball. If you consistently miss the tape and strike the ball solidly, you have earned the right to make the task more difficult.
This drill is especially valuable for tight lies in golf because it rewards the exact contact pattern needed when there is little grass under the ball.
Use a 10-shot progression
Hit 10 shots from your current setup and count the shots on which you miss the tape. Do not judge the drill only by the flight of the ball. A well-struck ball that came after contact with the tape still tells you that your low point needs work.
- If you miss the tape on fewer than about five of 10 swings, move the ball slightly farther forward from the tape to make the task easier.
- If you miss the tape on seven, eight, nine, or 10 swings, move the ball closer to the tape.
- Make the adjustment in small increments, roughly half an inch when appropriate.
- Continue until the ball is very close to the tape and you can still avoid it regularly.
Starting with the ball two to three inches ahead of the tape is not a shortcut. It gives you a manageable challenge. As your contact improves, decreasing the distance demands greater precision.
Step 6: Transfer the Drill to Fairway Woods, Hybrids, and Long Irons
Start with the club that gives you the most confidence. For some golfers, that will be a hybrid or long iron. For others, it will be a five wood. Once you can control the tape drill with one club, repeat the process with the others.
Keep the movement intention consistent:
- Load into the trail side without sliding.
- Begin moving toward the lead side while the arms are still back.
- Rotate through the ball.
- Allow the club to brush the ground near the ball and continue forward.
As you move to a longer fairway wood, resist the temptation to add extra effort. Longer clubs do not require a different basic sequence. They require more commitment to balance and low-point control.
When you take this to the course, use one uncomplicated cue. For example, feel your lead-side shift begin before the club releases. Avoid carrying the tape drill onto the course as a mechanical checklist. The practice drill builds the pattern, while the on-course shot calls for a simple, athletic golf swing.
Step 7: Avoid the Common Fairway-Wood Golf Mistakes
Trying to scoop the ball upward
A fairway wood has loft. You do not need to help the ball into the air by hanging back or flipping your hands. This often places the low point behind the ball and causes thin or heavy contact.
Sliding instead of rotating
Moving toward the target is helpful, but excessive sliding makes the swing difficult to repeat. Make a controlled bump toward the lead side, then rotate through.
Starting the arms before the body shifts
If the arms immediately pull down from the top, the club can bottom out too early. Rehearse the athletic throwing sequence until you can sense the lower body beginning first.
Changing too many things at once
Use the progression in order. First establish the throwing feel. Next rehearse the bump and turn. Finally, test your result with tape. The tape is your evidence, so trust it over a vague feeling.
Making the tape drill too difficult too soon
Place the ball two to three inches ahead of the tape first. If you put the ball directly beside the tape before you can succeed at the easier distance, you may only reinforce frustration rather than improve your golf contact.
Step 8: Follow a Five-Minute Golf Practice Plan
You do not need a long session to begin improving fairway-wood contact. Use this short routine before a range session or before hitting a series of fairway woods.
- Minute 1: Make 10 to 15 tennis-ball throws, feeling shift, turn, and release.
- Minute 2: Rehearse five slow bump-and-turn motions without a ball.
- Minutes 3 and 4: Hit 10 shots using the tape drill, recording how often you miss the tape.
- Minute 5: Make one small adjustment to the ball-to-tape distance based on your result, then hit a few more shots.
This approach gives every shot a purpose. Rather than hitting balls and hoping for better results, you are training a motion and checking whether it moves your ground contact closer to the ball.
Step 9: Make Clean Contact the Priority
Better fairway-wood golf shots begin with a simple objective: move the bottom of the swing close to the ball. The tennis-ball throw helps you find the athletic sequence. The bump-and-turn rehearsal limits unnecessary hip movement. The tape drill shows whether the change is actually improving contact.
Practice the motion at a speed you can control, then gradually build toward normal swings. When you can repeatedly miss the tape and strike the ball cleanly, fairway woods, hybrids, and long irons from the ground become much more manageable.
Fairway Wood Golf FAQ
Should you hit down on a fairway wood?
You should not try to chop steeply down. The goal is to deliver the club with a low point close to the ball, allowing it to brush the turf near the ball and continue forward.
Why do I hit my fairway wood behind the ball?
Contact behind the ball can result from hanging on the trail side, excessive hip sliding, or releasing the arms before shifting and rotating through. The tennis-ball and tape drills help address each issue.
Can the tape drill help with hybrids and long irons?
Yes. The drill is designed to improve low-point control for clubs struck from the ground, including fairway woods, hybrids, and long irons.
How far behind the ball should the tape go?
Begin with the back of the ball about two to three inches in front of the tape. Move the ball closer only after you can regularly miss the tape during sets of 10 shots.
How many repetitions should I make with the tennis-ball drill?
Make 10 to 15 throws until the shift, rotation, and release feel smooth and natural. Quality and rhythm are more important than throwing hard.
0 Comments