
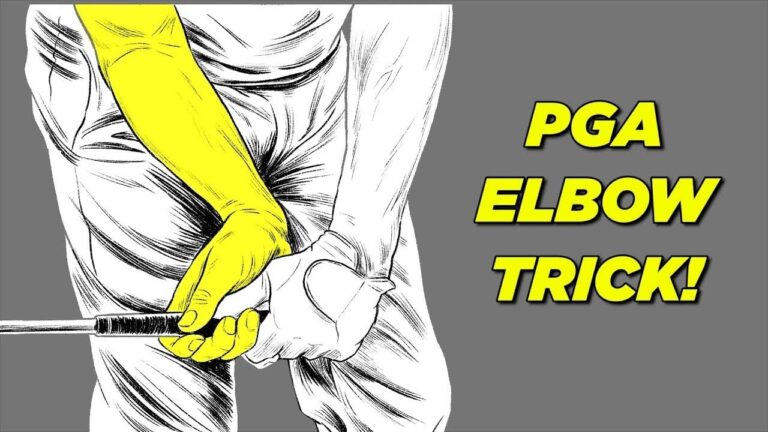

Solid golf shots are rarely created by simply swinging harder. They are built during the short transition from the top of the backswing into the downswing, when your hips begin moving toward the target and your trail elbow works down closer to your side.
This movement pattern is often described as getting into the PGA corridor. For a right-handed golfer, it means moving the lead hip forward while the trail elbow points down toward the ball rather than flying outward in front of the body. When these movements work together, you can arrive at impact in a much more functional position for compressed contact.
Many amateur golf swings lose this opportunity when the hips spin too early, the trail shoulder moves out, and the trail arm pitches away from the body. That pattern can contribute to pulls, blocks, fat shots, and inconsistent strike quality. The goal is not to force your arm behind you. It is to create a better path into the ball by shifting first and allowing the elbow to work down.
Table of Contents
- Step 1: Understand the Golf PGA Corridor
- Step 2: Identify the Common Golf Downswing Error
- Step 3: Shift Your Hips Forward Before You Rotate
- Step 4: Check the Trail Knee Angle in Your Golf Swing
- Step 5: Train the Trail Elbow With the Toe-Line Drill
- Step 6: Build the Movement With an Alignment Stick Station
- Step 7: Rotate With Tilt Through the Golf Ball
- Step 8: Practice the Golf Move in a Productive Order
- Frequently Asked Questions
Step 1: Understand the Golf PGA Corridor
The PGA corridor is a visual model for the delivery position shared by many strong ball strikers. From the top of the swing, the lead hip moves forward toward the target while the trail elbow lowers toward the trail hip and the ball.
For a right-handed golfer, the key sequence is simple:
- Your lead hip shifts forward.
- Your knees begin moving toward the target.
- Your trail elbow moves down, not out.
- Your hands stay relatively close to your trail thigh as the club approaches impact.
- Your body continues to open through impact without losing forward tilt.
This is not a request to keep the hips frozen. Your body must rotate through the shot. The important distinction is that the lower body shifts forward early enough to give the arms a useful route down. From there, rotation can happen with the arms and club working through the ball rather than being thrown out toward it.
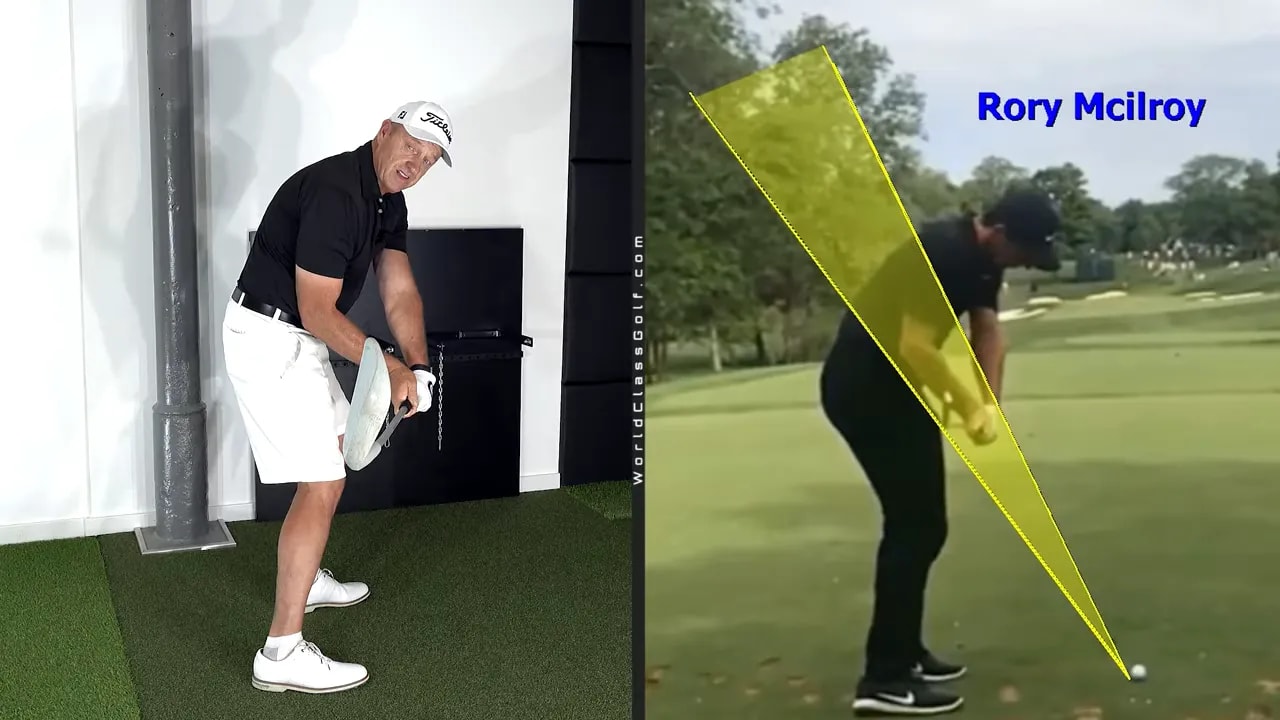
The contrast is visible in high-level golf swings. Sergio Garcia is used as an example of hands and arms working close to the body in the delivery phase. The trail elbow does not need to race in front of the torso. Instead, the hands work down close to the trail leg, providing room for the club to approach from a more efficient angle.
Step 2: Identify the Common Golf Downswing Error
The most damaging pattern is an early spin of the hips combined with the upper body moving outward. As the hips spin open without a forward shift, the trail shoulder can move out toward the ball. The trail arm then tends to pitch outward, often leaving the elbow high and away from the side.
This is sometimes easy to recognize in your own golf swing. At the start of the downswing, you may notice that:
- Your trail elbow points behind you or away from the ball.
- Your hands move far from your trail thigh.
- Your trail heel lifts early as you try to turn.
- Your chest and shoulders open aggressively before your arms have lowered.
- Your club feels as if it must be thrown at the ball from outside the ideal delivery path.
When the arm pitches out, contact becomes much harder to control. A club that approaches too steeply or too far outside can produce a pulled shot. An attempt to save it can leave the face open and cause a block. If the low point moves behind the ball, fat contact can follow.
Do not try to solve this only by forcing the trail elbow inward. The elbow movement is connected to the lower body. A better golf transition starts with the knees and hips moving toward the target, creating the space for the elbow to lower naturally.
Step 3: Shift Your Hips Forward Before You Rotate
From the top of the backswing to impact, the available time is extremely short, roughly 0.2 seconds. That is why the first thought in your golf downswing needs to happen early. Your intent should be to shift your hips and knees forward as you begin pulling the trail arm down toward your side.
Think of the first transition move as forward with the lower body, down with the trail elbow.
For a right-handed player, allow the knees to begin moving toward the target. This move brings pressure toward the lead side while maintaining pressure on the inside of the trail foot. You can then push from that trail foot as the body continues through the strike.
Golf instruction often becomes confusing when golfers are told only to rotate. Rotation is necessary, but rotation without a proper forward move can pull the shoulders and arms outward. The desired sequence is a forward shift followed by rotation through the shot.
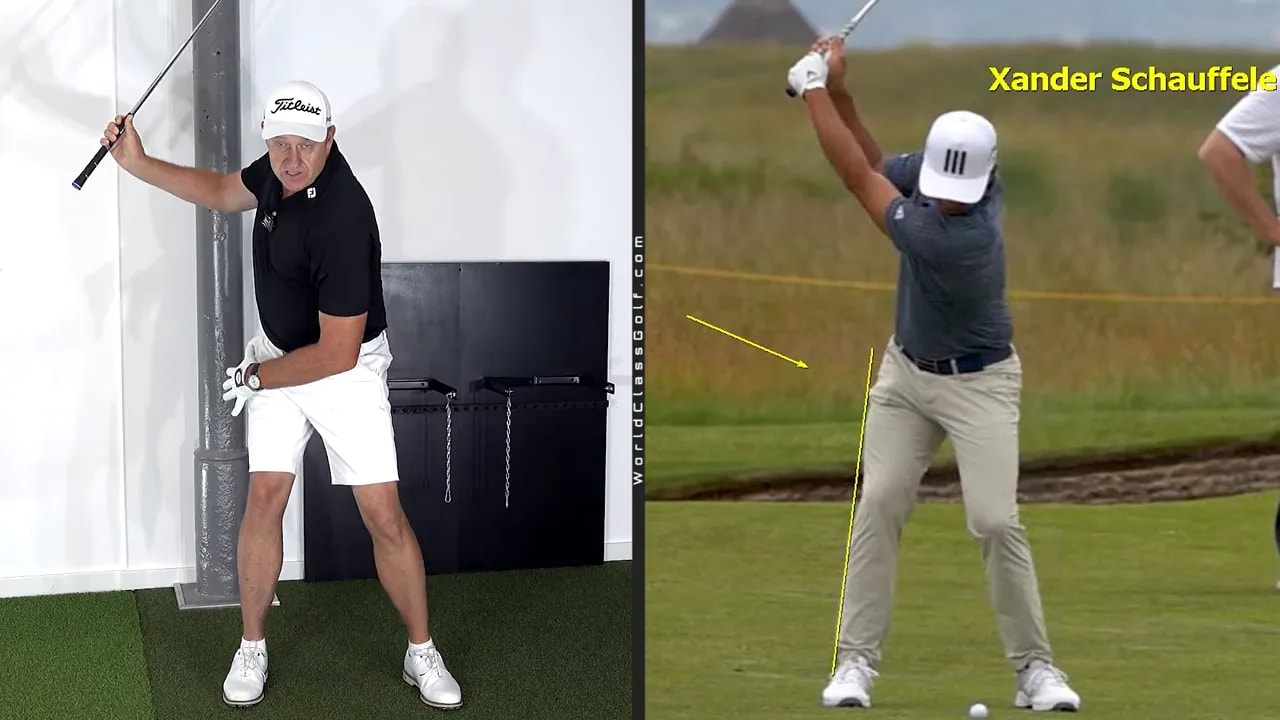
Adam Scott is used as a model for this early lateral movement. At the top, the hips and knees visibly start moving toward the target before the body fully unwinds. This early movement gives the arms a chance to lower into the hitting area.
Use Knee Movement as Your Simple Golf Feel
Technical ideas can be useful, but a clear body feel is usually more practical on the range. Focus on getting the knees moving toward the target as the downswing begins. This can help you avoid the instinct to spin the hips immediately.
As your knees shift, feel the gap between them begin to close. This movement encourages the trail knee to work in and forward rather than staying back with the trail leg straightening too soon. It also supports the lowering of the trail arm.
A useful rehearsal is to stop at the top, then make a slow transition where your knees move forward while your trail elbow moves down toward your trail hip. Repeat it several times without a ball before building up to a small swing.
Step 4: Check the Trail Knee Angle in Your Golf Swing
A reference point from PGA Tour data is the angle created by the trail leg during the delivery phase. Strong ball strikers are commonly shown with the trail knee working forward, creating an approximate angle between 55 and 65 degrees. The featured average is about 65 degrees, and the suggested upper limit is below 70 degrees.
The number is not meant to make your golf swing mechanical. It provides a useful visual checkpoint. If your trail leg stays too vertical, with the knee far behind the ankle, you may be missing the forward movement that helps place the arms in the corridor.
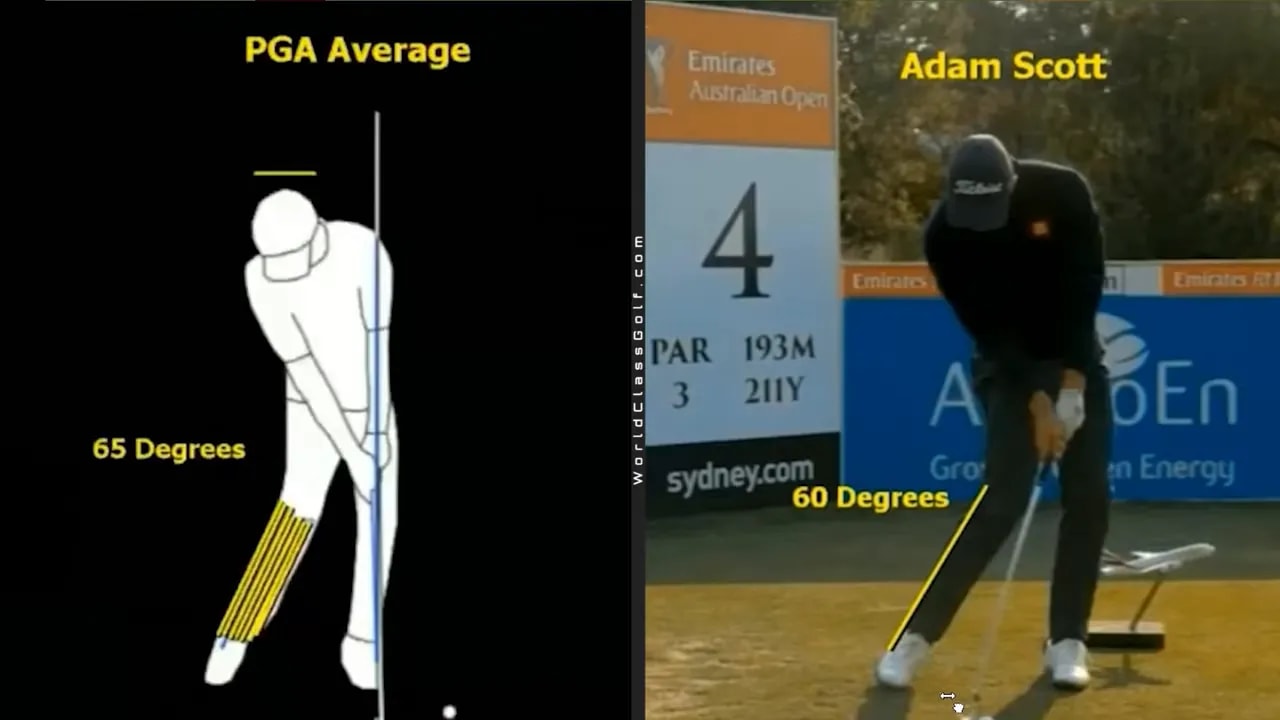
You can assess this with a face-on recording from a phone. Pause your swing as the club approaches impact and compare the line from your trail knee to your trail ankle. If the angle is consistently well above 70 degrees, work first on the feeling of the knees moving forward in transition.
This checkpoint is not a reason to chase one exact pose. Your height, mobility, grip, club, and setup can all influence what your position looks like. Use the reference to understand the direction of the move: the trail knee works forward and inward rather than remaining back as the hips spin.
Step 5: Train the Trail Elbow With the Toe-Line Drill
The first drill gives you a strong visual boundary for the correct trail-arm path. You only need a golf club.
- Set up in your normal address position without starting a full swing.
- Place another club on your toe line, creating a narrow reference area in front of your feet.
- Place your lead hand on top of the club or use it to create a stable wall-like reference.
- Make a slow downswing rehearsal.
- Move your trail arm through without allowing it to swing outward and collide with the reference.
The purpose is to exaggerate the feeling of the trail arm working down and in rather than out. As your lead side shifts, the lead hand reference helps you avoid sending your head forward. At the same time, the trail arm learns to approach close to the body.
Start with rehearsals only. Then progress to short, controlled golf swings where the priority is balance and centered contact, not speed. If you strike the object or feel crowded, reduce the swing length and rehearse the lower-body shift first.
Your hands do not need to be thrown far in front of the chest. In an effective delivery position, they can pass close to the trail leg. That compact route is a major reason the club can approach the ball with better control.
Step 6: Build the Movement With an Alignment Stick Station
The second drill uses an alignment stick placed vertically in the ground. It provides a physical target for your lead-side movement and helps you connect the hip shift, knee action, shoulder motion, and trail-arm path.
Set the station up carefully:
- Place an alignment stick or tour stick securely in the ground.
- Stand about one foot length away, with your toes aligned to the stick.
- Take your golf posture.
- Reach down with your lead hand toward the stick as low as your mobility comfortably allows.
- Return to address and rehearse the transition.
Reaching down creates the sensation of the lead shoulder extending and lifting appropriately as you move through. It also encourages the knees to close and the body to move forward. From there, rehearse the motion of the lead shoulder moving in while the trail shoulder stays back and lower during the approach to impact.
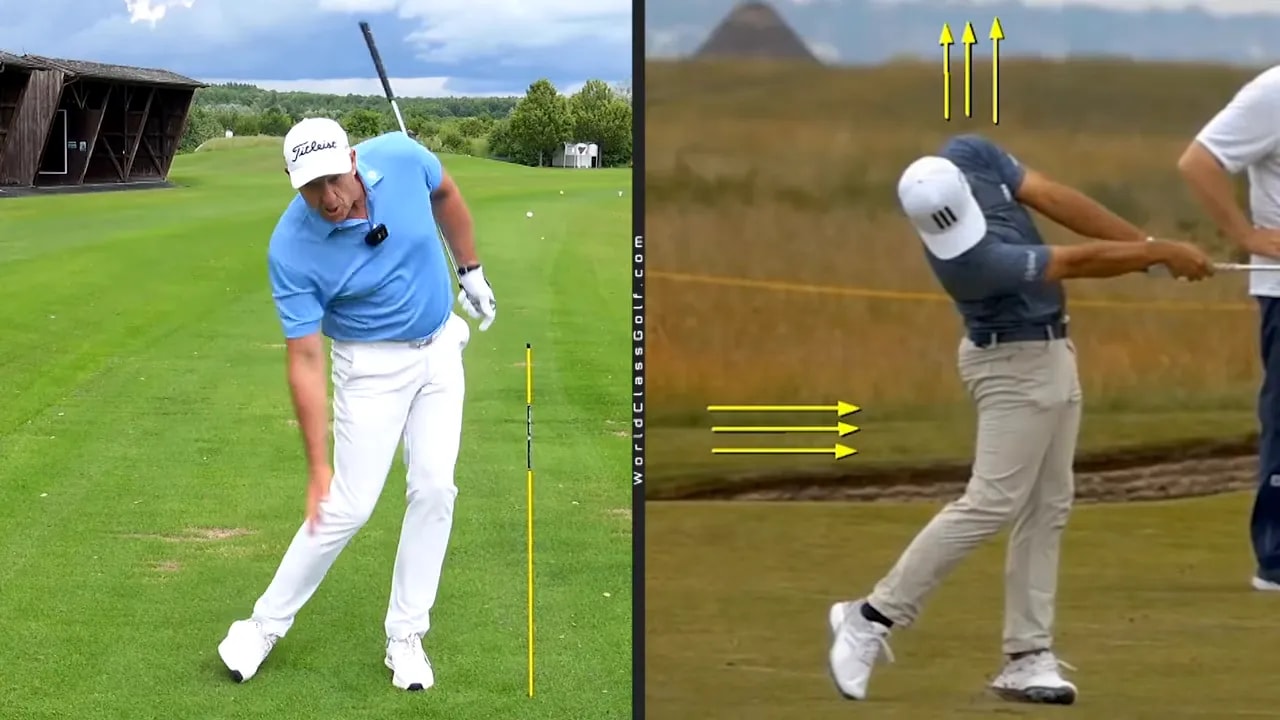
After a rehearsal, step in and make a smooth swing. Feel pressure on the inside of the trail foot, allow the knees to move forward, and keep the trail elbow connected near the trail hip. The alignment stick gives you a vivid reminder of the direction your body must move without requiring a complicated swing thought.
As with any golf drill involving a stick, make sure there is adequate space and begin at slow speed. The goal is a repeatable sensation, not a forced movement.
Step 7: Rotate With Tilt Through the Golf Ball
Once you have shifted forward and lowered the trail elbow, you still need to rotate through the strike. The desired turn is not flat and level. It includes tilt, with the lead shoulder working upward and inward as the trail shoulder stays lower through impact.
A useful image is turning your chest toward a high lead-side upper chest position. This helps you rotate with the appropriate side bend instead of spinning flat and pulling the ball left.
In a better impact pattern, the trail shoulder remains noticeably back as the body rotates. The trail elbow stays tucked close to the side of the hip, and the clubhead can move through the ball with speed. This is what allows a golfer to combine a forward shift, body rotation, and a powerful strike.
Try this sequence in order:
- Wind up: Make your backswing normally.
- Shift: Start down by moving the knees and hips toward the target.
- Lower: Pull the trail elbow down closer to the trail hip.
- Rotate: Turn through with tilt, allowing the lead shoulder to move high and in.
- Finish: Let the trail foot release naturally after the strike rather than lifting early to create the motion.
This sequence should make the golf swing feel more organized, not restricted. You are creating a route into the ball where the club can deliver speed and compression without needing a last-second hand action.
Step 8: Practice the Golf Move in a Productive Order
Changing a downswing pattern is easier when you separate the motion from the strike. Start with slow rehearsals, then use short swings, and only then add speed. Trying to make a full-speed correction immediately often brings back the instinct to spin the hips and throw the arms outward.
Use this practice progression:
- Make five slow rehearsals without a ball: knees forward, trail elbow down.
- Make five waist-high practice swings with the toe-line drill or alignment-stick station.
- Hit five short shots at reduced speed, prioritizing centered contact.
- Record a face-on swing and check your trail knee and arm path.
- Increase swing length only when the movement remains stable.
Keep one feel at a time. If your main issue is early hip spin, think only about moving your knees toward the target. If your lower body is already shifting well but your arms still pitch out, rehearse the trail elbow traveling down close to your trail hip.
Better golf ball striking comes from repeatedly finding the hitting area with a functional structure. The combination of a forward hip shift, a lower trail elbow, and rotation with tilt gives you a practical framework for doing exactly that.
Frequently Asked Questions
What is the PGA corridor in golf?
The PGA corridor is a visual description of a strong downswing delivery position. Your lead hip moves toward the target while your trail elbow works down closer to your side and toward the ball, helping the hands and club approach from a more efficient path.
Why does my trail elbow fly out in the downswing?
Your trail elbow can fly out when your hips spin too early, your trail shoulder moves toward the ball, and your arms are forced outward. Begin the transition by shifting your knees and hips toward the target, then feel the trail elbow move down toward the trail hip.
Should I keep my trail elbow pinned to my side in golf?
No. You do not need to force the trail elbow tightly against your body. The useful feeling is that it works down close to the trail hip instead of being thrown far out in front of your torso. The movement should remain athletic and allow the club to move freely through impact.
What trail knee angle should I aim for?
A useful reference is roughly 55 to 65 degrees during the delivery phase, with strong ball strikers commonly below 70 degrees. Use the number as a general checkpoint, not as a position to force. The key is that your trail knee moves forward and inward as you transition.
Can these golf drills help with fat shots and blocks?
They can help address movement patterns associated with fat shots, blocks, and pulls. Shifting forward and lowering the trail elbow can improve your route into the ball, but practice slowly and assess your individual swing pattern before expecting a permanent change.
0 Comments