


Great ball-striking rarely starts with a complicated swing thought. More often, it starts before the club moves. Your golf setup fundamentals, especially ball position, stance width, pressure placement, and takeaway structure, quietly influence the path, clubface, strike, and shot shape you produce.
That is why capable golfers can feel as if their swing is close yet still fight blocks, pulls, inconsistent contact, or unreliable distance control. If the setup gives you a poor starting point, you must make an athletic correction at impact. That is a tough way to play golf.
This step-by-step guide gives you a practical system for building repeatable golf setup fundamentals, developing a connected takeaway, and hitting a controlled knockdown shot without changing your entire swing.
Table of Contents
- Step 1: Build your golf setup fundamentals before changing your swing
- Step 2: Use the correct ball position for your iron shots
- Step 3: Create a stable stance without getting rigid
- Step 4: Add a small hip bump to organize your iron setup
- Step 5: Use an alignment rod to make your setup repeatable
- Step 6: Improve the takeaway with a small hinge and a connected hand path
- Step 7: Define width as connection, not a wide clubhead
- Step 8: Hit a three-quarter knockdown shot with full commitment
- Step 9: Set up the driver with a wider base and a forward ball
- Step 10: Avoid the setup mistakes that cost consistency
- Step 11: Use a simple practice plan to make the changes stick
- Step 12: Take your improved setup to the course
- FAQ: Golf Setup Fundamentals
Step 1: Build your golf setup fundamentals before changing your swing
Before you diagnose your backswing or try to fix your downswing, check the pieces that are easiest to repeat: your stance, ball position, and initial balance. These are not small details. They establish the geometry of the shot.
A ball that sits too far back can place your body ahead of the ball too early. From there, you may feel forced to use your hands to square the face or redirect the path through impact. A ball that is positioned correctly gives you room to turn, approach the ball, and continue through it.
Use this simple pre-shot checklist on the range:
- Start from the center of your body: Think of your sternum as the reference point, not the center of your stance.
- Set your stance width: Begin with your feet approximately shoulder width for a stock mid-iron.
- Place the ball: Move it gradually forward as clubs get longer.
- Check balance: Feel athletic pressure through the insides of your feet, not hanging on the outer edges.
- Set the club last: Once your body is organized, place the club behind the ball and aim it.
Do not try to correct every variable at once. Establish the setup first, then assess your ball flight. A consistent address position makes it much easier to identify whether a swing change is actually needed.
Step 2: Use the correct ball position for your iron shots
Ball position is one of the most important golf setup fundamentals because it changes where the club meets the ball during the arc. It can affect the direction the club travels, the face orientation you need, and whether you feel free to move through impact.
For a stock mid-iron such as an 8-iron, place the ball slightly forward of your body center. For many golfers, this will appear near the lead side of the face when looking down, even though it is not dramatically forward in the stance.
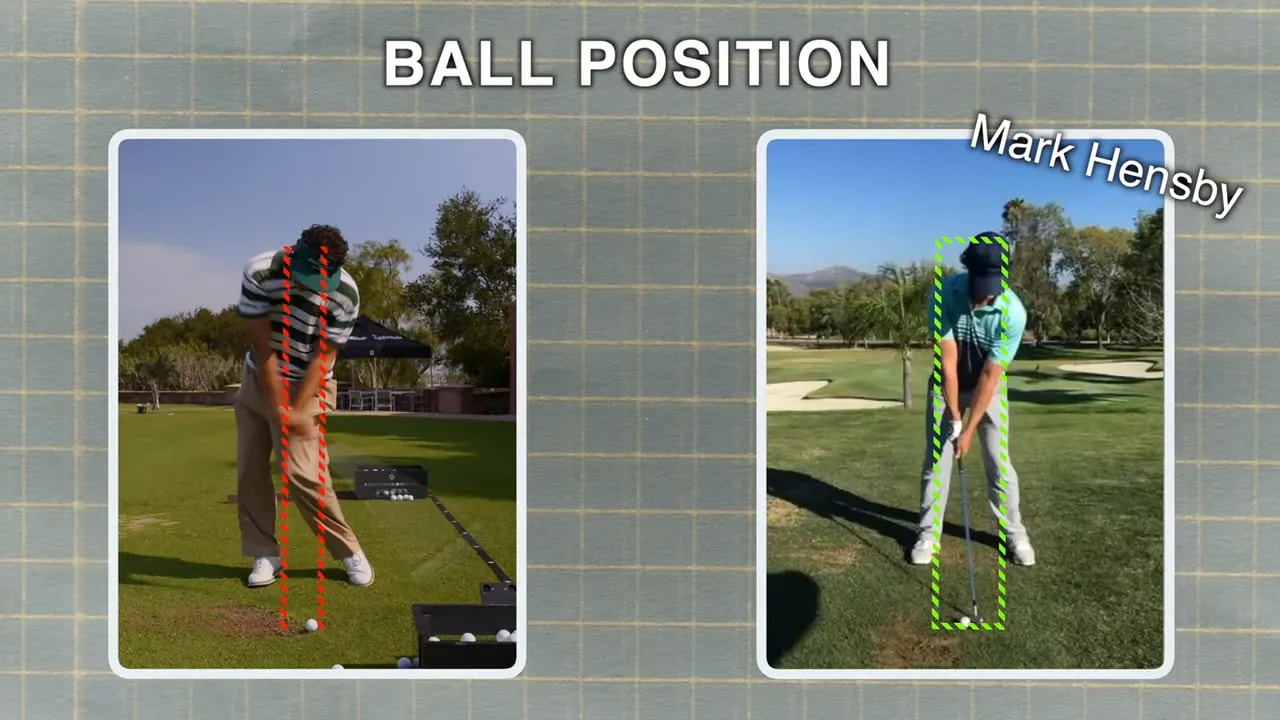
From there, use a gradual progression:
- Wedges: Closer to the center of your body.
- Short and mid-irons: Progressively forward from center.
- Longer irons and woods: Continue moving forward as the club length increases.
- Driver: Forward near the lead armpit area as a baseline.
Why moving the ball back often creates trouble
Many golfers move the ball back when they want a lower flight or more control. This can work for a specialty shot, but it also changes the path and face relationship. With the same swing, a ball moved back can encourage a more in-to-out delivery and require a more closed face to start the ball on line.
That can explain shots that over-draw, hook, or launch left for a left-handed golfer. It can also cause a right-handed golfer to see a ball start too far right and turn over too much.
If you feel that you must “save” the ball at impact, first check whether the ball has drifted too far back. Avoid adding a hand action to solve a setup issue.
Step 3: Create a stable stance without getting rigid
Your stance should be wide enough to create a dependable base, but not so wide that you lose mobility. A useful checkpoint is to align the outside of each shoulder roughly over the middle of each foot. For many golfers, that means a stance around shoulder width for a standard iron shot.
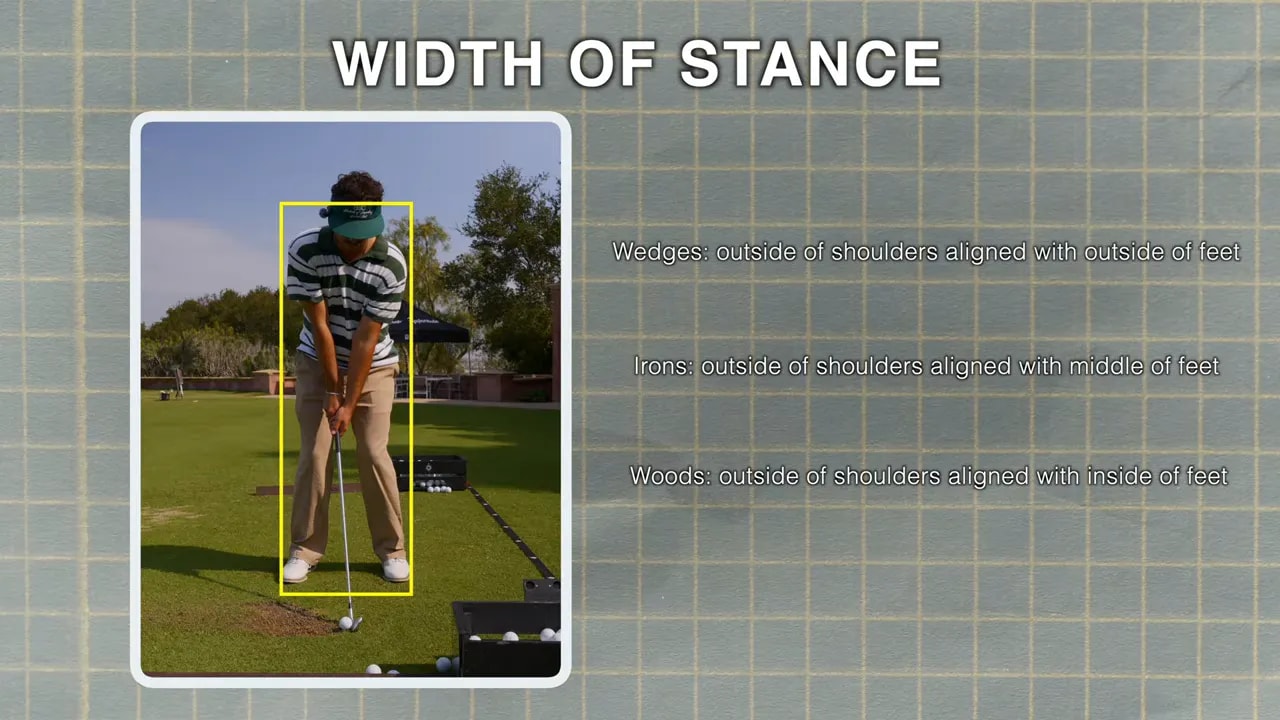
A slightly wider stance can improve your ability to turn into the trail side while keeping your pressure supported. The goal is not to lock yourself in place. The goal is to have a brace that lets you rotate with balance.
At address, notice where your feet are working:
- Feel pressure supported by the inside portions of both feet.
- Avoid rolling onto the outside of the trail foot during the backswing.
- Keep your knees athletic rather than deeply flexed.
- Let your arms hang naturally from your shoulders.
These golf setup fundamentals make it easier to turn back and then move through the strike without losing your posture or needing to lunge at the ball.
Step 4: Add a small hip bump to organize your iron setup
For a stock iron shot, a subtle shift of the pelvis toward the target can establish a useful amount of pressure on the lead side and create a slight tilt of the spine away from the target. This is a setup adjustment, not a dramatic slide.
For a right-handed golfer, the hips move slightly toward the target, while the sternum remains centered. For a left-handed golfer, reverse the directions. The movement is small, roughly an inch, and your hips should remain square rather than opening toward the target.
Think of this as setting a post that you can turn around. You should feel prepared to load into the inside of the trail foot, then cover the ball through impact.
Important: Do not lean your upper body backward to create tilt. Let the slight pelvic shift create the tilt naturally. Overdoing it can make you hang back and add inconsistency.
Step 5: Use an alignment rod to make your setup repeatable
Your setup can feel correct even when it is not consistent. A simple alignment rod station helps remove the guesswork from your practice.
Place an alignment rod on the ground parallel to your target line. Use it to check where your feet are, then establish a repeatable reference for ball position. A simple system can be built around your body center:
- Identify the midpoint between your feet.
- Use the midpoint as a reference for wedge ball position.
- Move the ball gradually forward as the clubs get longer.
- Keep the same reference system whenever you practice.
This is especially valuable when you have limited practice time. Instead of spending each session trying to rediscover the right address position, you can make your golf setup fundamentals automatic.
Step 6: Improve the takeaway with a small hinge and a connected hand path
Once your address is stable, focus on how the club begins moving. A common problem is dragging the clubhead too low and too far behind the body. That can make the club feel stuck under the swing plane and can reduce face control.
A better early-swing intention is to blend your body turn with a small amount of wrist hinge. As the club moves back, allow the shaft to begin lifting naturally rather than keeping the clubhead pinned to the ground.
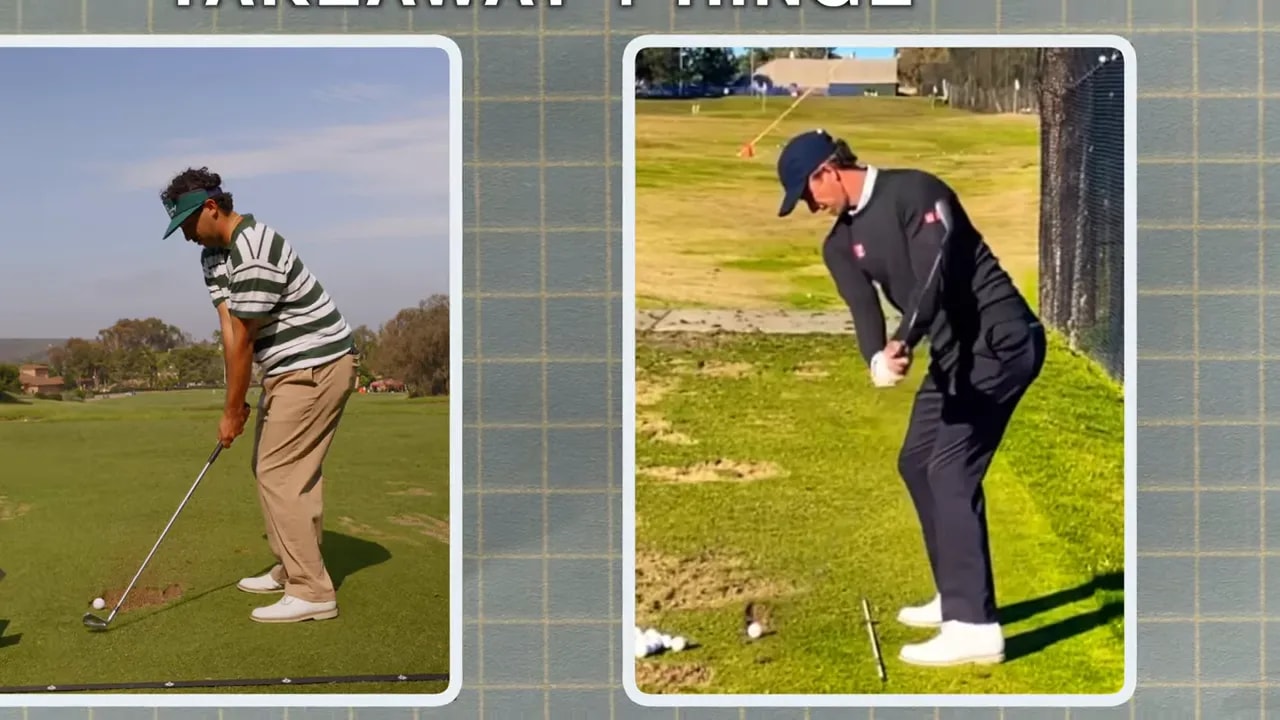
At the point where the club is parallel to the ground, your hands should generally be moving along the line of your feet. The butt end of the club can point just inside the ball, rather than above it. If you tend to drag the club inward and low, the corrective feel may be slightly more out and slightly more up.
Use the 10-and-10 rehearsal
If your takeaway gets overly inside and low, rehearse the club moving approximately 10 degrees more outward and 10 degrees more upward than normal. This is a feel, not an exact measurement. The purpose is to offset the motion you habitually create.
Make slow rehearsals first:
- Set up using your normal golf setup fundamentals.
- Move the club back with your chest turning.
- Allow a small hinge that gets the clubhead off the ground.
- Pause when the shaft reaches parallel.
- Check that the club feels supported rather than dragged behind you.
- Hit a relaxed shot while keeping the same blended feeling.
The best rehearsal should make the club feel more stable, not forced. If your club already travels well outside the hands, do not overcorrect it.
Step 7: Define width as connection, not a wide clubhead
Golfers often hear that they need more width and respond by pushing the clubhead farther away from their body. That is not necessarily productive. A more useful definition of width is the distance between your hands and the center of your body.
Imagine a rope connecting your sternum to the grip end of the club. During the early takeaway, keep that rope reasonably taut. You can hinge the wrists while maintaining this relationship. The club can rise without your hands disconnecting or collapsing inward.
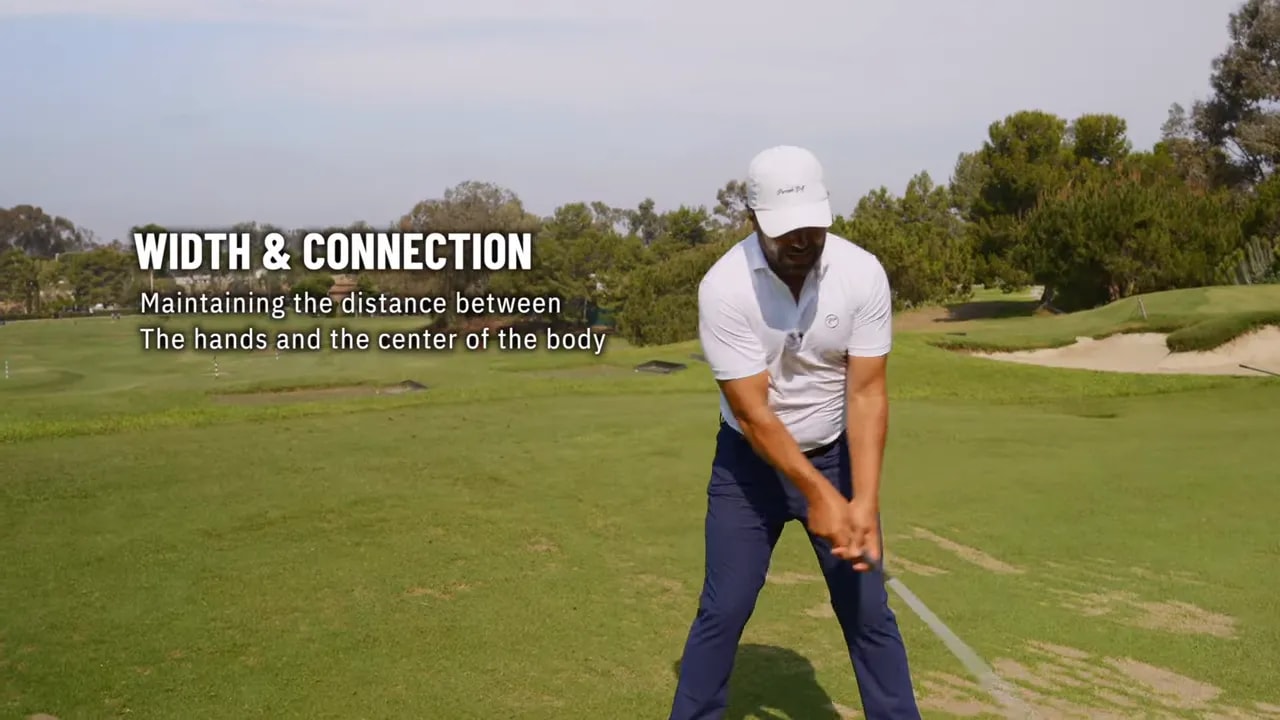
This connected width helps you control the clubface while giving your body room to turn. It also prevents the false solution of simply throwing the clubhead far away from you.
Step 8: Hit a three-quarter knockdown shot with full commitment
A knockdown shot is useful when you want to take a little distance off an iron, flight it lower, or control your yardage in changing conditions. The key concept is simple: a three-quarter swing is not three-quarter effort.
Rather than slowing down and guiding the ball, make a normal committed swing with a smaller setup and a slightly shorter arm swing.
Use the “one, one, and one” method:
- Grip down one inch on the club.
- Stand one inch closer to the ball.
- Narrow your stance by one inch relative to your normal stance.

Keep your normal ball position. This is the part golfers often miss. You do not need to move the ball back merely because you want a lower shot. Gripping down, moving closer, and narrowing the stance can shorten the swing and reduce distance while preserving a familiar path and face relationship.
For the swing itself, feel as if your arms finish closer to shoulder height rather than making a full backswing and a full finish. Stay committed through the shot. Trying to “take something off” by decelerating usually creates weak contact and unpredictable direction.
Step 9: Set up the driver with a wider base and a forward ball
Your driver setup should differ from your iron setup. With a driver, create a wider base and position the ball forward, near your lead armpit as a practical reference. This gives you space to sweep the ball from a wider arc.
For a right-handed golfer, a small trail heel lift during the backswing can be acceptable if it helps you complete your turn and does not become a hard push away from the ball. The same applies in reverse for a left-handed golfer.
Focus on a reliable tee-shot pattern rather than trying to manufacture different shapes on every swing. Many skilled golfers prefer one dependable shape with the driver and use another tee club when they want a different curve. The practical lesson is to build a shot you can trust under pressure.
Step 10: Avoid the setup mistakes that cost consistency
Use this checklist when your strike or start line suddenly disappears.
- Do not put every iron in the middle of your stance. Ball position should progress forward with longer clubs.
- Do not move the ball back as your default knockdown adjustment. Preserve your normal ball position unless a specialty situation requires otherwise.
- Do not widen your stance until you cannot turn. You want support and mobility, not stiffness.
- Do not create spine tilt by leaning backward. A small hip shift is enough to organize the setup.
- Do not drag the clubhead back low and inside. Blend a small wrist hinge with your turn.
- Do not confuse less swing length with less commitment. A controlled shot still needs a decisive strike.
- Do not chase ball flight before checking your address. Start with the simplest variable first.
Step 11: Use a simple practice plan to make the changes stick
To improve your golf setup fundamentals, practice in short blocks with one priority at a time. Here is a useful range routine:
- Five setup rehearsals: No ball. Check stance width, ball position, and pressure through the feet.
- Five half-swings: Focus on the connected takeaway and small wrist hinge.
- Five stock shots: Use one club and judge start line before judging distance.
- Five knockdown shots: Apply the one, one, and one setup without moving the ball back.
- Five tee shots: Use your wider driver stance and forward ball position.
Keep notes on your start line, strike quality, and curve. If you see a repeated miss, return to your address position before introducing a new swing thought. Better golf often comes from fewer moving parts, not more.
Step 12: Take your improved setup to the course
On the course, avoid turning your pre-shot routine into a long technical inspection. Use one or two reliable cues. For example: “ball slightly forward, pressure inside trail foot” for an iron, or “wide base, ball forward” for driver.
The goal is not to look perfect. The goal is to put yourself in a position where your natural swing can deliver the club consistently. When your golf setup fundamentals are dependable, you can spend more attention on the target, the shot shape, and the fun of playing the game.
FAQ: Golf Setup Fundamentals
How far forward should the ball be for an 8-iron?
For a stock 8-iron, position the ball slightly forward of the center of your body. It may look farther forward than expected when you look down, but use your sternum as the reference rather than the center of your feet.
Should I move the ball back to hit a knockdown shot?
Not as a default. Keep your normal ball position and instead grip down slightly, stand closer, and narrow your stance. This can reduce distance and flight while preserving a more familiar swing path and clubface relationship.
What is the best stance width for irons?
A practical starting point is approximately shoulder width, with the outside of your shoulders roughly aligned over the middle of your feet. Adjust modestly for comfort and balance, but avoid a stance that is so narrow you lose support or so wide you cannot turn.
Why do I keep pulling or over-drawing shots when the ball is back in my stance?
Moving the ball back can alter the path and face conditions at impact. You may deliver the club more from the inside and need a more closed face to start the ball on target, which can produce an over-curved shot.
What does a connected takeaway feel like?
It feels as if the hands remain a consistent distance from the center of your body as your chest turns. You can add a small wrist hinge and allow the clubhead to rise without dragging it low behind you.
Is a small trail-heel lift okay with driver?
It can be acceptable if it helps you turn and remain balanced. The key is that the heel lift should not become a forceful push that moves you away from the ball or disrupts your strike.
Bottom line: Before searching for a complicated swing fix, tighten up your golf setup fundamentals. A centered reference for ball position, an athletic stance, balanced foot pressure, and a connected takeaway can remove the compensations that make golf feel much harder than it should.
0 Comments