
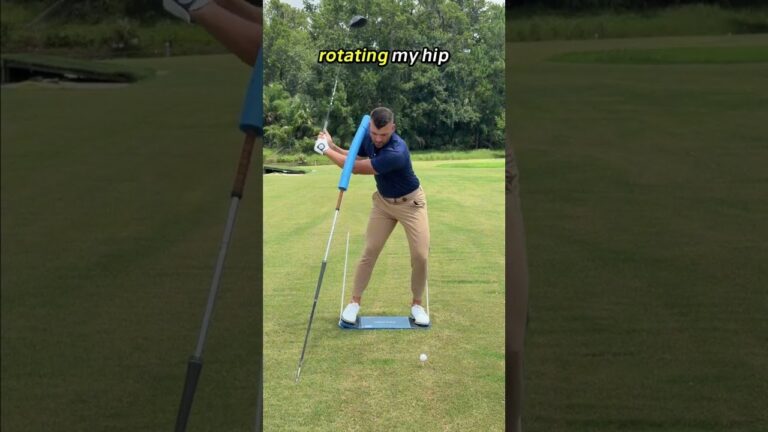

A better golf downswing does not begin by spinning your hips or throwing your upper body toward the ball. It begins with a controlled shift toward the target while your head stays relatively centered. This sequence helps you maintain spine tilt, gives your arms room to work, and can reduce the steep, over-the-top move that produces weak slices.
If your golf swing feels powerful but your shots fly high, spin too much, or curve right, the issue may be how you start down. The goal is not to keep all your weight back or freeze your head. It is to shift your lower body forward first, then rotate from a stable, tilted position.
Table of Contents
- Step 1: Understand the Difference Between a Golf Shift and a Slide
- Step 2: Build a Centered Golf Backswing Before You Shift Forward
- Step 3: Start the Golf Downswing With a Lateral Pressure Shift
- Step 4: Keep Your Head Back While Your Golf Body Moves Forward
- Step 5: Let Your Upper Body Follow the Golf Shift Without Taking Over
- Step 6: Rotate Only After the Forward Golf Shift Is Established
- Step 7: Check Your Golf Impact Position
- Step 8: Practice the Golf Shift With Alignment Guides
- Step 9: Avoid These Golf Downswing Mistakes
- Step 10: Use a Simple Golf Practice Routine
- Takeaway: Build a Better Golf Downswing Sequence
Step 1: Understand the Difference Between a Golf Shift and a Slide
In golf, shifting means moving pressure and body mass toward the target in a controlled way. Sliding means drifting too far laterally, often taking your head and upper body with you.
These moves can look similar at first, but they produce very different impact positions:
- Productive shift: Your lower body moves toward the target while your upper body follows enough to preserve its tilt.
- Slide: Your hips, chest, and head all move excessively forward, making the downswing steep.
- Hang back: Your head stays back, but your weight fails to shift forward. You may spin out and lose distance.
The useful golf motion is between those two extremes. You want forward movement, but not a forward lunge. Your head should remain behind the ball at impact rather than racing ahead of it.

Think of your body as moving in sequence. The lower body initiates the transition, the upper body follows without surging ahead, and rotation happens after the initial forward move. This creates a more athletic golf impact position than trying to force the club down with your shoulders.
Step 2: Build a Centered Golf Backswing Before You Shift Forward
A good downswing sequence is much easier when the backswing does not sway too far away from the target. If your head drifts well behind the ball during the backswing, you must make a large recovery move just to return to the original position. That makes consistent golf contact much harder.
Allow a small amount of head movement, but keep it controlled. From address to the top of the backswing, your head should move only a few inches rather than drifting dramatically away from the ball.
Use these checkpoints at the top:
- Your trail-side hip is loaded, not pushed outside your trail foot.
- Your trail hip stays just inside an imagined line outside your trail leg.
- Your head remains close to its address location.
- Your upper body retains enough tilt to stay behind the ball.
This is not a demand to hold your head perfectly still. Golf is a moving athletic motion. The important point is avoiding a large sway that leaves you trapped behind the ball and out of position for the downswing.

Step 3: Start the Golf Downswing With a Lateral Pressure Shift
As your backswing finishes, begin moving toward the target before aggressively rotating your hips. This early shift is the key transition move. It gives your arms space to drop and helps prevent the club from becoming excessively steep.
The forward shift is a distinct motion, not just a vague thought of getting to your lead side. In the demonstrated golf drill, the hips move roughly six to eight inches laterally before rotational force takes over. Your exact amount may vary with your build and setup, but the sequence matters: shift first, rotate second.
A simple feel is to move your belt buckle or lead hip gently toward the target as the club reaches the top. At the same time, do not shove your head forward. Your upper body can follow the lower body, but it should retain its backward tilt relative to the target.

Use a pressure cue instead of a spinning cue
Many golf players hear “use your lower body” and immediately spin their hips. That can leave pressure on the trail side or pull the upper body forward too early. Instead, feel an initial push into the lead side. Once you have shifted, you can push back against the lead foot to rotate.
This matters because rotation requires resistance through the lead foot. If you are still trying to travel forward while attempting to rotate hard, your movement can become unstable. Complete the initial shift, then use the ground under the lead foot to turn through impact.
Step 4: Keep Your Head Back While Your Golf Body Moves Forward
The most important distinction in this golf move is that the body shifts forward without the head leading the motion. Your head does not need to be frozen in space, but it should not move aggressively toward the target during the downswing.
When the head moves too far forward, the upper body tends to dominate. The club can approach the ball too steeply, encouraging an over-the-top path, excess spin, and a slice. It can also reduce distance.
At impact, a helpful reference is the relationship between your head and the ball. A vertical line down from your lead ear should remain behind the ball rather than moving far ahead of it. This supports the spine tilt needed for a driver swing that strikes up on the ball.

Do not confuse keeping your head back with keeping all your weight back. Those are different. Your lower body should get forward while your head stays relatively behind the ball. That separation is what increases spine tilt from the top of the swing into impact.
Step 5: Let Your Upper Body Follow the Golf Shift Without Taking Over
A common golf mistake is trying to move only the lower body while locking the chest and shoulders in place. The result can feel disconnected. Your upper body should follow the shift, but it should not rush forward ahead of the lower body.
Picture the transition in three parts:
- Lower body shifts: Pressure and the hips begin moving toward the target.
- Upper body follows: Your torso moves with the shift while preserving its tilt.
- Body rotates: You turn through the ball after the forward shift is established.
This sequence helps the club approach from a more functional path. It also avoids the abrupt upper-body throw that often sends the club out and over the plane. In practical terms, you should feel that your chest is moving with the shift, but your head is not diving toward the ball.
Step 6: Rotate Only After the Forward Golf Shift Is Established
Once your lead-side shift is in place, rotate hard through the shot. At this stage, the lead foot provides the resistance that allows the hips and torso to turn. This is where the golf swing moves from lateral motion into rotary motion.
Starting rotation too early is a frequent error. If you spin before shifting, you may never get enough forward pressure. If you slide continuously without rotating, you can lose balance and produce an inconsistent strike.
Use this transition rhythm:
Top of backswing, shift, rotate, impact.
The shift and rotation happen quickly in a full golf swing, but they are not the same action. Practicing them in slow motion makes the distinction easier to feel. Pause at the top, move toward the target, then turn through with your lead foot supporting the rotation.

Step 7: Check Your Golf Impact Position
Your impact position reveals whether the sequence is working. For a driver, the desired shape includes forward lower-body position, head behind the ball, maintained spine tilt, and a small amount of forward shaft lean.
Use this golf impact checklist:
- Your lower body has moved toward the target.
- Your lead leg is supporting the rotation.
- Your head remains behind the ball rather than moving ahead of it.
- Your chest has not lunged forward.
- Your spine tilt is maintained or increased from the top into impact.
- The shaft has a modest forward lean.
These checkpoints support a positive attack angle with the driver and a more consistent ball flight. They also help you avoid the steep, glancing strike that can produce a weak, spinny shot.
Step 8: Practice the Golf Shift With Alignment Guides
Feedback makes a body-motion change easier to train. You can use an alignment stick and a soft foam guide to give yourself simple reference points during golf practice.
Hip boundary drill
Set an alignment stick just outside your trail leg. During the backswing, keep your trail hip inside that boundary. This discourages excessive sway away from the target and helps you load into the trail side without drifting.
Head-position drill
Place a padded guide beside your lead ear at address. As you shift and rotate, keep your ear near that reference rather than allowing your head to move far forward. A soft guide is important because it provides feedback without creating a hard obstacle near your head.
Lead-side shift drill
Place a reference just outside your lead hip. Make a slow backswing, then move your lead hip toward that reference before you rotate. This gives you a clear feel for the initial lateral golf shift.
Begin with rehearsals rather than full-speed shots. Make three slow motion transitions, then hit one shot. The goal is to teach your body a reliable sequence, not to force a large movement during every golf swing.
Step 9: Avoid These Golf Downswing Mistakes
Sliding the head toward the target
This is the most damaging error for this pattern. When your head leads forward, your upper body tends to take over. The club can get steep, the path can move over the top, and a slice becomes more likely.
Keeping all your weight on the trail side
Holding the head back is not an excuse to stay back with your weight. Without a real shift into the lead side, you may spin out and sacrifice distance. Move the lower body forward while retaining the head position.
Rotating before shifting
An early hip spin can stop the forward move before it begins. Feel the lateral push first, then rotate through the lead foot.
Overdoing the backswing sway
A large move away from the target creates a difficult recovery. Keep the trail hip contained and your head reasonably centered so that the forward golf shift is manageable.
Trying to manufacture shaft lean with the hands
Forward shaft lean is more reliable when it comes from improved body sequence and impact position. Forcing the hands forward without the proper shift and rotation can create other compensations.
Step 10: Use a Simple Golf Practice Routine
Train the sequence in small pieces before expecting it to hold up at full speed. Use this routine on the range:
- Make five slow rehearsals without a ball: backswing, shift, rotate.
- On each rehearsal, keep your head near its original position as your hips move forward.
- Hit five half-speed golf shots, prioritizing balance and strike over distance.
- Check whether your shots are less steep and less spinny.
- Gradually add speed only when the shift happens before the rotation.
A useful swing thought is: “Shift my lower body, keep my head back, then rotate.” Keep it simple. Too many mechanical thoughts can make golf feel rigid, while one clear sequence cue can improve your transition.
Takeaway: Build a Better Golf Downswing Sequence
To start your downswing the right way, load without swaying, shift toward the target as the backswing finishes, keep your head from moving too far forward, and then rotate through the shot. This produces the separation between forward lower-body movement and a stable upper-body tilt that supports more consistent golf contact.
The goal is not to slide, spin, or hang back. It is to make a purposeful forward shift, then rotate from a balanced position. Practice the motion slowly, use alignment feedback when possible, and let a better sequence create a more dependable golf ball flight.
Golf Downswing Shift FAQ
Should you shift or rotate first in the golf downswing?
Start with a forward shift toward the target, then rotate. The initial lateral shift should occur before you aggressively rotate through the lead foot.
Should your head stay still during a golf swing?
Your head does not need to be completely motionless, but it should not sway excessively during the backswing or surge forward during the downswing. Keeping it relatively centered helps preserve spine tilt.
Why does moving my head forward cause a slice?
When the head and upper body move forward too early, the downswing can become steep and over the top. That pattern commonly produces a slice and excess spin.
Can you shift forward and still keep your head behind the golf ball?
Yes. Your lower body should shift toward the target while your head remains behind the ball. This separation helps maintain or increase spine tilt into impact.
How far should you shift in the golf downswing?
The demonstrated movement uses roughly six to eight inches of lateral hip shift before rotation. Use that as a practice reference while keeping the motion controlled and balanced.
0 Comments