


If your downswing falls apart just when you are trying to strike the ball, the instinct is usually to fix the downswing itself. You may try to clear your hips faster, drop the club into a slot, or hold lag longer. Those moves can feel productive, but they often fail because the downswing is reacting to a problem that started earlier.
A more reliable golf swing fix is to work backward. Your setup, lower-body structure, takeaway, wrist set, and transition determine whether you can rotate through the ball or whether you must lunge, slide, flip, or throw the clubhead to find it.
This step-by-step guide explains why a downswing falls apart, how to identify the earlier cause, and how to build a more connected, repeatable motion.
- Identify the compensations
- Build lower-body structure
- Set the club earlier
- Organize the transition
- Rotate through impact
Table of Contents
- Step 1: Recognize why your downswing falls apart
- Step 2: Create lower-body structure before the club moves
- Step 3: Add wrist set in the takeaway to prevent extra arm swing
- Step 4: Use a brief pause to organize the transition
- Step 5: Rotate around your lead side instead of sliding toward the ball
- Step 6: Build the new motion from small swings to full shots
- Step 7: Avoid the fixes that keep the problem going
- Step 8: Use this pre-shot checklist when your downswing falls apart
- FAQ: Fixing a Downswing That Falls Apart
- Takeaway: Fix the Cause Before You Fix the Downswing
Step 1: Recognize why your downswing falls apart
The golf swing works as a chain of events. When your backswing puts you too far away from the ball, your body has to make an athletic recovery on the way down. That recovery can look like a steep move, a dive toward the ball, a slide, arms getting stuck behind you, or a last-second release.
These are not always independent downswing flaws. They are often the only way your body can get the club back to the ball from an unbalanced position.
For example, if you drift excessively to the trail side in the backswing, your low point can become difficult to control. To reach the ball, you may drive forward hard in transition. That forward movement can leave your upper body behind, force your hands to trail, and encourage you to throw the clubhead early.
The key question is not only “What did my downswing do?” Ask, “What made that downswing necessary?”
Common signs that the cause is earlier in the swing
- You feel as if you must rush back to the ball from the top.
- Your pressure moves dramatically outside your trail foot.
- Your arms keep swinging after your chest has completed its turn.
- You lose contact quality even though the swing feels athletic.
- You hit shots thin, heavy, or off the heel because the low point moves around.
- You feel as though your hands must save the strike at the last moment.
When several of these patterns show up together, start with structure rather than searching for another downswing thought.
Step 2: Create lower-body structure before the club moves
To stop a downswing from falling apart, begin with a stable platform. The goal is not to eliminate motion. Golf is dynamic. The goal is to avoid drifting so far that you lose your ability to turn around your posture.
At address, establish a balanced stance and a centered sternum. For a right-handed golfer, a useful setup feel is to position the belt slightly toward the target while keeping the sternum centered. This creates a dependable forward-side reference point without leaning excessively left.
As you start back, preserve knee flex and keep the trail knee working inside the trail foot rather than letting it bow outward. That supports a braced trail side and helps you turn into your right side without swaying away from the target.
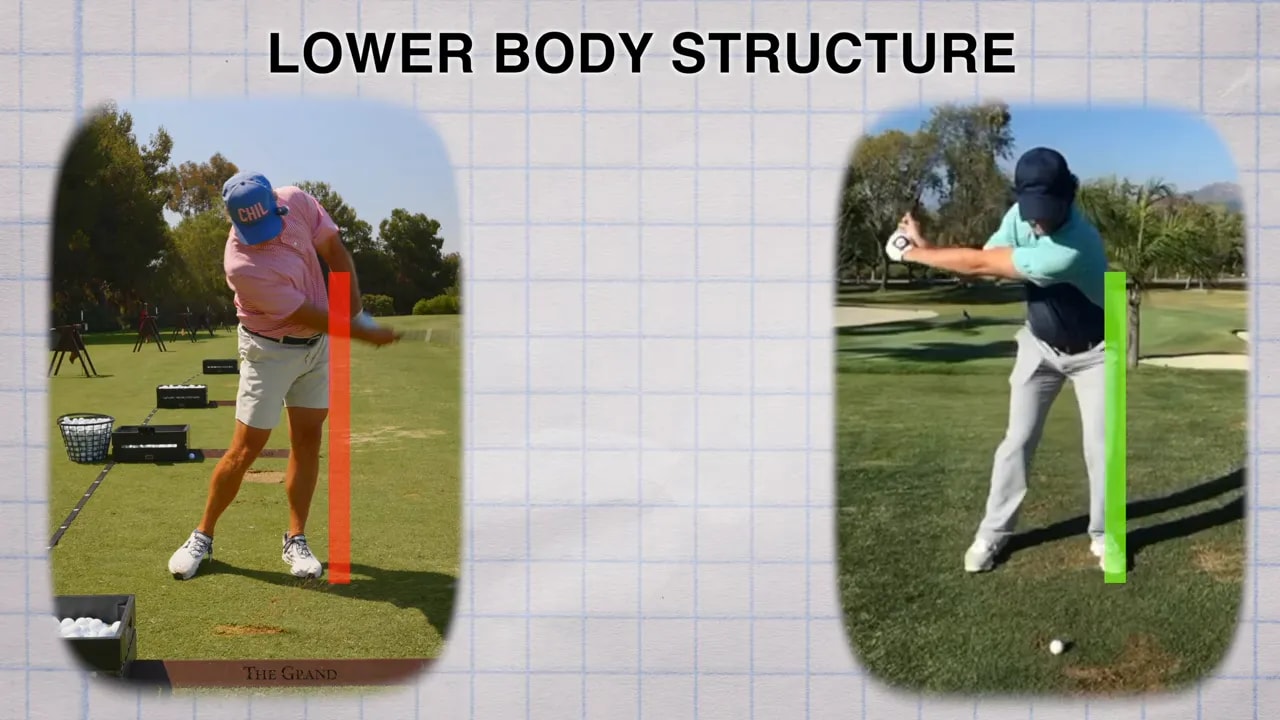
Use the telephone-booth check
Imagine swinging inside a narrow telephone booth. Your body can turn, but it should not wander far away from its original space. This simple image helps distinguish rotation from lateral drift.
During your backswing, you should feel your chest turn around your spine angle into the inside of the trail foot. You may feel the trail leg becoming more engaged. At the same time, retain the sense that your lead hip remains available as an anchor rather than disappearing away from the target.
Quick structure rehearsal
- Take your normal address position.
- Move your belt about an inch toward the target while keeping your sternum where it is.
- Maintain flex in your trail knee.
- Turn your chest toward the inside of the trail foot.
- Stop before your body drifts outside that stable base.
Repeat this without hitting a ball first. You are training a position that makes a rotational downswing possible.
Step 3: Add wrist set in the takeaway to prevent extra arm swing
A late or missing wrist set can cause another version of the same problem. If the club remains too vertical or unhinged as your body finishes turning, your arms may feel as if they need to keep moving to complete the backswing. That extra arm travel makes the top of the swing loose and difficult to organize.
A better pattern is to create an earlier set in the takeaway, at the same pace as your body turn. The feeling is not a forced flick with the wrists. Instead, as your lead shoulder moves the hands back, allow the club to form more of an L shape by the time the hands are around waist height.
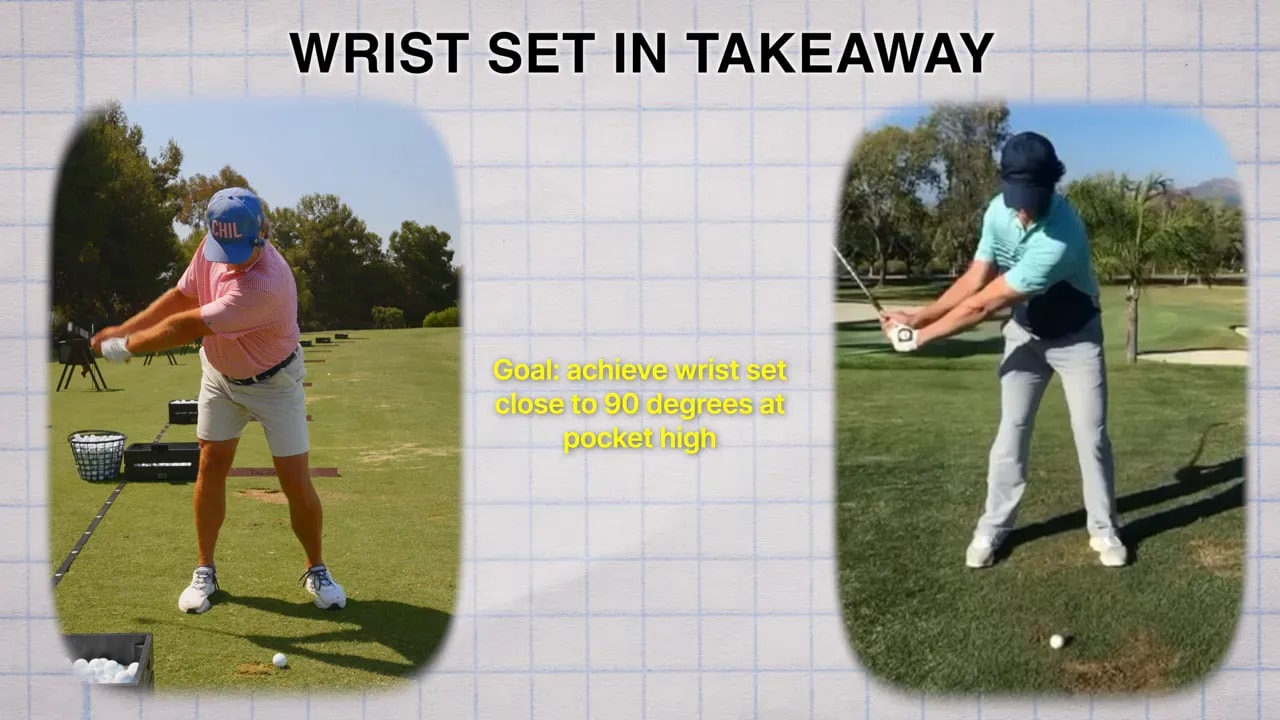
One useful feel is to apply pressure down the handle as you turn. As the handle works down, the thumbs naturally work upward and the club begins to set. This gives you leverage without consciously trying to manipulate the clubhead.
Why this helps when your downswing falls apart
An earlier wrist set gives the club a more organized position sooner. When your arms reach the end of their natural travel, the club is already in a useful place. You are less likely to keep lifting, over-swinging, or letting the arms float independently at the top.
You do not need maximum hinge. The correct amount varies between golfers. The practical benchmark is simple: you should feel that your turn, arms, hands, and club arrive at the top together rather than the arms continuing after the body has stopped.
Takeaway drill
- Make a slow takeaway to about waist height.
- Turn your chest while allowing the club to set into an L-shaped relationship with your lead arm.
- Pause and check that your arms have not drifted far behind your torso.
- Return to address and repeat several times.
- Hit short shots while preserving the same set and turn.
Start small. A half swing with a well-organized club is more useful than a full swing that relies on a rescue move.
Step 4: Use a brief pause to organize the transition
Transition is where many golfers feel their downswing falls apart. Often, the issue is that the body begins moving toward the target while the arms are still traveling back. The two parts are effectively moving in opposite directions, which creates a timing problem.
A brief pause at the top is an effective training tool. It does not need to become a permanent playing swing. Its purpose is to give you a clear moment where the backswing has finished before the downswing begins.
At the pause, check three items:
- Your trail knee is still supported inside the trail foot.
- Your club is set rather than hanging vertically above you.
- Your arms, hands, and chest feel finished together.
Then start down by rotating from the stable base. This sequence gives your hands a chance to move with your body instead of being left behind it.
How long should you pause?
For practice, make the pause obvious, even one or two seconds. This exaggeration helps you recognize the correct position. As your motion improves, the pause can become a split-second sense of completion. The goal is not a posed backswing. It is a clean change of direction.
Transition drill for better sequencing
- Make a backswing with your new lower-body structure and wrist set.
- Pause at the top.
- Feel that the backswing is completely finished.
- Rotate through at half speed.
- Finish balanced on your lead side.
Use this drill before every shot during a practice session. The rehearsal gives your mind a simple, repeatable picture instead of a list of disconnected swing thoughts.
Step 5: Rotate around your lead side instead of sliding toward the ball
Once your backswing is structured, you do not need a dramatic effort to get back to the lead side. Pressure can remain supported on the inside of the trail foot as you complete the backswing, allowing you to push and rotate around the lead side through impact.
The important distinction is between shifting into a stable lead side and sliding away from the ball. A slide can leave your upper body back, move your contact point behind the ball, and make forward shaft lean difficult. Rotation keeps your body moving as a connected unit.
Through impact, feel the lead hip and left-side pocket moving back while the right shoulder and arms move through. This helps the club release naturally rather than requiring a hand-driven throw at the ball.
What a connected release feels like
Your arms and hands should feel as if they are moving with your body, particularly with the lead hip, rather than racing past it. When the body rotates and the club is already organized, the release is a result of the motion. You do not need to manufacture it.
A balanced finish is a valuable checkpoint. If you can rotate through and finish on your lead side without falling backward or lunging toward the ball, you are far more likely to control contact and low point.
Step 6: Build the new motion from small swings to full shots
Do not take a major change straight to maximum speed. Use a progression that protects the new structure and lets you learn the feel.
Practice progression
- Position rehearsals: Rehearse the setup, trail-knee support, chest turn, and early set with no ball.
- Paused half swings: Swing to the top, pause, then rotate through to a balanced finish.
- Three-quarter shots: Keep the same pause feeling, but allow more speed.
- Full swings: Retain one simple cue, such as “set, pause, rotate.”
- On-course rehearsal: Before a shot, make one slow practice swing to the set position. Then trust it and play.
Measure progress by contact first. Cleaner compression, a more predictable strike, and improved balance are meaningful signs that your swing is becoming more structured. Do not judge the change only by how it looks or how strange it feels at first.
Step 7: Avoid the fixes that keep the problem going
When a downswing falls apart, more effort rarely solves it. Avoid these common traps:
- Trying to fix impact only: If you are out of position at the top, impact instructions may simply add another compensation.
- Over-sliding in the backswing: Turning into the trail side is different from moving outside it.
- Letting the trail knee move outward: This can remove the brace you need for a centered turn.
- Forcing wrist hinge with the hands: Let the set develop with pressure on the handle and body rotation.
- Rushing the transition: A brief practice pause can prevent the arms and body from separating.
- Adding too many swing thoughts: Use one sequence: structure, set, pause, rotate.
If you have pain, limited mobility, or a persistent strike issue despite more stable movement, work with a qualified golf instructor who can assess your individual motion. Different body types can create effective swings in different ways.
Step 8: Use this pre-shot checklist when your downswing falls apart
Use this short checklist on the range or course:
- Structure: Is my belt slightly forward with my sternum centered?
- Brace: Can I keep my trail knee inside my trail foot?
- Set: Did I allow the club to set as my chest turned?
- Completion: Do my arms and body finish the backswing together?
- Transition: Can I sense a completed backswing before rotating down?
- Finish: Can I rotate around my lead side and hold my balance?
That is a far more complete approach than trying to force a perfect downswing from a poor top-of-swing position.
FAQ: Fixing a Downswing That Falls Apart
Why does my downswing fall apart even when my backswing feels good?
A backswing can feel powerful while still putting you too far from the ball or leaving the arms disconnected from the body. Check whether you are swaying, losing trail-leg structure, or allowing the arms to continue after your chest has completed its turn.
Should I pause at the top of my golf swing?
A noticeable pause is useful as a practice drill because it separates the completion of the backswing from the start of the downswing. In your playing swing, it may become only a brief feeling of completion rather than a visible stop.
How do I stop sliding in the golf swing?
Create a stable base at address, keep your trail knee inside your trail foot in the backswing, and turn your chest into the inside of that trail foot. Then rotate around your lead side through impact instead of lunging toward the target.
Does more wrist hinge fix an over-the-top downswing?
More wrist set alone is not a universal fix. However, an earlier, properly timed set can prevent extra arm swing and give you a more organized top-of-swing position. Combine it with stable lower-body structure and a controlled transition.
What is the simplest swing thought for a more consistent golf swing?
Try: “Set, pause, rotate.” It summarizes the priorities of creating club structure in the takeaway, completing the backswing before changing direction, and rotating through from a stable base.
Takeaway: Fix the Cause Before You Fix the Downswing
Your downswing is often the visible result of what happened before it. When you build lower-body structure, set the club during the takeaway, complete the backswing, and rotate through a stable lead side, you remove the need for many last-second corrections.
The next time your downswing falls apart, resist the urge to chase the club at impact. Rehearse your structure, create a better set position, pause briefly, and rotate through in balance. Better contact usually starts well before the downswing begins.
0 Comments