


If your golf swing has become shorter as your flexibility has changed, trying to turn harder may not be the answer. You may need a different way to create swing length, deliver the club, and release it through the ball.
The lift and drop swing style gives you that alternative. Instead of relying on a large shoulder turn, you allow your arms to lift more independently, then fall before you turn through. Combined with relaxed hands and better release timing, this approach can help you pursue more distance without simply adding effort.
The 50-yard headline is not a guaranteed result. Your practical goal is to find a golf swing that suits your available movement and helps you use your speed more effectively. Start with your flexibility, build the backswing, and give particular attention to the downswing sequence that makes this style work.
Table of Contents
- Step 1: Match Your Golf Swing to Your Available Flexibility
- Step 2: Check Your Rotation With a Simple Golf Flexibility Test
- Step 3: Make Your Golf Setup Easier to Move From
- Step 4: Use the Wall Drill to Build Golf Backswing Length
- Step 5: Allow a Softer Lead Arm in Your Golf Backswing
- Step 6: Let Your Arms Drop Before You Turn Through the Golf Ball
- Step 7: Improve Your Golf Release With the Swoosh Drill
- Step 8: Combine the Moves Into One Repeatable Golf Swing
Step 1: Match Your Golf Swing to Your Available Flexibility
You do not need to copy the movement of a highly flexible tour player to strike the golf ball well. If you cannot make a large turn comfortably, trying to reproduce that position can leave you struggling to get your arms far enough back.
With limited rotation, your torso can restrict the route your arms take around your body. Allowing your arms to move a little higher gives you another way to create backswing length.
This is not only relevant if you are a senior golfer. You may have limited movement because of previous injuries, your build, or your natural flexibility. The useful question is not your age, but how much rotation you can actually use.
The contrast between Rory McIlroy and Tom Watson illustrates why different patterns deserve consideration. You can see different hand positions and arm heights at the top, yet both provide examples of outstanding ball striking. Higher arm positions also appear in the swings of Jack Nicklaus and Scottie Scheffler.
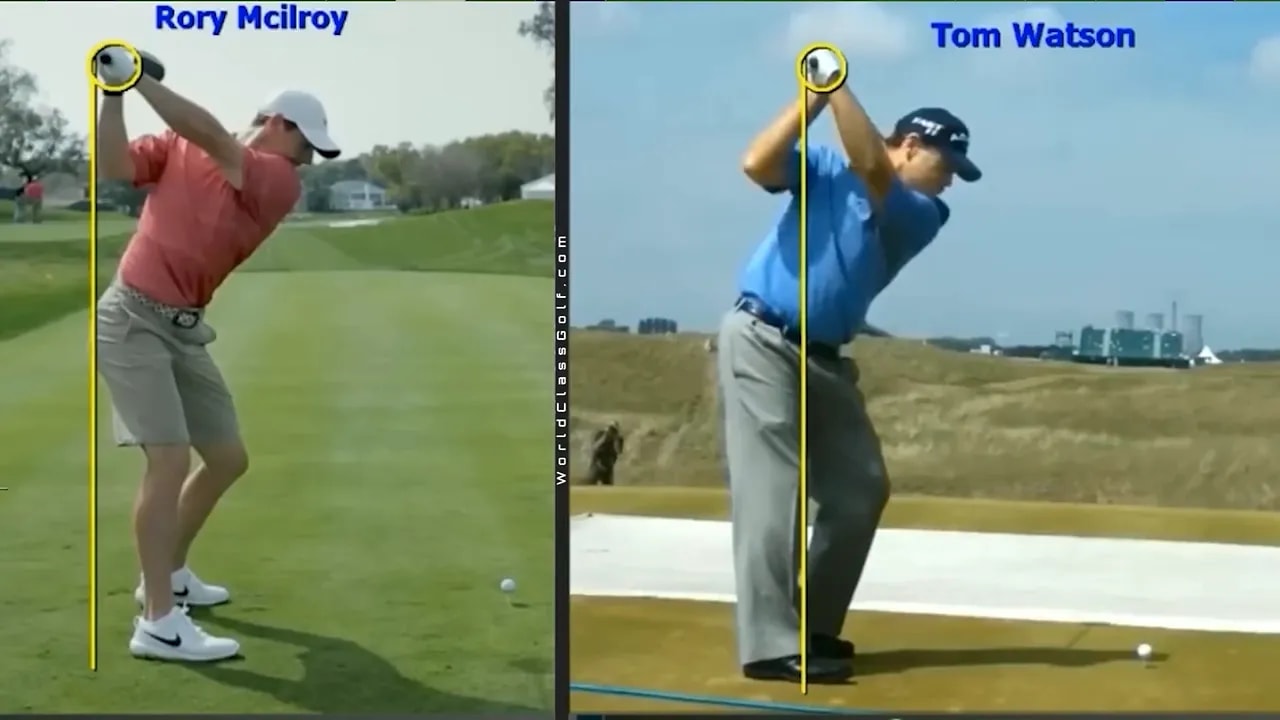
Your takeaway is simple: a higher golf backswing is not automatically a fault. What matters is whether you pair that backswing with a suitable movement back toward the ball.
Step 2: Check Your Rotation With a Simple Golf Flexibility Test
Before changing your technique, use a quick rotation check to understand why your current backswing may feel restricted. You need a golf club and a fixed reference, such as a table leg, chair leg, or door frame.
The demonstration uses a seated position, helping you notice how much you can turn without gaining extra movement from your legs.
- Choose a fixed reference and align it with your spine.
- Place the club across your shoulders, holding it securely.
- Turn your upper body toward your backswing side.
- Check whether you can bring the grip around to touch the reference without lifting or moving your legs to help.
- If you stop well short, recognize that a rotation-dependent backswing may not suit your available movement.
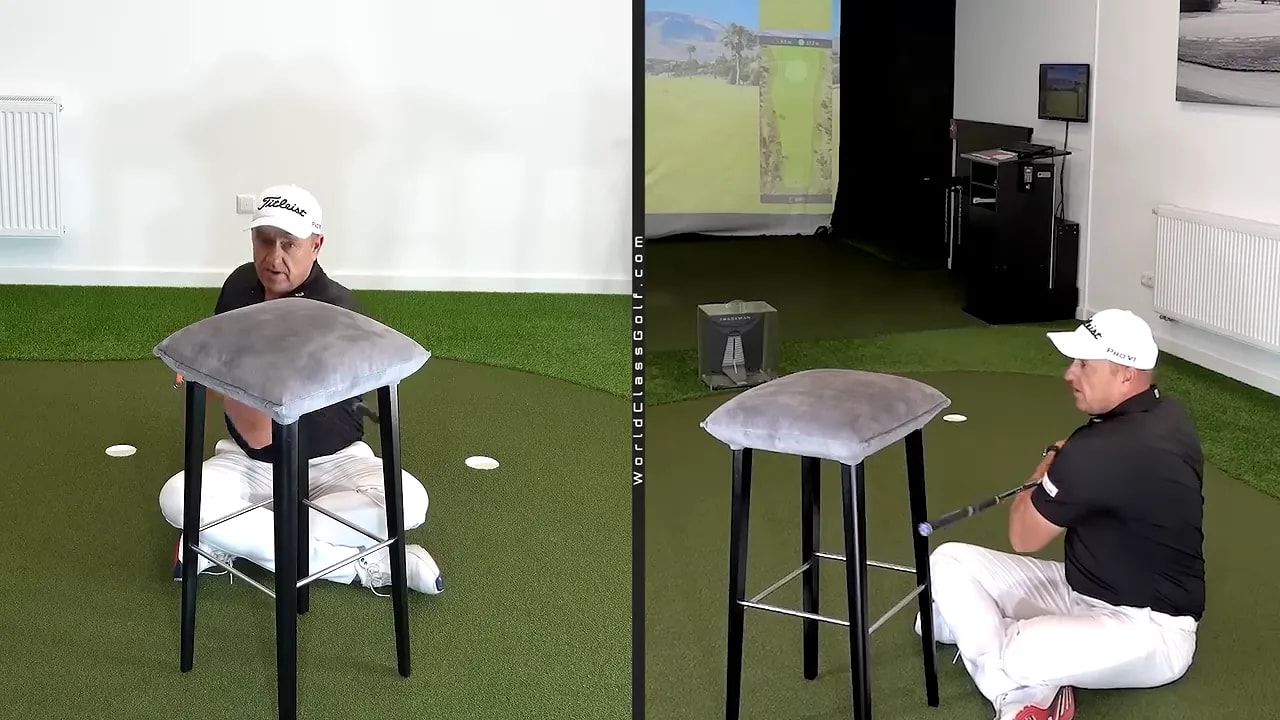
Treat this as a practical coaching check rather than a medical assessment. You are identifying your comfortable range, not trying to win a stretching contest.
If the movement is more difficult than expected, that gives you useful information. You can work with the rotation you have and explore arm lift instead of repeatedly forcing a bigger turn.
Step 3: Make Your Golf Setup Easier to Move From
Before rehearsing a higher backswing, consider a few small setup adjustments. Your aim is to make your available turn easier, not to hold yourself in a position that feels unnecessarily restrictive.
For a right-handed golf swing, you can experiment with the following:
- Flare your right foot outward slightly. This can help your ankle and knee accommodate your backswing turn.
- Allow a small head turn. You do not have to keep your head rigidly fixed while your body moves.
- Consider standing slightly more upright. This may make the movement feel less demanding on your back and joints.
If you play left-handed, reverse the side-specific instructions throughout these steps. Your trail side is the side farther from the target at address.
Keep each adjustment modest. You are looking for a comfortable starting position that supports your golf swing, not trying to change everything before you move the club.
These setup options support the main idea: use the turn you have, then let your arms contribute the additional height and length you need.
Step 4: Use the Wall Drill to Build Golf Backswing Length
The wall drill gives you a clear reference for learning arm lift. Position yourself with a wall behind you, approximately one of your own foot lengths away, and take your address posture.
The wall discourages you from taking the club too far around behind your body. To make a backswing without contacting it, you need to let your arms travel more upward.
- Set up near the wall with enough clear space to rehearse safely.
- From address, gently lift your arms in front of you to recognize how they can move independently of your chest.
- Add your comfortable backswing turn.
- Allow your arms to continue upward as you approach the top.
- Keep the club clear of the wall throughout the rehearsal.
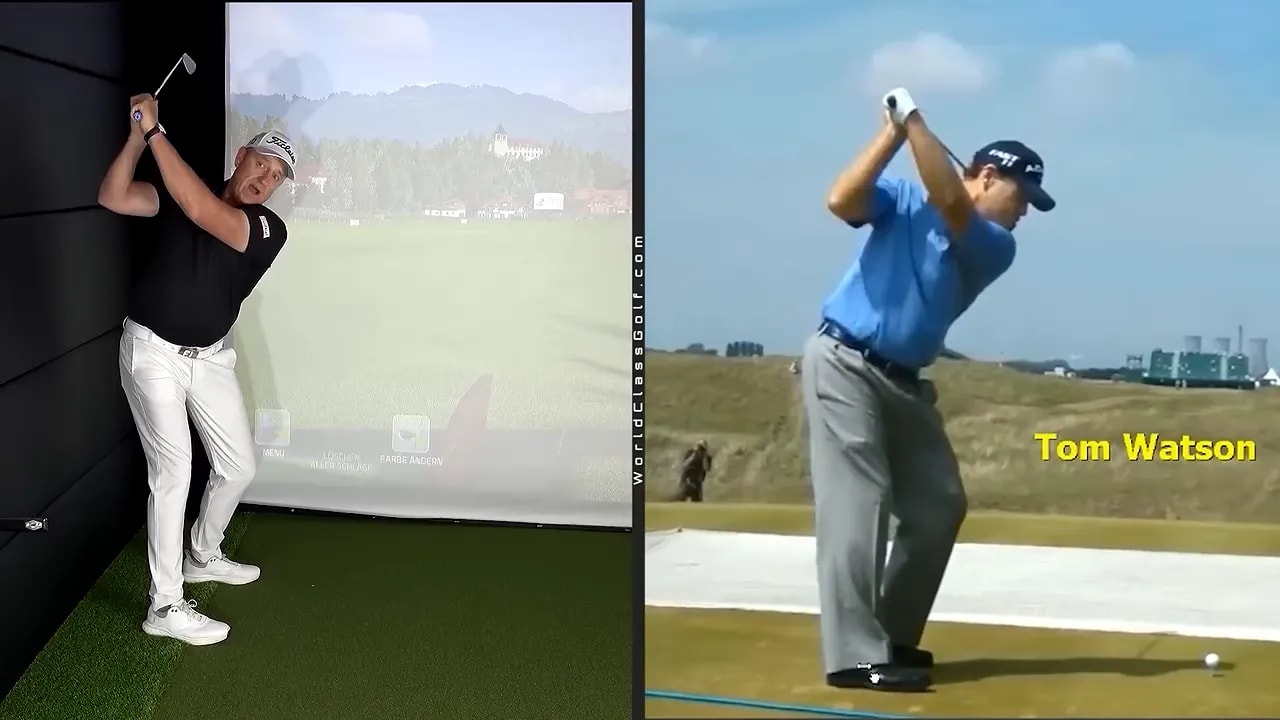
The new movement may feel unusually vertical. That is understandable if you have spent years trying to keep your arms low or wrapped tightly around your torso.
You are not trying to lift as high as possible. You are learning to create usable swing length without demanding rotation your body cannot provide. Think of your arms as floating upward, rather than being pulled around by an increasingly strained turn.
This is the first half of the lift and drop golf swing. The second half is essential: those higher arms need an opportunity to come down before your upper body turns aggressively toward the ball.
Step 5: Allow a Softer Lead Arm in Your Golf Backswing
If keeping your lead arm perfectly straight makes your backswing feel tight and short, you do not need to treat that rigid position as an absolute requirement.
A slightly softened lead arm can help you create length within this swing style. Tom Watson and Ángel Cabrera provide useful examples of higher arm positions with some softness in the lead arm.
In Cabrera’s example, the arms continue upward during the later part of the backswing without requiring an equally large additional shoulder turn. You can use that image to understand how arm movement contributes to the overall length.
The distinction is between softness and collapse. You are giving yourself permission to avoid excessive rigidity, not deliberately folding your arm as much as possible.
- Let your arms rise without pinning them tightly against your chest.
- Keep the lead arm comfortable rather than locked.
- Use your available shoulder turn without forcing extra rotation.
- Choose a top position from which you can let your arms fall smoothly.
A longer golf swing is only useful if you can deliver it. Once your backswing feels less restricted, turn your attention to the transition.
Step 6: Let Your Arms Drop Before You Turn Through the Golf Ball
This is the key movement that matches the higher backswing. Let your arms fall slightly before you really turn through.
If you lift your arms and immediately spin your shoulders toward the target, you risk moving the club outward and coming over the top. The additional backswing length then feeds into a steep delivery instead of helping your strike.
Use a simple rehearsal to separate the movements:
- Move to the top with your comfortable turn and higher arms.
- Let your hands and arms lower slightly.
- Feel the club returning toward the inside rather than being thrown outward.
- Then turn through and continue into your finish.
Your practice cue is “lift, drop, turn.” Use it to establish the order, then let the movements blend into a flowing golf swing. You are not trying to create a permanently disconnected, stop-start action.
Pay attention to your trail shoulder and trail leg. For a right-handed golfer, an early kick from the right leg or an aggressive movement of the right shoulder can interfere with the arm drop.
You may find it helpful to keep your right foot on the ground a little longer and let your right side feel more passive early in the downswing. That gives your arms and right forearm more opportunity to lower before you turn through.
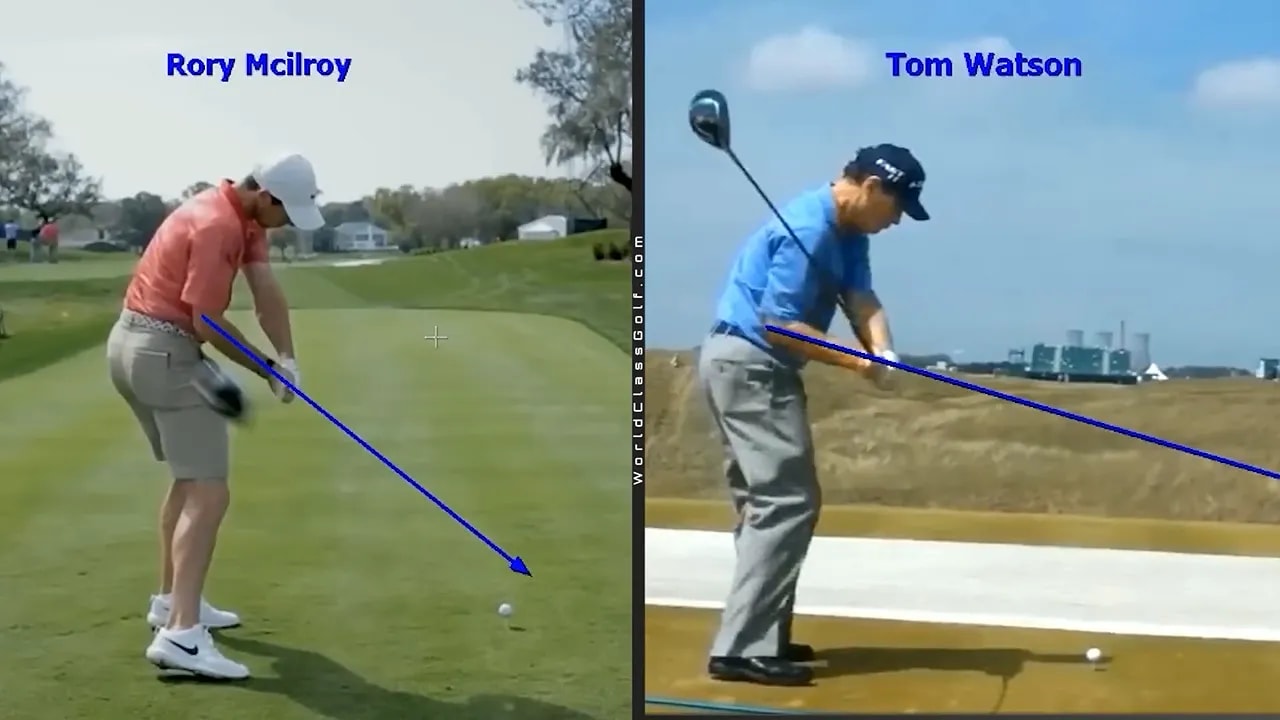
The forearm comparison highlights that different golf swing styles can arrive with different arm orientations. You do not need to force your delivery to look identical to McIlroy’s.
You still need to turn. The adjustment is about when you apply that turn, not eliminating body movement or keeping your trail foot planted throughout the finish.
Step 7: Improve Your Golf Release With the Swoosh Drill
Once you have matched the backswing and downswing, work on how you release the club. More effort is not the same as better timing.
If you throw the club outward too early, your practice swing may resemble a fly-fishing cast. With a sound-producing training aid, you can hear the release happening in the wrong place.
The alternative is to feel the release continuing past the golf ball. A useful reference discussed through Justin Rose’s release feel is approximately 30 centimeters beyond the ball. Fred Couples has also described the sensation of releasing past it.
Use that as a feel for the swoosh, not as an instruction to move your contact point beyond the ball.
- Take your address position with room for a full practice swing.
- Relax your hands and arms.
- Swing to the top without rushing.
- Let your arms lower, then turn through.
- Try to place the strongest swoosh beyond the imagined ball position.
- Complete the motion and hold your finish.
Avoid replacing an early throw with an attempt to hold wrist angles indefinitely. The objective is a natural, well-timed release, not a rigid handle-dragging action.
Your golf swing needs flow as well as positions. Relaxed hands, time in transition, and a clear sound cue give you a straightforward way to work on that rhythm.
Step 8: Combine the Moves Into One Repeatable Golf Swing
Bring the pieces together in their original order. Start by understanding your rotation, make your setup comfortable, and rehearse the arm lift beside the wall. Then move away from the wall and add the drop, turn, and release.
Keep your practice focused on a few clear checks:
- At address: Can you move comfortably from your setup?
- At the top: Have your arms gained height without a forced turn?
- In transition: Do your arms lower before your shoulders rush around?
- Through the ball: Can you release freely and finish in balance?
If your golf swing feels longer but the delivery becomes steep, revisit the arm drop and your trail-side timing. If the sequence feels comfortable but the release remains forced, return to relaxed practice swings and the swoosh cue.
You will not feel equally loose every day. Stiffness and timing can vary, so judge the method by how well the movements work together rather than expecting every swing to feel perfect.
If you cannot identify where the sequence breaks down, personalized golf swing analysis offers a way to examine your movement with side-by-side feedback instead of relying only on feel.
The central lesson is to build a golf swing around your body. Give yourself permission to lift your arms, soften the lead arm slightly, let the club come down, and release it with flow. Your route to easier distance may be a better-matched sequence, not a harder swing.
0 Comments