
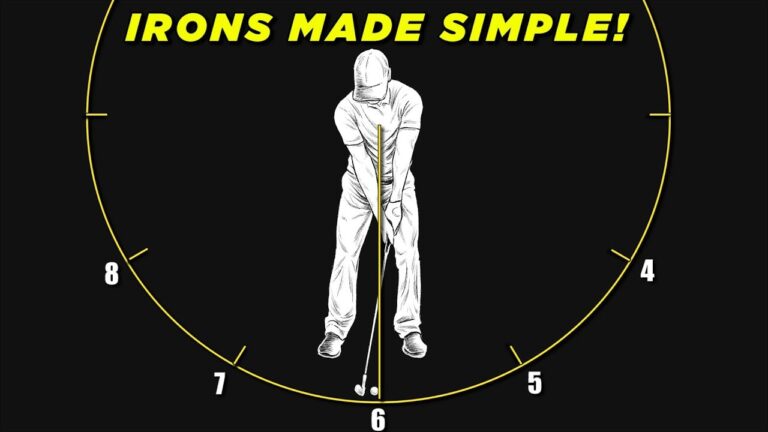

Pure iron shots are not created by trying to scoop the ball into the air. In golf, reliable compression comes from controlling one essential point in your swing: the low point of the swing arc. When that low point is in the right place, you can strike the ball first, take a divot afterward, and produce the solid feel and predictable distance that make golf far more enjoyable.
For many golfers, fat and thin contact seems like two separate problems. They are usually the same low point problem expressed in different ways. If the club reaches the bottom of its arc behind the ball, you may strike the ground first. If it barely misses the ground, you catch the ball thin. Move the bottom of the arc forward and you create the conditions for compressed iron shots.
Table of Contents
- Step 1: Understand the golf swing low point
- Step 2: Build a forward-friendly golf setup
- Step 3: Turn through impact to cover the golf ball
- Step 4: Use the forward tee drill for golf compression
- Step 5: Lead with your knees and drive the trail leg through
- Step 6: Check your golf swing against useful impact patterns
- Step 7: Turn the movement into a repeatable golf practice routine
- Step 8: Keep the golf cue simple on the course
- Frequently Asked Questions
Step 1: Understand the golf swing low point
Your iron swing travels on a circular arc. The club descends, reaches its lowest point, then begins to rise. With an iron, the ball should not be at the very bottom of that circle. Instead, the low point should be roughly two to three inches ahead of the golf ball, toward the target.
This is why a proper iron shot contacts the ball before the turf. The club is still moving downward when it reaches the ball, then it continues into the ground and creates a divot in front of where the ball sat. That sequence is the foundation of clean golf ball striking.
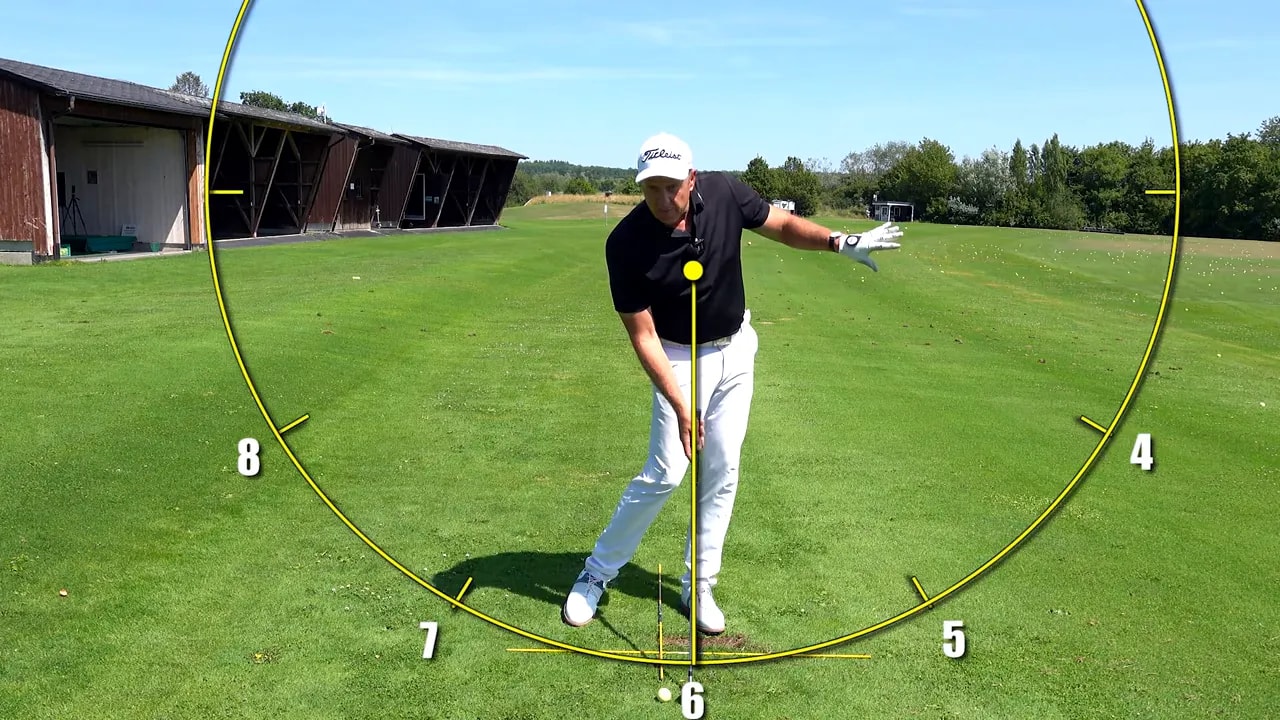
Your sternum, or the center of your chest, is a useful reference for this concept. In the model presented here, the position of the sternum helps establish the low point of the swing circle. At impact, you want your body structure sufficiently forward so the club can bottom out ahead of the ball rather than behind it.
This does not mean lunging your head toward the target or forcing your upper body far forward. It means developing a controlled shift and turn that move your golf swing through the ball.
Why fat and thin shots are closely related
A fat shot happens when the club hits the turf too early, often because the low point remains behind the ball. A thin shot can happen when the same low point is still behind the ball, but the club approaches just high enough to catch the middle or upper portion of the ball instead of the ground.
- Low point too far back: fat contact, thin contact, inconsistent strike.
- Low point forward of the ball: ball first contact, then turf.
- Club ascending too soon: added loft and a weaker, higher strike.
If your 7 iron often flies more like an 8 iron, an early low point and excessive added loft may be part of the reason. In golf, improving strike quality can help you access the loft and distance your club was designed to produce.
Step 2: Build a forward-friendly golf setup
You can make low point control easier before the club ever starts back. Set up with the shaft and lead arm appearing as one continuous line, then organize your pressure with approximately 60 percent on the lead side and 40 percent on the trail side.
This is not a dramatic lean. It is a subtle starting position that makes it easier to shift forward during the downswing. From there, you need only a small movement toward the target to arrive in a strong impact position.
At address, keep your goal simple:
- Place the ball in your normal iron position.
- Feel slightly more pressure in your lead foot.
- Allow the handle and lead arm to form a clean line.
- Settle into balance rather than bracing rigidly.
- Prepare to move through the shot instead of staying behind it.
Good golf impact is not a static pose you force with your hands. It is the result of a sequence that shifts, turns, and brings the club to the ball with the correct low point.
Step 3: Turn through impact to cover the golf ball
A common mistake is trying to avoid rotation through impact. If you stay closed and remain behind the ball, the low point can stay too far back. The result is often poor contact, excess loft, and an unreliable strike.
Instead, allow your hips and torso to open as you move into impact. The golf swing model here uses tour player averages as a reference: approximately 30 to 50 degrees of hip turn and 25 to 35 degrees of torso turn at impact.
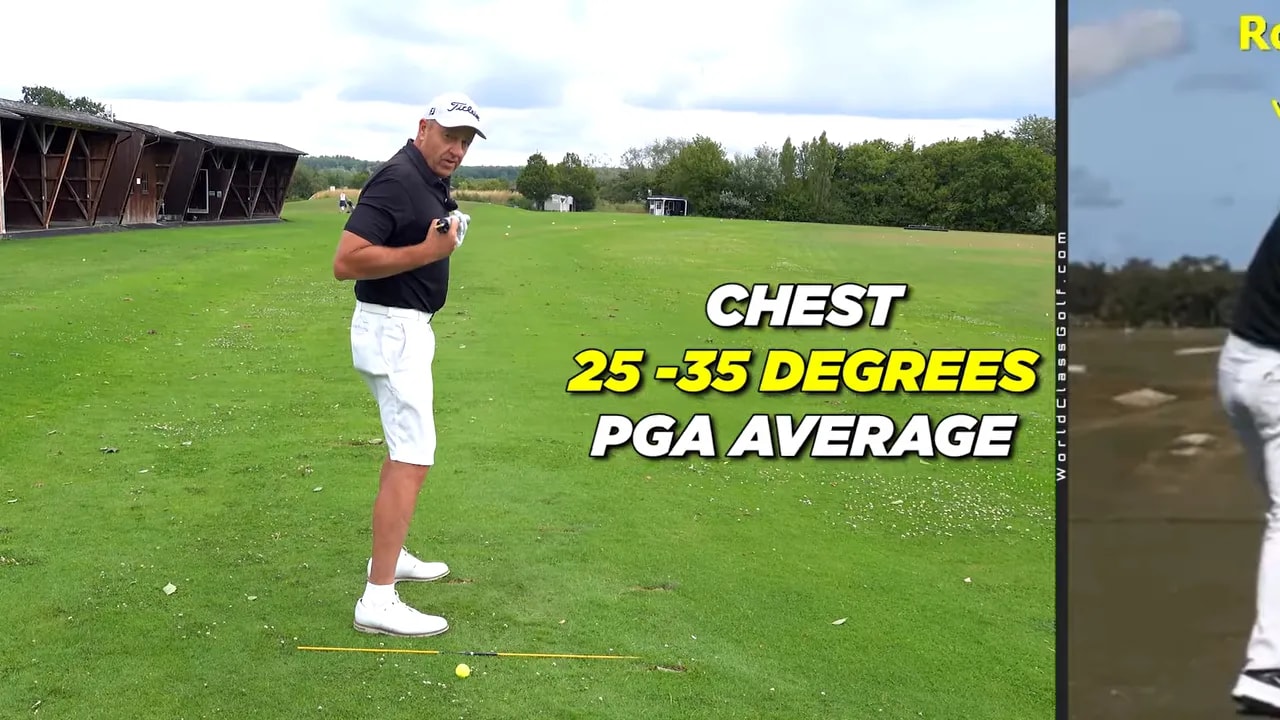
These numbers are not instructions to freeze into exact angles. They describe a useful overall pattern. Great ball strikers tend to clear and rotate through the shot, helping their sternum and low point move ahead of the golf ball.
Think of the turn as a way to “cover” the ball. Your chest opens toward the target while your lower body continues to support the movement. This gives the club room to strike down, compress the ball, and travel into a forward divot.
A simple impact checkpoint
Make a slow practice swing, then stop at impact. Look down and check whether the clubhead is slightly ahead of the ball position while your sternum is forward enough to support that position. If you feel trapped behind the ball, rehearse a small shift and more open body rotation.
Keep your head relatively steady during this rehearsal. Excessive movement toward the target can create its own recovery problem. The goal is not to slide. It is to shift, turn, and continue moving through the golf ball.
Step 4: Use the forward tee drill for golf compression
A simple practice drill provides immediate feedback about your low point. Place a tee, or half a tee pressed into the turf, approximately one clubhead length in front of the ball. Your task is to strike the ball, then clip the forward tee.
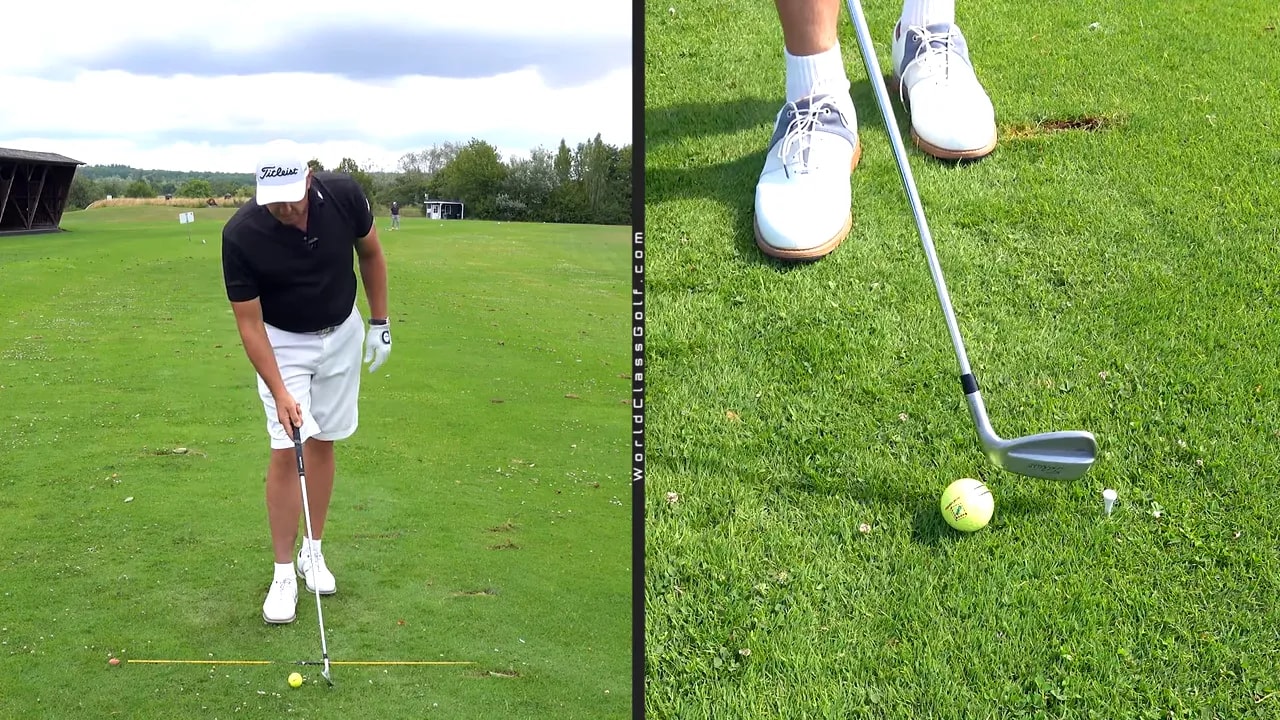
This setup turns a vague golf instruction into a measurable task. If you hit the ball but miss the forward tee, your low point may still be too far back. If you catch the ball and disturb the forward tee, you have evidence that the club is traveling down and forward through impact.
- Place a ball on the turf.
- Push a tee or half tee into the ground one clubhead length ahead of it.
- Start with a controlled, short swing.
- Focus on striking the ball first.
- Continue the club into the turf and toward the tee.
- Check whether the tee moved or came out of the ground.
Begin slowly. Trying to add speed before you can control contact can hide the feel you need. As your golf strike improves, gradually lengthen the swing while retaining the same ball first, turf second pattern.
The forward tee is also useful because it encourages movement through the shot. You are not trying to chop sharply downward at the ball. You are moving the low point forward so the club can continue toward a target-side reference.
Step 5: Lead with your knees and drive the trail leg through
To shift and turn more effectively, use a lower-body checkpoint: your trail knee should reach the finish line before your hands do. The finish line is an imaginary vertical line extending upward from the ball area.
Many amateur golfers allow their hands to race toward impact while the trail knee remains back. This tends to leave the body behind the shot. In contrast, moving the trail knee toward the lead knee helps close the gap between the legs, encourages a forward shift, and supports a more open body position.
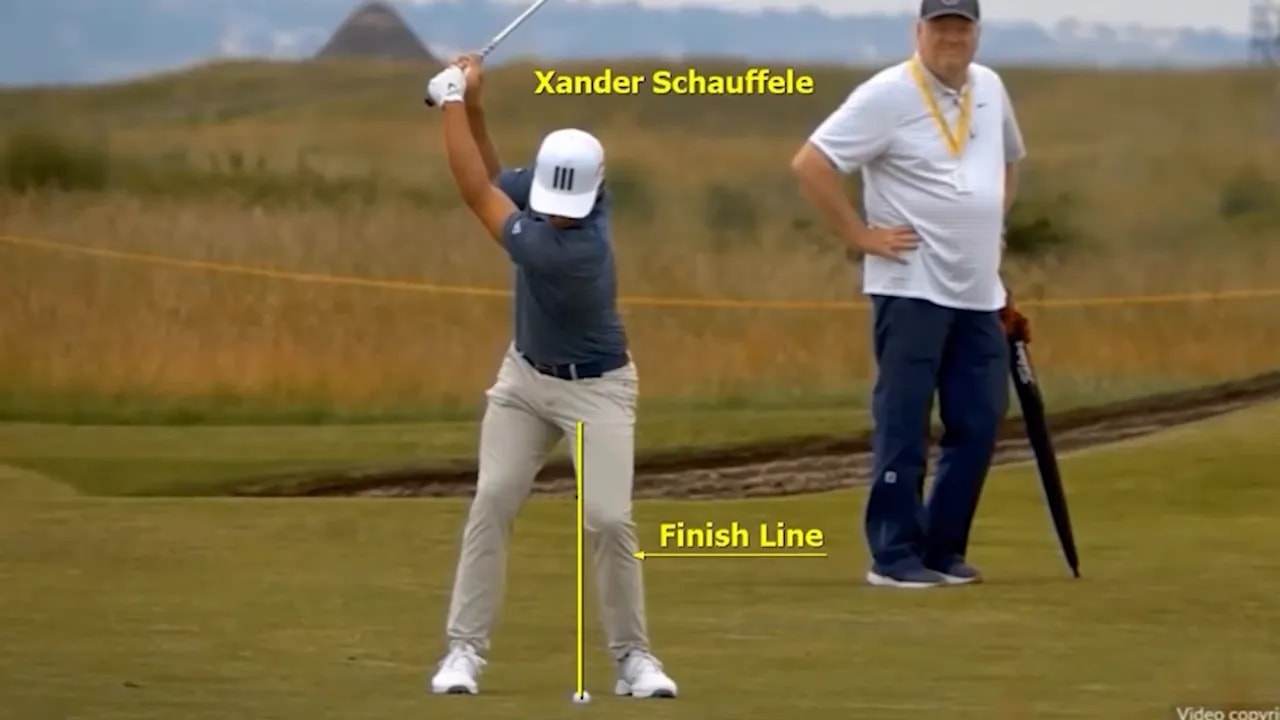
A practical checkpoint occurs when your arms are around parallel to the ground in the follow-through. By then, your thighs should be close together. This reflects a trail leg that has driven toward the lead side rather than staying behind.
Use the motion in a controlled rehearsal:
- Make a small backswing.
- Begin down by moving the trail knee toward the lead knee.
- Feel the trail leg drive inward, not outward toward the ball.
- Allow your hips and chest to open naturally.
- Finish balanced on your lead side.
This is a useful two-in-one golf thought because it supports both shift and rotation. It can be applied to full iron swings, shorter pitch shots, and simple practice motions without a ball.
Step 6: Check your golf swing against useful impact patterns
For golfers who record their swings, the trail leg angle can offer another checkpoint. A line drawn from the trail knee toward the trail ankle at impact is described here as averaging about 65 degrees among PGA Tour players. Strong ball strikers are generally shown below 70 degrees, while many amateur examples sit closer to 80 degrees or higher.
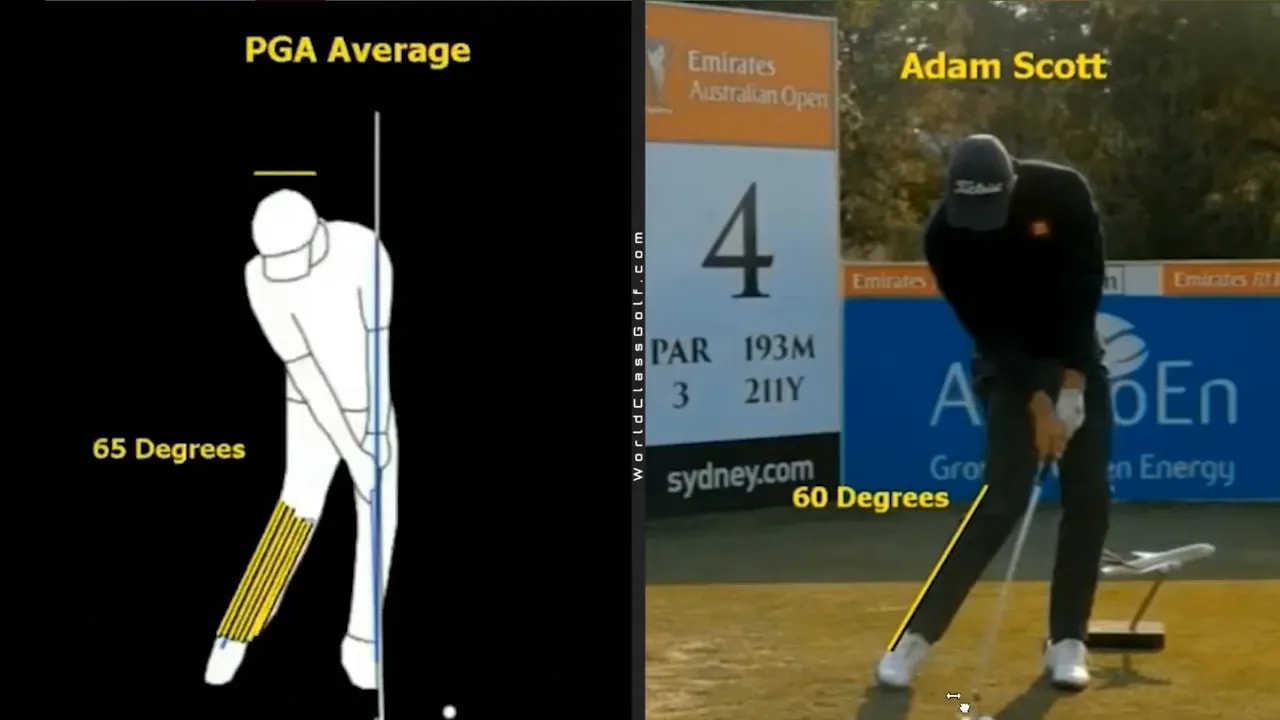
Use this information as a diagnostic reference rather than a demand to copy a single number. Body shape, mobility, camera angle, and setup can affect what you see. Still, if your trail leg remains very straight and your body is stalled behind the ball at impact, it may confirm the same low point issue revealed by fat and thin shots.
A phone recording from face-on can help you assess three practical questions:
- Has your sternum moved forward enough to place the low point ahead of the ball?
- Are your hips and chest opening through impact?
- Has your trail knee driven toward your lead knee before your hands pass the ball?
Focus first on the ball flight and turf pattern. A golf swing measurement is useful only when it helps you create more predictable contact.
Step 7: Turn the movement into a repeatable golf practice routine
Better golf contact comes from a repeatable process, not from collecting multiple unrelated swing thoughts. Build your practice around the same low point objective each time: move through the ball so the club bottoms out ahead of it.
Try this progression during an iron practice session:
- Rehearse without a ball: Make slow motions that shift pressure forward, open the body, and bring the trail knee toward the lead knee.
- Stop at impact: Check that your sternum and club position are slightly ahead of the ball location.
- Add the forward tee: Hit short shots while trying to brush the ball and forward tee in sequence.
- Increase swing length: Maintain the same movement with half swings, then three-quarter swings.
- Use normal swings: Finish in balance and inspect the divot location after each shot.
Your divot is valuable feedback. A divot that begins after the ball generally supports the intended low point pattern. A divot behind the ball suggests that your golf swing may still be bottoming out too early.
Do not chase a perfect strike on every swing. Instead, look for a trend: more ball first contact, more forward divots, a more stable launch, and a stronger sense that your body is moving through impact.
Step 8: Keep the golf cue simple on the course
Practice can include several checkpoints, but a golf course requires a simpler approach. Choose one cue that helps you create the right movement without overthinking.
Useful choices include:
- “Ball, then tee.” Best when using the forward tee drill in practice.
- “Turn through.” Best when you tend to stay closed and behind the ball.
- “Knee to knee.” Best when your trail leg stalls and your hands dominate impact.
- “Finish forward.” Best when fat and thin shots appear under pressure.
Use only one at a time. The purpose is to let your golf swing respond naturally to a clear intention, not to manufacture several positions at once.
Frequently Asked Questions
Why do I hit both fat and thin golf shots?
Both misses can come from a low point that is too far behind the ball. When the club reaches the ground early, you hit it fat. When it narrowly misses the turf but catches the ball high on the face, you hit it thin.
Where should the divot be on an iron shot?
For a solid iron shot, the ball should be struck first and the divot should begin ahead of the ball position. This indicates that the low point of the golf swing was forward of the ball.
Should I keep my head completely still in the golf swing?
Keep your head relatively steady rather than forcing it toward the target. The key is a controlled shift and turn through the ball, not an excessive slide with your upper body.
How much should I turn through impact?
The reference pattern presented here places hip turn at roughly 30 to 50 degrees and torso turn at roughly 25 to 35 degrees at impact. Use those figures as a guide to understand the value of opening through the shot, not as exact positions you must force.
What is the fastest drill for better golf iron contact?
Place a tee one clubhead length ahead of the ball and practice striking the ball and then the tee. The drill gives clear feedback about whether your low point has moved forward.
Pure iron contact becomes much simpler when you organize your golf swing around low point control. Set up with a slight lead-side bias, shift and rotate through impact, drive the trail knee toward the lead knee, and use a forward tee to confirm that your club is bottoming out ahead of the ball. Build that pattern gradually, and clean compression can become a dependable part of your game.
0 Comments