


If your driver produces pulls, weak fades, or a stubborn slice, the solution may start before the club ever moves. Many golfers place the ball forward, then unconsciously open their chest and shoulders to reach it. That address position can encourage a steep, leftward club path and an open clubface, which is a difficult recipe for solid, powerful drives.
This how to hit a draw with driver guide organizes the key checkpoints into a practical progression. The goal is not to force a massive hook. It is to build a predictable right-to-left pattern, reduce excess spin, and create a delivery that can produce more solid contact and better distance.
Table of Contents
- Step 1: Build a Draw-Friendly Setup for How to Hit a Draw With Driver
- Step 2: Set the Clubface Closed to the Shaft
- Step 3: Maintain the Closed Face Through Impact
- Step 4: Create Backswing Depth for a More Powerful Driver
- Step 5: Use the Zero-Line Follow-Through Checkpoint
- Step 6: Practice the Complete How to Hit a Draw With Driver Drill
- Step 7: Diagnose Your Driver Miss Before Adding More Changes
- Step 8: Take a Predictable Driver Pattern to the Course
- FAQ: How to Hit a Draw With Driver
Step 1: Build a Draw-Friendly Setup for How to Hit a Draw With Driver
Your driver ball position should be forward, roughly under your lead armpit or about one ball behind your lead shoulder. The common mistake is reaching toward that forward ball position by opening your upper body. When your chest opens and your trail shoulder rises, you are pre-setting a motion that tends to travel down and left through impact.
Instead, get to the forward ball by moving your lower center toward the target. A useful feel is moving your belt buckle approximately two inches forward from the middle of your stance. This adjustment naturally puts your upper body slightly behind your lower body and creates side tilt.
From there, organize your upper body around that tilt:
- Move your hips slightly toward the target.
- Allow your upper body to tilt slightly away from the target.
- Feel your trail shoulder move back, rather than forward toward the ball.
- Feel your trail arm sit underneath your lead arm.
This can feel unusually closed or twisted if you normally slice. That feeling is often a useful correction because your usual address may be more open than you realize. Use a mirror or a down-the-line camera angle to check the position rather than relying only on feel.
Avoid creating the tilt by simply moving your head and weight far back. That may make the clubhead feel too far behind the ball and can create low-point issues. The hips moving forward are what allow the side tilt to form while keeping you organized around the ball.
Step 2: Set the Clubface Closed to the Shaft
The second checkpoint for how to hit a draw with driver is understanding clubface alignment relative to the shaft. This is not simply a matter of aiming the clubface left of your target. It is a visual relationship between the driver face and the shaft.
With the club held in front of you, a face that is closed to the shaft has the toe slightly in front of the heel. The clubface appears to point more downward than a fully open, skyward-facing position. An open-to-the-shaft face has the toe behind the heel and commonly contributes to a slice pattern.
At address, establish an awareness of this relationship. You can slightly move the handle forward and lightly twist the grip in your fingers until you can both see and feel the face positioned closed to the shaft. The goal is not to lock your hands. It is to know what a clubface that is capable of producing a draw looks and feels like.
This face relationship works with the setup from Step 1. The forward hips, side tilt, trail shoulder back, and trail arm under can help support an inside-to-out delivery. A face that is closed to the shaft can then reduce the tendency for the ball to curve excessively to the right.
Use a Simple Takeaway Feel
Once you establish the face at address, keep that relationship early in the backswing. A useful feel is keeping the logo on your glove more down, rather than immediately rolling it toward the sky. Another image is to keep the clubface looking more toward the ball as the club begins back.
At an early takeaway checkpoint, the toe should remain in front of the heel when viewed relative to the shaft. If the face quickly opens, you may spend the rest of the swing trying to recover from a slice-producing position.
Step 3: Maintain the Closed Face Through Impact
Setting the clubface correctly at address only helps if you maintain it. Many golfers can establish a closed-to-the-shaft face, then twist it open on the way back or through the strike. That is why the most useful practice objective is to preserve the alignment from address through the swing.
Think of the early takeaway and early follow-through as matching checkpoints. In the follow-through, keep the handle forward enough that the trail hand remains more on the side of the shaft. The clubface should still look closed to the shaft, rather than flipping upward with the hands dropping underneath.
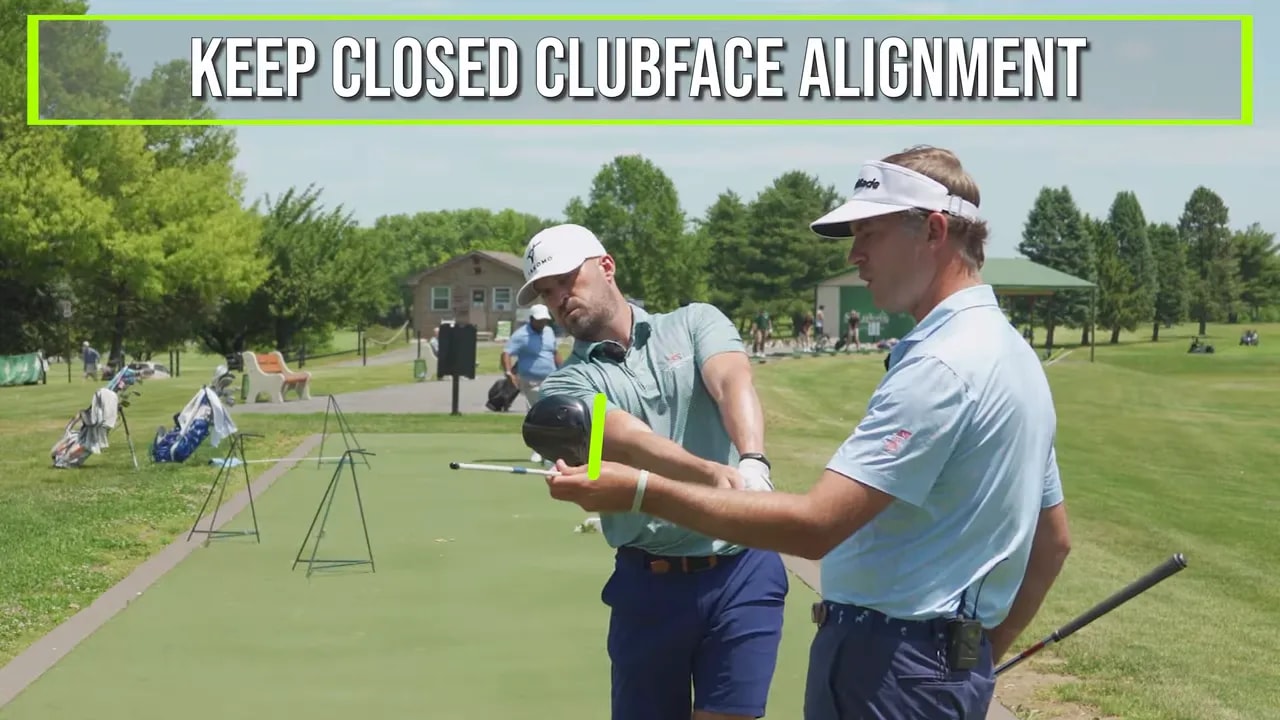
For golfers who slice, an exaggerated practice feel can be productive. Feel as though you are increasing how closed the face is through the ball by turning the club counterclockwise with your hands and forearms. You may initially hit shots that start farther left and draw more than intended. That is useful feedback during practice because it confirms you are no longer leaving the face open.
Do not confuse an exaggeration drill with your final on-course pattern. If you already hit significant draws, you do not need more closure. Your correction would be the opposite: reduce the amount of face closure and avoid over-curving the ball.
Step 4: Create Backswing Depth for a More Powerful Driver
Once your setup and clubface are organized, build enough depth in the backswing. Depth means the hands, arms, and club travel sufficiently around your body instead of lifting straight up or staying too far in front of your chest.
With driver, you want more turn and depth than you would typically use with a shorter club. The driver is designed to travel the farthest, so a fuller backswing turn can help create more potential speed. A simple top-of-swing checkpoint is that your hands and the butt end of the club should be well behind your trail shoulder, with the club handle appearing behind the trail ankle from a down-the-line view.
Depth starts from the ground up. Allow a fuller hip turn on the backswing, which creates more space between your legs as the trail hip turns. That turn helps the arms travel around your body. If your body barely turns and your hands stay in front of your trail shoulder, the swing can become shorter and less powerful.
Keep the clubface awareness from the previous steps while adding depth. More depth alone is not the answer if the face rolls wide open. The ideal combination is a fuller turn, hands traveling behind the trail shoulder, and a face that remains organized relative to the shaft.
Step 5: Use the Zero-Line Follow-Through Checkpoint
The final piece of how to hit a draw with driver is controlling how much your upper body races open after impact. A common pull-slice pattern has too little turn going back and too much turn through. The head moves forward, side tilt disappears, and the swing moves across the ball.
Reverse that pattern. Create more turn and depth in the backswing, then reduce the amount of upper-body turn in the follow-through. This acts as a braking mechanism that can help transfer momentum to the clubhead while preserving an inside-to-out delivery.
Use your lead shoulder at address as a reference, or “zero line.” In the follow-through, feel that your trail shoulder replaces your lead shoulder at that line. It should not keep spinning dramatically beyond it.
At the same time, feel that your head stays back rather than driving forward with your chest. This preserves side tilt and helps create extension through the strike. For a golfer accustomed to pulling and slicing, the sensation may feel like swinging and stopping, or staying more closed through the follow-through. In reality, the body is still moving. You are simply reducing the excessive opening that sends the club across the ball.
Step 6: Practice the Complete How to Hit a Draw With Driver Drill
Work through the checkpoints in order. Do not attempt to fix everything at full speed on the first swing. Begin with rehearsals, then make controlled swings before building toward normal speed.
- Set the ball forward: Place it near your lead armpit.
- Bump the hips forward: Move your belt buckle about two inches toward the target.
- Create the upper-body tilt: Trail shoulder back and trail arm under the lead arm.
- Close the face to the shaft: Feel the toe slightly ahead of the heel and sense the face in your fingers.
- Maintain the face relationship: Keep it organized in the takeaway and through impact.
- Add depth: Turn your hips and get the hands farther behind your trail shoulder at the top.
- Control the finish: Let the trail shoulder replace the lead shoulder while your head stays back.
When practicing a slice correction, aim to see evidence that the ball is curving less to the right. A pronounced draw or even an overdraw can be acceptable at first. You are learning a new set of positions and replacing a familiar open-face, across-the-ball pattern. Once the ball reliably curves right to left, reduce the exaggeration until you find a playable middle ground.
The major advantage is predictability. If you know the face is more closed to the shaft and the path is better organized from the inside, you can anticipate a draw-biased ball flight instead of hoping the ball does not slice.
Step 7: Diagnose Your Driver Miss Before Adding More Changes
These checkpoints are designed primarily for golfers who hit pulls, fades, and slices. They are not universal fixes for every driver issue. If you already hit strong hooks or excessive draws, closing the face more and adding more inside-to-out delivery can make the miss worse.
Use your ball flight to guide the adjustment:
- Pull-fade or slice: Prioritize forward hips, trail shoulder back, trail arm under, and a face that stays closed to the shaft.
- Weak, high-spin shot: Check whether the face is opening during the takeaway or through impact.
- Short, powerless driver: Check whether your backswing lacks hip turn and hand depth.
- Overdraw or hook: Reduce the amount of closed-face feel rather than exaggerating it further.
Grip and hand placement still matter, but the core pattern remains useful: organize the body for a draw-friendly path, organize the face for less rightward curve, create enough backswing depth, and avoid over-rotating through the ball.
Step 8: Take a Predictable Driver Pattern to the Course
Better driving is not only about producing the longest shot. It is about knowing what the ball is likely to do. A reliable draw pattern can help you commit to a target, manage trouble, and swing with more confidence from the tee.
Start each practice session with the setup. It may not feel as exciting as a dramatic downswing move, but it determines the conditions you bring into the swing. Then add clubface control, depth, and the follow-through checkpoint in that sequence. The progression gives you a repeatable framework for building a stronger, more predictable driver.
FAQ: How to Hit a Draw With Driver
Why do I slice my driver even when I try to close my shoulders?
You may be trying to create side tilt by moving your head and weight too far back rather than moving your hips forward. Start by bumping your hips slightly toward the target. That helps create side tilt while allowing your trail shoulder to move back and your trail arm to sit under the lead arm.
What does closed to the shaft mean with a driver?
It describes the relationship between the clubface and shaft. When the face is closed to the shaft, the toe is slightly in front of the heel. When it is open to the shaft, the toe is behind the heel. A face that stays open to the shaft commonly supports a slice pattern.
Should I try to hit a hook when learning how to hit a draw with driver?
During practice, an exaggerated draw can be useful feedback if you normally slice. It indicates that you are changing the open-face, across-the-ball pattern. The final goal is not a hook. It is a controllable draw or a ball flight with less rightward curve.
How much should I turn in the follow-through?
For the pull-slice pattern, feel more turn in the backswing and less excessive upper-body turn through impact. Use the checkpoint of having your trail shoulder replace your lead shoulder at the setup zero line, while keeping your head back enough to preserve side tilt.
What is the most important driver checkpoint to begin with?
Begin with the setup. Move the hips slightly forward to accommodate the forward ball position, then let the trail shoulder move back and the trail arm sit under the lead arm. This provides the foundation for the clubface and swing-path changes that follow.
0 Comments