


Better golf around the green does not require a different technique for every awkward lie, pin position, or amount of green. It requires a dependable baseline shot and a simple way to adjust it. With that approach, you can use one wedge to produce lower runners, standard pitches, and higher, softer shots without rebuilding your motion each time.
The key is to start with a repeatable mid-flight, mid-spin golf shot. From there, make controlled changes with two tools: effective loft and release. These adjustments are not all-or-nothing. They work on a spectrum, so you can create exactly as much height and stopping power as the situation requires.
Table of Contents
- Step 1: Build Your Baseline Golf Pitch Shot
- Step 2: Practice the Golf Baseline With an Alignment-Stick Drill
- Step 3: Use Effective Loft to Control Golf Trajectory
- Step 4: Change Release to Add or Remove Height
- Step 5: Let the Golf Course Choose the Shot
- Step 6: Combine the Two Golf Tools With Purpose
- Step 7: Build Skill Before Taking It Onto the Golf Course
- FAQ
Step 1: Build Your Baseline Golf Pitch Shot
Your baseline is the reliable shot to use in the majority of short-game situations. It should produce a medium trajectory, a controlled amount of spin, and clean contact. Before trying to manufacture low or high shots, make this motion comfortable.
Begin with a narrow stance. Your heels should be approximately a clubhead width apart, with your toes slightly flared. A narrow stance encourages touch and finesse rather than a full-swing mindset.
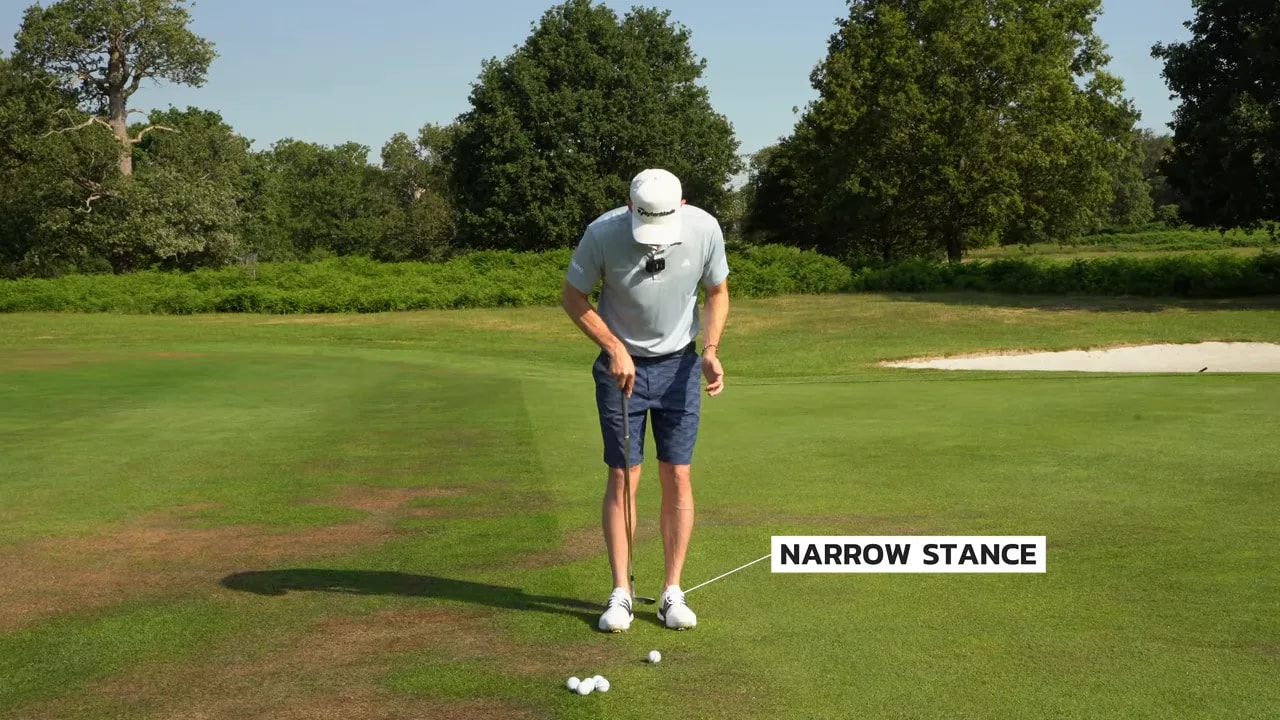
Next, place most of your pressure on your lead side. A useful feel is roughly 80 percent forward, leaving the trail heel light enough that it would be difficult to lift. This forward pressure helps the club strike ball then turf, an essential ingredient for predictable contact and spin in golf.
Ball position should be referenced from your upper body, not your feet. With your weight forward, allow the club to hang naturally from your sternum. Position the ball in line with your sternum or slightly behind it. This setup creates a slightly downward attack angle without excessively changing the club’s loft.
Use a wide, rotating motion
Keep the club relatively wide going back and through. Avoid excessive wrist set in this baseline motion. Instead, rotate your body through the shot while keeping the forward pressure in place.
The important finish is not just a turn through the ball. You should also extend upward through impact. Finish taller than you started, with space between the grip and your belt. This combination of rotation and extension helps prevent the club from digging or remaining too low through the strike.
Your baseline golf pitch should have these characteristics:
- A narrow stance with slightly flared toes.
- Most of your weight on the lead side.
- Ball positioned beneath or just behind the sternum.
- A wide club motion with limited wrist action.
- Body rotation combined with an upward extension through the finish.
When this shot becomes consistent, it gives you a dependable starting point for all the variations that follow.
Step 2: Practice the Golf Baseline With an Alignment-Stick Drill
A common short-game problem occurs when the hands, arms, or body become too active too early. The clubhead gets pulled inside on the takeaway, stays low to the ground, and then approaches the ball from an unreliable path. From there, you may feel forced to flip the trail hand to square the face, making solid contact far less predictable.
Use two alignment sticks to create a simple practice station that promotes a better clubhead path.
- Place one alignment stick on the ground to reference your target line. The ball should sit around one clubhead width outside this stick.
- Set a second stick behind the ball, approximately a wedge length back, at a similar angle to your wedge shaft.
- Make your baseline motion while keeping the clubhead outside the rear stick in the takeaway.
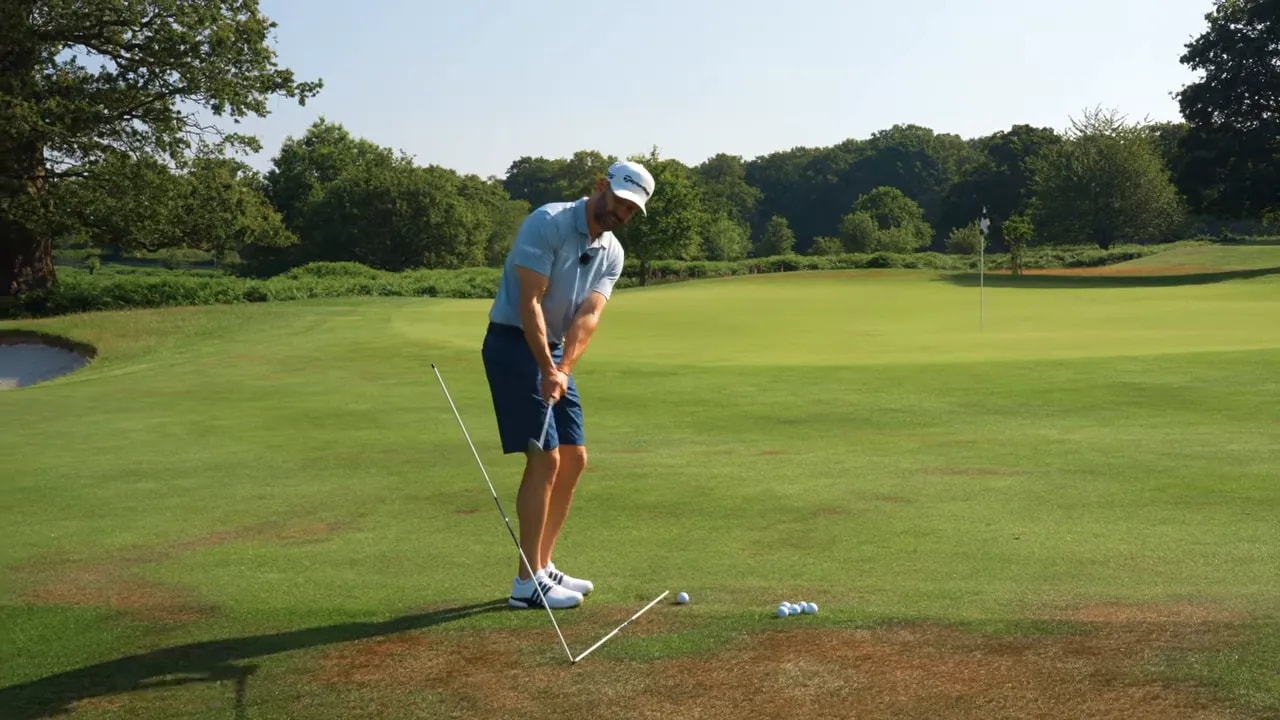
The intention is for the club to move more directly back and upward rather than immediately rolling inside. This makes it easier to return the club crisply to the ball. It also encourages relatively square alignment, rather than opening your body excessively at address.
Spend time hitting simple baseline shots with this drill before working on trajectory changes. Good golf fundamentals should remain underneath every variation.
Step 3: Use Effective Loft to Control Golf Trajectory
The first adjustment tool is loft. A wedge stamped 56 degrees does not always deliver 56 degrees of loft at impact. Shaft lean and face rotation change the effective loft, allowing one wedge to cover several useful golf shots.
With the shaft vertical and the leading edge square to the target, a 56-degree wedge presents its stated loft. Move the handle forward and you reduce loft. Rotate the shaft and face open, and you increase loft.
How to hit a lower golf shot
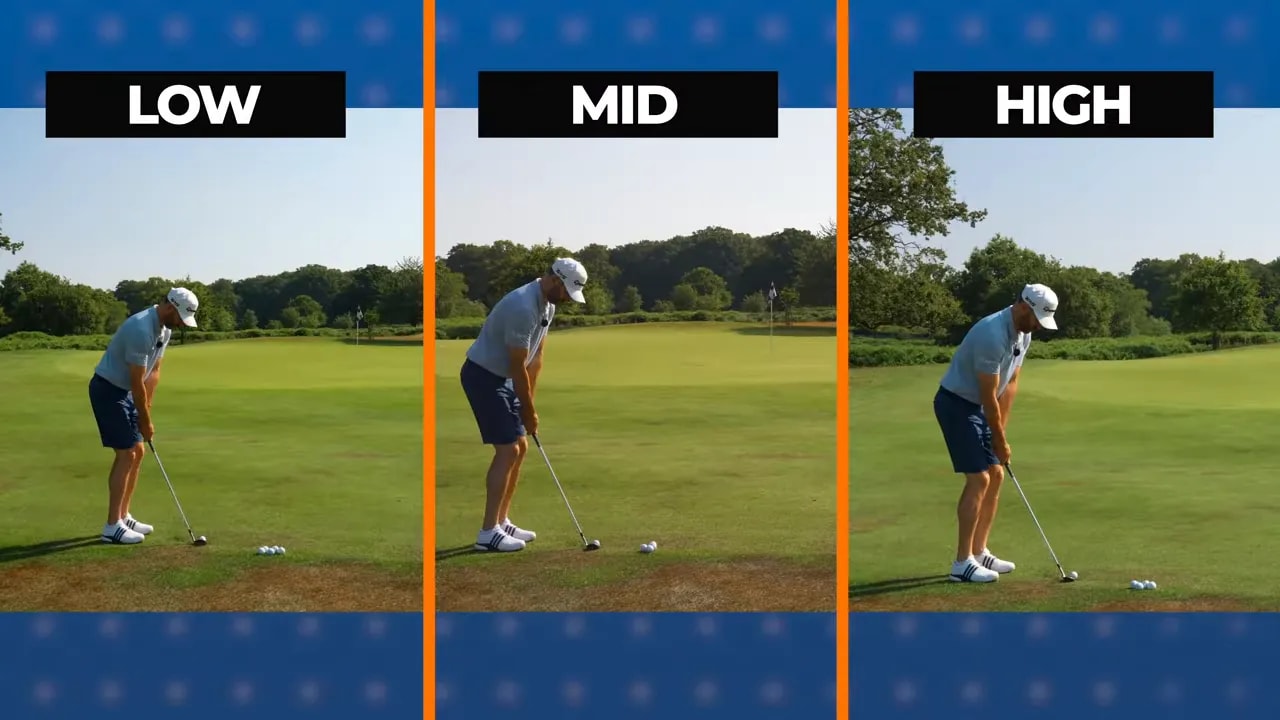
To lower the flight, retain the same narrow stance, forward pressure, and grip position relative to your body. Then move your whole body slightly closer to the target. In effect, the ball shifts farther back relative to your sternum.
This adds shaft lean and de-lofts the club. The shot comes out lower, lands at a shallower angle, and rolls farther. It is not automatically the correct shot for every pin, but it is a valuable option when you have plenty of putting surface between the ball and the target.
Do not change the baseline motion into a jab. Keep rotating and extending through the shot. The setup adjustment changes the flight while the core technique stays familiar.
How to add loft safely
To create a higher, softer golf shot, do not simply push the ball far forward. That can make clean contact difficult. Instead, return the ball to a neutral position beneath your sternum and keep the shaft relatively neutral.
Then rotate the clubface open before taking your grip. The open face adds loft while the central ball position preserves your ability to strike the ball cleanly. The result is a ball that launches higher, lands more softly, and releases less after landing.
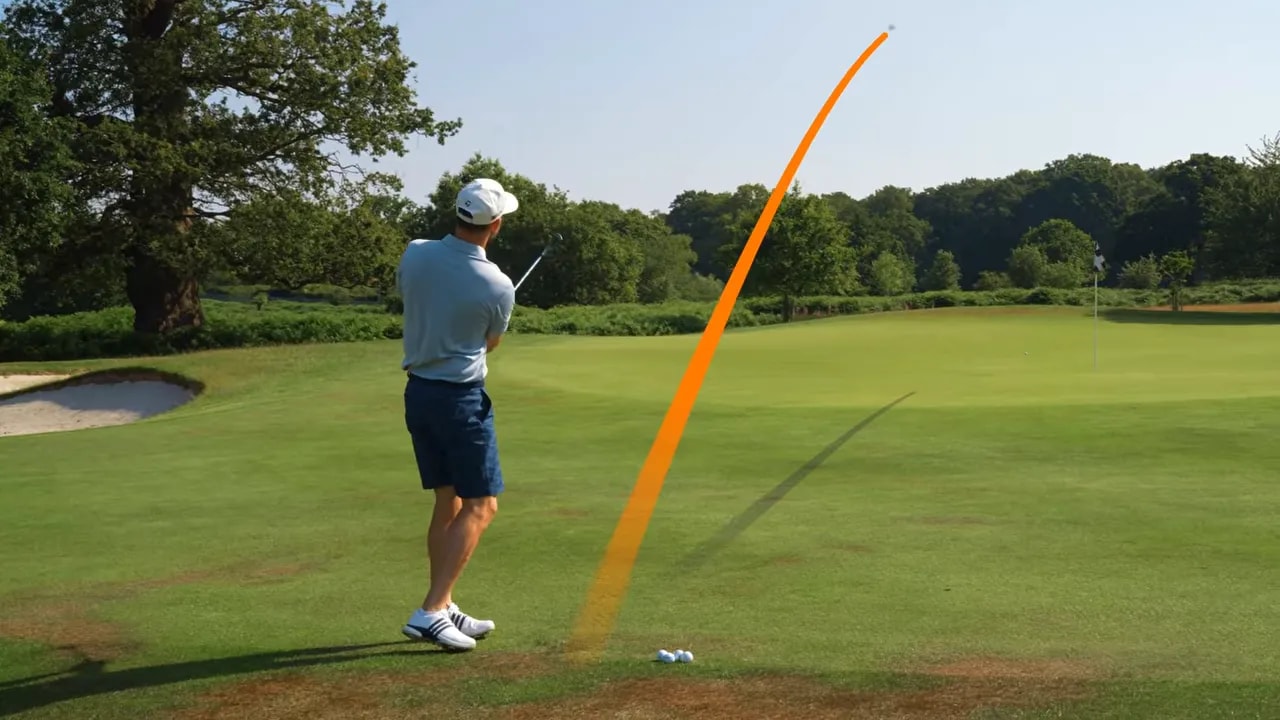
Think in degrees of adjustment rather than fixed categories. You may open the face slightly for a modest increase in height or open it more when the golf situation demands a softer landing.
Step 4: Change Release to Add or Remove Height
The second tool is your release, meaning how much your wrists work through the backswing and downswing. This tool can alter trajectory even if you make no change to the clubface or ball position.
For a lower shot, use very little wrist action. Your lead arm and club should remain close to a uniform line as your body provides most of the movement. Less wrist action lowers launch and produces a more penetrating ball flight.
For a higher shot, allow more wrist action going back and through. The clubhead can work more above your hands in the backswing, then release more through the bottom of the motion. This adds height and creates a softer landing.
The goal is not to force maximum wrist action. Like loft, release works on a spectrum:
- Minimal release: lower launch and more roll.
- Moderate release: a useful middle flight with controlled rollout.
- More release: higher launch and a softer landing.
This distinction is particularly useful because it lets you alter your golf shot without always changing clubs. Keep the baseline setup and motion recognizable, then modify the amount of release to suit the desired trajectory.
Step 5: Let the Golf Course Choose the Shot
The smartest short-game decision is usually dictated by the conditions, not by a preference for a particular shot. Before selecting a technique, assess the lie, how much green is available, the firmness of the surface, and how quickly the ball must stop.
Start by asking one practical question: Do you need the ball to travel mainly through the air, or can it land early and roll?
Situation 1: Plenty of green to work with
When the ball is only a few paces off the green and there is a large amount of putting surface available, the lower shot is often the safer option. You do not need unnecessary carry, so reduce loft by playing the ball farther back relative to your sternum. Combine that with minimal wrist action.
The ball should come out low, land early, and roll toward the hole. You still need to read the slope and judge rollout, but this is generally a lower-risk golf option than trying to float the ball high when height is not needed.
Situation 2: More rough, less green, and firm conditions
When you have more grass to carry before the green, limited room for rollout, or a firm summer surface, the ball needs extra height. A standard mid-flight shot may land and release too far.
There is no need to jump immediately to an extreme flop shot. Instead, make measured changes:
- Open the face moderately, around 20 to 25 degrees.
- Keep the ball beneath the sternum rather than pushing it too far forward.
- Allow a little more wrist set in the backswing.
- Use a slightly more active trail-hand release through the strike.
These combined adjustments produce a ball flight that is higher and softer without demanding the highest-risk version of the shot.
Step 6: Combine the Two Golf Tools With Purpose
The real value of this system comes from combining loft and release deliberately. You are not locked into only low, medium, and high shots. You can adjust each lever by a small or large amount to create a wide range of usable trajectories.
For example, a low-running golf shot uses both tools in the low direction: de-loft the club with more shaft lean and reduce the wrist release. A soft, higher shot uses both tools in the opposite direction: add loft by opening the face and allow more release.
Between those extremes are countless practical options. You might open the face only a little but retain a quiet release. Or keep the face neutral but add a small amount of wrist action. The best choice depends on the required carry, landing angle, and rollout.
Use this decision sequence before each short-game shot:
- Read the lie and identify obstacles or rough that must be carried.
- Estimate how much green is available for the ball to roll.
- Decide whether the shot should be low, medium, or higher.
- Choose how much loft change is needed.
- Choose how much release change is needed.
- Commit to the same core setup and motion principles.
This turns golf around the green from guesswork into a repeatable process. Rather than searching for a brand-new technique, you make a clear decision and use familiar tools to create the shot.
Step 7: Build Skill Before Taking It Onto the Golf Course
Practice should begin with clean, straightforward lies. Hit several baseline pitches first and focus on strike quality. Then use the alignment-stick drill to confirm that the club is not being pulled sharply inside during the takeaway.
Once the baseline is reliable, hit groups of shots using one wedge. Create low, medium, and high trajectories while keeping the distance similar where possible. This helps you recognize how each adjustment changes launch, landing, and rollout.
A useful progression is:
- Hit baseline shots with neutral loft and moderate release.
- Move the ball back relative to your sternum and reduce release for lower shots.
- Return the ball to neutral, open the face, and add release for higher shots.
- Vary the adjustments in smaller amounts to explore the spectrum between each shot.
- Practice from different lies and decide which option offers the simplest route to the target.
The objective is not to make every golf shot spectacular. It is to develop enough control to select the simplest, safest shot the conditions allow. When you can reliably change trajectory with one wedge, more up-and-down opportunities become available.
FAQ
Should you use a different wedge for every short golf shot?
No. Changing clubs can change loft, but one wedge can create multiple trajectories by changing effective loft and release. Using a single wedge during practice can help you understand those controls more clearly.
Where should the ball be positioned for a basic golf pitch?
Set the ball in line with your sternum or slightly behind it. Use your upper body as the reference rather than your feet, especially because the narrow stance and forward pressure can make foot-based references misleading.
How do you hit a low-running golf chip with a wedge?
Move your body slightly toward the target so the ball sits farther back relative to your sternum, creating more shaft lean. Then use very little wrist action. This reduces effective loft and launch, encouraging the ball to land early and roll.
How do you make a wedge shot land softer?
Keep the ball in a neutral position beneath your sternum, open the clubface before gripping it, and allow more wrist action and release through the shot. These adjustments add height and create a softer landing.
Why is a narrow stance useful in the golf short game?
A narrow stance supports touch and finesse, makes it easier to place pressure on the lead side, and helps distinguish a short-game motion from a full swing. It is the foundation of the baseline pitch setup.
0 Comments