


A more effortless golf swing starts with how your body moves through impact, not simply how quickly you swing your arms. If your hands race ahead while your lower body stays behind, you can end up flipping the club, hitting the ground too early, or catching the ball thin.
The key concept is to move your lower body toward the target while allowing your upper body to turn with the right amount of tilt. Your trail foot rolls inward, the gap between your knees narrows, and your lead side rises as you rotate through the golf ball.
These movements belong together. Rather than trying to control each one at full speed, you can use a series of rehearsals to learn the impact position, connect it to your swing, and eventually take one simple feel onto the golf course.
The directions below describe a right-handed golf swing. If you play left-handed, reverse the left and right references.
Table of Contents
- Step 1: Understand the Golf Impact Sequence
- Step 2: Rehearse Your Golf Impact Position Before Swinging
- Step 3: Separate Your Hip Shift from Your Head Movement
- Step 4: Repeat the Golf Movement Without Equipment
- Step 5: Check Your Shoulder Tilt at Golf Impact
- Step 6: Use the Window Feel on the Golf Course
- Step 7: Learn the Forward, Down, and Under Golf Move
- Step 8: Blend the Drills into a Smooth Golf Swing
Step 1: Understand the Golf Impact Sequence
Imagine a vertical finish line near the ball, extending upward through the impact area. Now consider whether your trail knee or your hands reach that line first during the downswing.
The useful feel is that your trail knee gets forward before your hands race through. This encourages your lower body to participate in the strike rather than leaving your arms to deliver the club on their own.
If your hands win that race while your legs remain passive, you may compensate by releasing the clubhead too early. That flipping action is associated with the inconsistent contact you are trying to eliminate: some golf shots strike the turf too soon, while others catch the ball thin.
This is not a cue to lunge your knee toward the target in isolation. You want coordinated footwork, leg movement, turning, and body tilt. The knee is a simple reference point for a much broader movement.
- Your lower body moves forward: Your trail knee works toward your lead knee.
- Your trail foot rolls inward: Your footwork supports the movement instead of remaining static.
- Your upper body retains tilt: Your head does not travel forward as much as your hips.
- Your body keeps turning: You move through the strike rather than stopping and flipping your hands.
Keep that overall picture in mind as you work through the drills. Your aim is better golf contact through improved coordination, not a forced position.
Step 2: Rehearse Your Golf Impact Position Before Swinging
You can make an unfamiliar impact position easier to learn by building it before you hit a ball. This rehearsal gives you time to notice your feet, knees, elbow, and body bends without the pressure of a moving club.
- Take your normal address position with an iron.
- Move the club forward along the ball line until the clubhead is outside your lead foot, roughly 10 inches forward in the demonstration.
- Let your trail knee move forward and down as your trail foot rolls onto its inside edge.
- Keep your trail elbow tucked underneath rather than allowing it to move outward.
- Maintain the body bends needed to reach the club toward the ground in that forward position.
- Hold the rehearsal for a count of three.
- Return to address, make your backswing, and hit a smooth golf shot.

The pause matters. During a normal golf swing, the impact area passes too quickly for you to study it. Holding the position lets you register how your trail foot, knee, and elbow work together.
Notice that reaching the forward position requires a change in your body shape. You do not simply shove the handle toward the target while remaining in your address posture. Your legs move, your body turns and tilts, and your trail side works down.
Rehearse the shape, return, then swing. You are giving yourself a clear reference for impact and slightly beyond it, rather than trying to stop your actual swing at the ball.
Step 3: Separate Your Hip Shift from Your Head Movement
One important mistake to recognize is moving your head forward whenever your hips move forward. If both travel toward the target together, your upper and lower body remain too closely stacked during the shift.
The movement you want is different: your lower body shifts toward the target while your upper body retains some backward tilt relative to it. Your lead shoulder works upward as you turn through the golf ball.
A resistance band makes this relationship easier to feel.
- Place one end of a fitness band securely under your lead foot.
- Hold the other end in your lead hand and take your golf address posture.
- Shift your lower body toward your lead side.
- As you shift, pull upward on the band.
- Feel your lead shoulder move farther away from your lead big toe while the gap between your knees narrows.
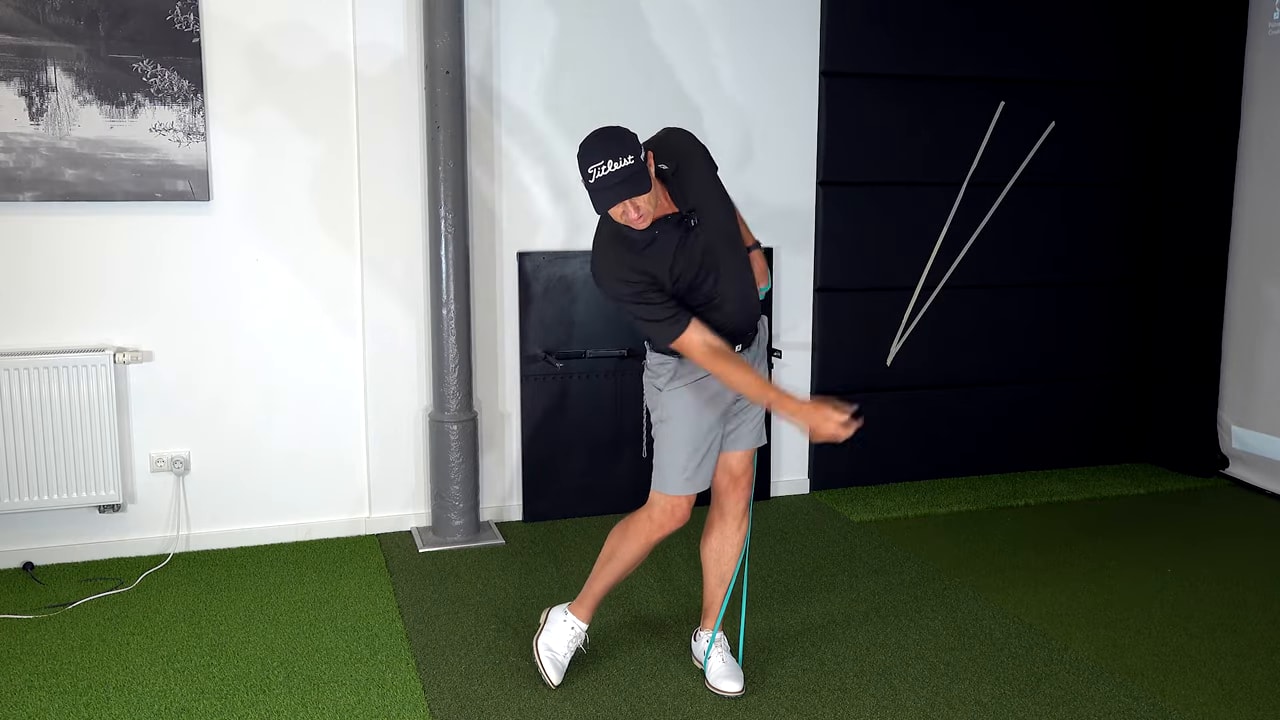
Think of the movement as shifting and lifting together. The upward pull helps you feel your lead side rising while your lower body continues forward and around.
This is different from sliding sideways with level shoulders. Staying too level can compromise how you deliver the club and make it harder to turn through the golf ball.
Use the band to understand the relationship, not to make the exercise strenuous. The important lesson is the direction of movement: your hips shift, your lead side rises, and your chest turns with tilt.
Step 4: Repeat the Golf Movement Without Equipment
If you do not have a resistance band, your hands can provide a simpler reference. This version is also useful when you want to rehearse the movement without setting anything up.
- Take your address posture with your hands resting outside your legs.
- Place your right hand near your right knee and your left hand near your left hip.
- Move your right knee inward and forward as your left hip works upward.
- Continue turning through into the early follow-through.
Your hands help you track two complementary actions: the trail side works down and inward while the lead side works up. You should feel a changing body angle, not a flat sideways slide.
Keep the movement connected. If you only push your right knee inward, you miss the turning and lifting component. If you only raise your left hip, you miss the forward movement supported by your trail foot.
This rehearsal links the earlier impact drill to the larger golf swing. You are learning how to arrive in the position through movement, rather than merely arranging your body into a pose.
Step 5: Check Your Shoulder Tilt at Golf Impact
Feels become more useful when you can compare them with what your swing actually does. A face-on recording lets you examine whether your shoulders remain too level through impact.
The instructional comparisons use a shoulder-line tilt of approximately 22 to 28 degrees as a PGA reference range for iron impact. Several professional examples sit around 24 degrees, while the amateur examples shown measure approximately 15 and 16 degrees.
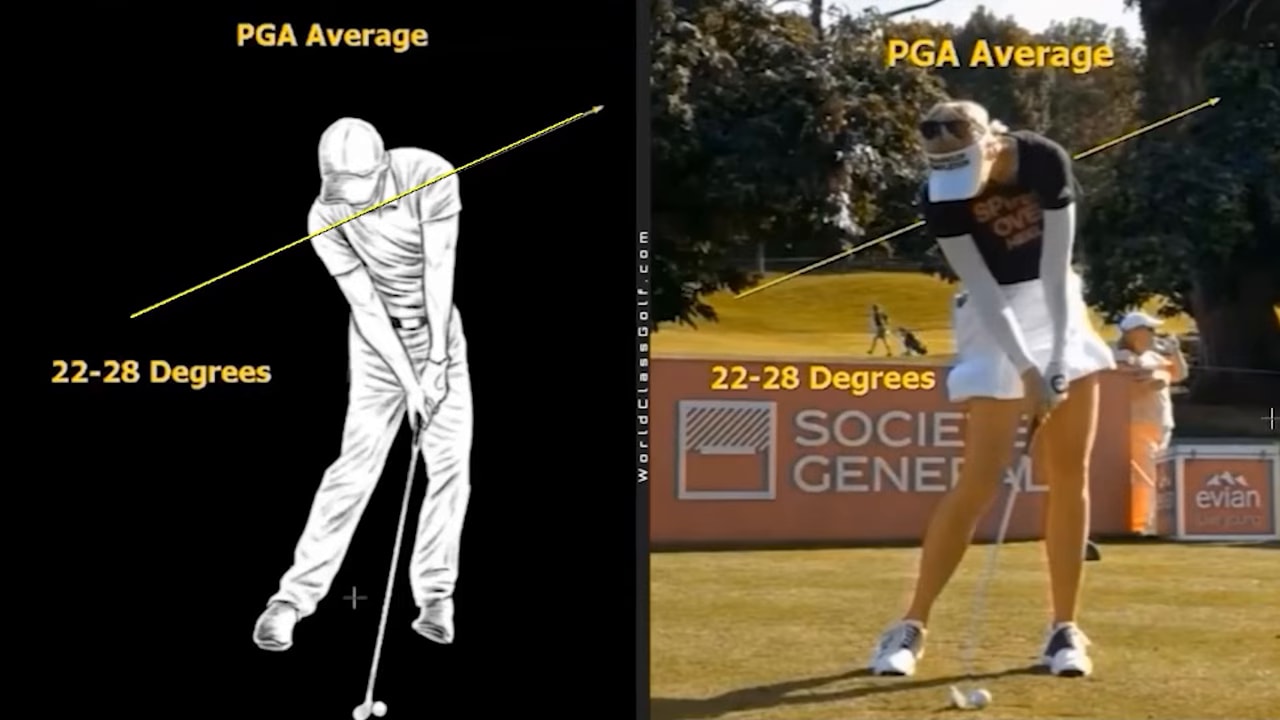
Use those numbers as a reference for understanding the movement, rather than treating one angle as a complete assessment of your golf swing. The main question is whether your upper body stays too level as your lower body moves forward.
To review your own movement:
- Record your iron swing from face-on.
- Pause near impact and draw a line through your shoulders.
- Check whether your lead shoulder is higher than your trail shoulder.
- Compare your head movement with your hip movement.
- Look for the trail knee moving forward and the knees narrowing as you turn.
You can use a mobile swing-analysis tool such as Swing Slap to draw reference lines. The purpose is to replace guessing with a visible checkpoint.
Do not respond to a level shoulder line by tilting your head alone. Return to the shift-and-lift rehearsal so that the change comes from your overall movement through the golf ball.
Step 6: Use the Window Feel on the Golf Course
Detailed drills help you learn, but you need something simpler when you play. One useful image is to imagine leaning your head out of an open window and looking around the corner.
Applied to your golf swing, that image encourages a tilted head and neck position as your body turns through impact. For a right-handed player, another description is imagining water dripping from your right ear.
The purpose is not to make a separate neck movement. You are using the image to encourage a coordinated shape: your right side stays lower while your left chest turns upward.
This can be particularly helpful when you try to hit the golf ball harder. If that extra effort makes your right side rise too early, the window feel gives you a different direction for your movement.
- Unhelpful feel: Your right side lifts as you throw effort at the ball.
- Useful feel: You turn through with your right side lower and your left chest higher.
The tilted turning motion is intended to support an inside delivery and a freer move through the strike. Keep it connected to your footwork and lower-body shift rather than exaggerating your head position.
Take one feel onto the golf course. You do not need to think about knee sequencing, shoulder measurements, elbow position, and foot pressure during the same shot. Use the drills to prepare, then choose the image that best helps you reproduce the movement.
Step 7: Learn the Forward, Down, and Under Golf Move
Alignment sticks provide a physical reference for combining the forward shift with the tilted turn. In this drill, two sticks are placed in the ground at roughly a 45-degree angle.
The setup uses an eight iron to establish approximately a club length of spacing from the sticks, with the lead foot aligned near the grip end of the club laid on the ground.
Begin with a slow rehearsal. Move through the impact area and reach toward the angled stick with your trail hand, following the pattern forward, down, and under.
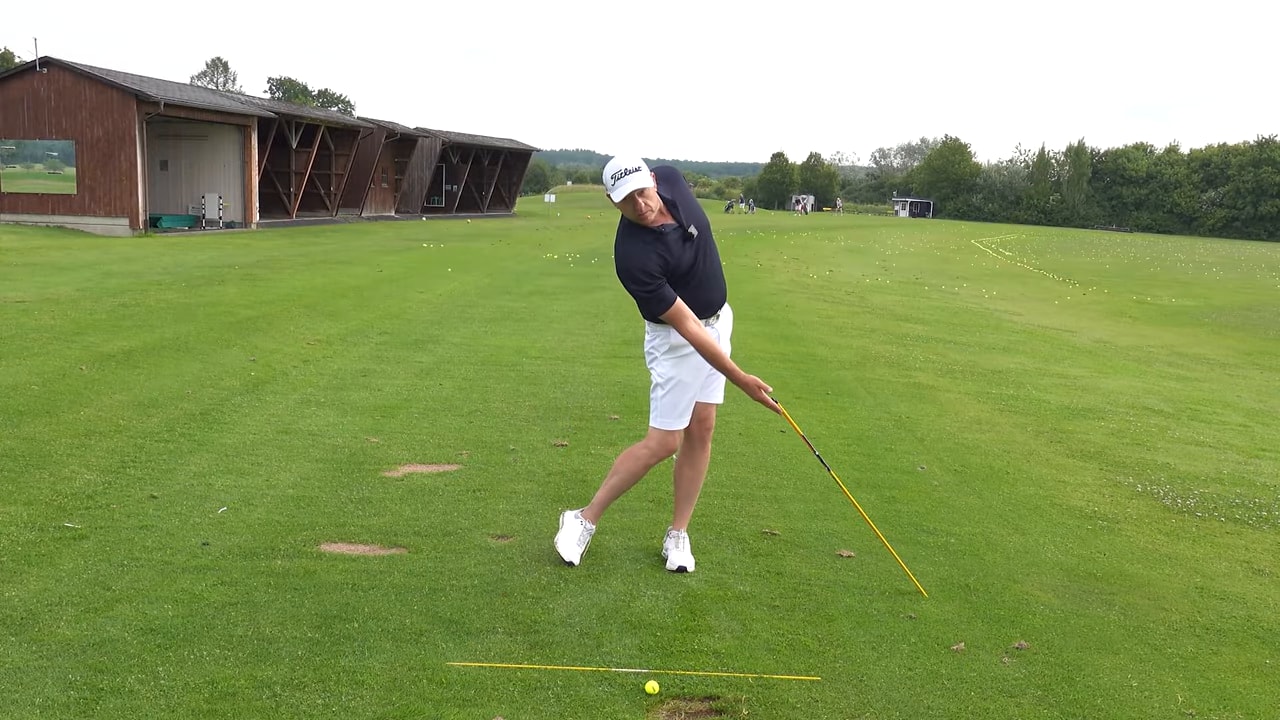
- Forward: Let your lower body move toward the target.
- Down: Allow your trail side to work lower rather than rising too early.
- Under: Turn through with your lead side higher and your upper body slightly held back relative to your hips.
The instruction uses approximately four to six inches of lateral shift as a tour reference, while noting that some players move more. You do not need to chase the largest possible shift. Use the drill to understand how forward motion combines with turning and tilt.
As you move, let the gap between your knees close. This provides a useful combined cue because it encourages your trail leg to move through while your body opens toward the target.
Check that you are not merely sliding forward at the same height. The defining feature is the changing body shape: your trail side works underneath as your lead side turns upward.
Once you understand the rehearsal, make smooth golf swings and allow the movement to continue into your finish. You are passing through the tilted position, not trying to remain bent over after the shot.
Step 8: Blend the Drills into a Smooth Golf Swing
The final task is to connect the impact feel to a backswing and a flowing finish. Start by winding your body back until your lead shoulder reaches behind the ball, or at least level with it.
If you are a senior golfer or have difficulty making that turn, include your hips in the backswing rather than trying to create the entire motion through your shoulders alone.
Then return through the golf ball with the movement you have rehearsed: your trail foot rolls inward, your trail knee moves through, and your body turns forward, down, and under.
You can organize your practice around this sequence:
- Find the position: Hold the forward impact rehearsal for three counts.
- Learn the movement: Use the band or hands-on-legs rehearsal to connect shifting with lifting.
- Add a reference: Use the angled-stick drill to feel your trail side working underneath.
- Hit smoothly: Return to address and make a flowing iron swing.
- Check your result: Review contact and your face-on impact position.
- Simplify for play: Keep one transferable thought, such as looking around the window.
Avoid making the drills a competition for speed. Their value comes from helping you recognize and repeat a better coordinated movement.
A more effortless golf swing is not an arm swing with a harder hit added at the bottom. It is a connected action in which your feet and legs support the forward shift, your upper body retains useful tilt, and your turn continues through the ball. Build that relationship slowly, then let one clear feel guide your swing.
0 Comments