
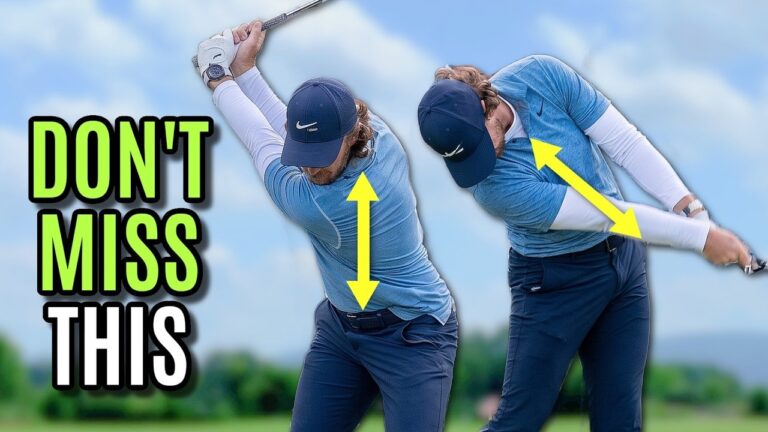

A reliable golf downswing transition is not simply about turning your hips as hard as possible. The key is learning how your body changes tilt from the top of the backswing into impact. Great ball strikers move from left side bend in the backswing to right side bend in the downswing, while their hips shift forward and rotate.
This combination helps you stay centered in the backswing, keep your head behind the ball through impact, and deliver the club from the inside rather than throwing it over the top. If you fight pulls, weak slices, steep approaches, or inconsistent contact, the missing piece may be a forward hip slide that works together with rotation.
Table of Contents
- Step 1: Understand the golf downswing transition goal
- Step 2: Build left side bend in the backswing
- Step 3: Avoid carrying left tilt into the downswing
- Step 4: Use a forward hip slide to create right side bend
- Step 5: Learn the belt buckle drill for the golf downswing transition
- Step 6: Add rotation so the golf hip slide does not become a sway
- Step 7: Keep your head back while your hips and weight move forward
- Step 8: Take the drill from rehearsal to full swings
- Step 9: Use your ball flight to check your progress
Step 1: Understand the golf downswing transition goal
For a right-handed golfer, your body begins in a typical iron setup with forward bend and a slight tilt away from the target. Your upper body is not perfectly vertical, but you are also not dramatically leaning away from the target.
As you make a backswing, your torso needs to develop left side bend, also called lead-side tilt. In practical terms, your lead shoulder moves down slightly as you turn. At the top of the swing, your upper body has a small amount of tilt toward the target.
Then, as you begin down, the pattern reverses. You need to move into right side bend, or trail-side tilt. At impact, your upper body is tilted more away from the target than it was at setup, even though your hips and pressure have moved forward.
This may sound contradictory at first. How can your weight and hips move toward the target while your upper body tilts away from it? The answer is that your lower body creates much of that upper-body tilt.
Your basic golf downswing transition sequence is:
- Start in forward bend with a slight tilt away from the target.
- Add left side bend during the backswing.
- Shift your hips forward as the downswing starts.
- Rotate your hips as they move forward.
- Allow the forward hip movement to create right side bend through impact.
Step 2: Build left side bend in the backswing
Left side bend in the backswing is important because it helps you preserve your posture and your distance from the ball. It also helps you turn without excessively swaying away from the target.
From a face-on angle, this lead-side tilt helps keep your body relatively centered. From a down-the-line angle, it helps maintain your forward bend so you do not stand up during the backswing.
Without enough left side bend, your shoulders can turn too flat. When that happens, your head tends to drift too far behind the ball and your torso can move farther away from the ground. You then face a difficult recovery: you must somehow return to the original ball position from a poorly organized top-of-swing position.
That often creates inconsistent low point control, thin shots, heavy shots, and timing-dependent contact. Rather than trying to force your head to stay still, organize your torso correctly as you turn.
A useful backswing feel is to let your lead shoulder work slightly down as your chest turns away from the target. This is not a dramatic crunch or a forced dip. It is a natural amount of lead-side bend that lets you turn while maintaining your athletic posture.
Step 3: Avoid carrying left tilt into the downswing
Left side bend is valuable in the backswing, but it is a problem if you keep it too long during the downswing. When your body remains in lead-side tilt as the club comes down, your head tends to move forward toward the target. At the same time, the club can steepen and approach from outside the target line.
That pattern commonly produces two frustrating outcomes:
- Pulls: The club travels too far left through impact and starts the ball left of your target.
- Weak slices: The steep, over-the-top delivery often leaves the face open relative to the path.
Many golfers attempt to cure these misses by manipulating their arms or dropping the club behind them. While arm action matters, it is easy to miss the underlying body motion. If your hips do not move forward correctly, it becomes far harder to create the right tilt that keeps the head back and supports an inside delivery.
The goal is not to freeze your torso in the backswing shape. Your golf downswing transition must include a clear change from lead-side tilt to trail-side tilt.
Step 4: Use a forward hip slide to create right side bend
The most commonly missed part of the transition is the forward movement of the hips. Many golfers have been told to turn their hips, so they try to make a pure rotational motion. Their pelvis spins, but it does not shift sufficiently toward the target.
A forward hip slide is not a mistake when it is paired with rotation. In fact, it is a major reason skilled players can have their hips well forward at impact while their upper body remains behind the ball.
Try this without a club. Stand in golf posture, then gently bump your belt buckle and lead hip toward the target. Your upper body will naturally tilt away from the target. That is the essential relationship.
Now add hip rotation to the movement. Instead of sliding your pelvis straight toward the target and leaving it there, shift it forward while opening your hips. This creates a balanced impact position, rather than a lateral sway.
Elite players such as Scottie Scheffler, Collin Morikawa, and Tommy Fleetwood all demonstrate this principle. Their hips move substantially forward from setup to impact, but their hips also turn. The forward shift and rotation are partners, not competing ideas.
For your own swing, think of the move this way:
- Not enough: Turn in place with little forward hip movement.
- Also not enough: Slide forward without opening the hips.
- Better: Shift your hips forward, then continue turning through the shot.
This is why a productive golf hip slide does not mean sliding forever. It is a brief, powerful move that places your lower body in a position where it can rotate and support the strike.
Step 5: Learn the belt buckle drill for the golf downswing transition
The belt buckle drill makes the hip shift visible and easier to feel. You need a seven iron or an alignment rod. Place the clubhead against your trail hip, with the grip end extending out to your lead side. You can also place an alignment rod through your belt loops if that is more comfortable.
The club acts as a pointer for your pelvis. It helps you see whether your hips are moving forward and rotating, rather than merely spinning in place.
Set the top-of-backswing reference point
Make a slow backswing rehearsal. As your hips turn away from the target, allow your belt buckle to move from the center of your stance to approximately inside your trail heel, trail ankle, or trail hip. This is a small movement, not a large sway off the ball.
Your trail hip should move only slightly farther from the target as you turn. Keep the lead shoulder down enough to maintain your backswing left side bend.
Move the belt buckle toward the lead hip
From the top, begin the transition by moving your belt buckle from inside the trail hip toward inside the lead hip. At the same time, feel your lead knee move from inside your lead ankle to slightly outside your lead ankle.
The club or alignment rod should move noticeably toward the target. This is the visual evidence of the forward hip shift. If the rod stays behind you or keeps pointing toward your trail side, you are likely turning in place rather than shifting forward.
Your three core drill checkpoints are:
- Belt buckle: Move it from inside your trail hip to inside your lead hip.
- Lead knee: Move it from inside the lead ankle to slightly outside the ankle.
- Club or rod: Move it forward toward the target.
Step 6: Add rotation so the golf hip slide does not become a sway
The belt buckle drill has one essential detail: the club or rod must move forward and left for a right-handed golfer. It cannot simply travel straight toward the target while remaining pointed toward the trail side.
As your hips shift forward, they must also rotate open. By the time your pelvis has moved forward, the end of the club should be working toward your lead heel line. This demonstrates that the hips have moved laterally and around.
This distinction protects you from two opposite errors:
- Pure spin: Your hips rotate but stay too far back, making it difficult to create enough right side bend.
- Pure slide: Your hips move forward but fail to open, causing your lower body to stall.
Practice the drill slowly before hitting shots. Make three or four rehearsals where you pause at the top, move your belt buckle toward the lead hip, let the lead knee move forward, and point the rod forward and left. Then remove the rod and make a relaxed swing with the same lower-body intention.
Do not try to force maximum movement immediately. The best feel is the one that improves your position and contact, not the most exaggerated motion you can make.
Step 7: Keep your head back while your hips and weight move forward
A strong impact position contains a valuable contrast. Your hips are forward of where they started, yet your head remains behind the ball. Your upper body has more trail-side tilt than it had at address.
This is the hallmark of a good golf downswing transition. You are not hanging back on your trail foot. Instead, your pelvis and pressure are moving forward while your upper body tilts away from the target in response.
A small amount of trail-side oblique crunch can help you recognize the correct tilt. For a right-handed golfer, this is a light sensation of shortening the right side of your torso. It should be subtle. Trying to manufacture a large side crunch with your upper body can create tension and interfere with rotation.
Most of your right side bend should come from the lower body moving correctly. In other words, do not try to hold your head back by leaning your shoulders away from the target. Shift and rotate your hips correctly, and the upper body will be far more likely to organize itself naturally.
At impact, check for these signs:
- Your hips are clearly farther toward the target than they were at setup.
- Your lead knee has moved forward and begun to straighten as you rotate.
- Your upper body is tilted away from the target.
- Your head is staying back over the ball rather than racing toward the target.
- Your club has room to approach from the inside rather than cutting across the ball.
Step 8: Take the drill from rehearsal to full swings
Once you can make the belt buckle drill consistently, use a simple progression. Do not rush from a new feel directly into full-speed swings. Build the movement in layers.
- Dry rehearsal: Use the club or alignment rod at your hips. Rehearse the backswing and transition without a ball.
- Slow motion swing: Remove the rod, make a slow backswing, and pause briefly at the top.
- Half swing shot: Hit a short shot while prioritizing belt buckle movement and a forward lead knee.
- Three-quarter swing: Keep the same lower-body sequence and allow the club to accelerate naturally.
- Full swing: Add speed only when your ball flight and contact remain controlled.
Your primary thought during the swing can stay simple: belt buckle from trail hip to lead hip, then forward and left. If you add the feeling of a small trail-side oblique crunch, it can reinforce the upper-body tilt without overwhelming you with too many swing thoughts.
Do not judge the movement only by how it feels. A forward hip shift can feel excessive when it is new, particularly if you have spent years turning in place. Use ball flight, strike quality, and occasional swing video to determine whether the change is producing the intended result.
Step 9: Use your ball flight to check your progress
As your golf downswing transition improves, you should have a better chance of producing solid contact with a more inside approach. You may also see fewer steep pulls and weak slices caused by carrying left side bend into the downswing.
However, ball flight is influenced by clubface position as well as club path. A forward hip shift does not automatically correct every face-control issue. Its purpose is to improve the body conditions that make a functional delivery easier to repeat.
If you still hit pulls, slices, or poor strikes after rehearsing the drill, return to the basics:
- Make sure you have left side bend in the backswing rather than a flat shoulder turn.
- Confirm that your belt buckle actually moves forward in transition.
- Ensure that your hips continue to rotate as they shift.
- Keep the trail-side crunch small instead of forcing a large upper-body lean.
- Use slow rehearsals until the movement becomes clearer and more comfortable.
The secret is not a complicated arm move. It is a coordinated body motion: left tilt going back, then hips shifting and turning forward to create right tilt coming down. When you understand that relationship, the transition becomes much easier to practice with purpose.
Golf Downswing Transition FAQ
Should you slide your hips in the golf swing?
Yes. A forward hip slide is beneficial when it is combined with hip rotation. Your hips should shift toward the target in transition, then continue rotating through impact.
Why do I keep coming over the top?
One common reason is keeping too much left side bend into the downswing. When your hips fail to move forward, your head can move toward the target and the club can steepen over the top.
What is the best feel for a golf downswing transition?
Feel your belt buckle move from inside your trail hip to inside your lead hip, your lead knee move slightly outside your lead ankle, and your hips move forward and left as they rotate.
Should my head stay behind the ball at impact?
For a typical iron swing, your head should remain back over the ball as your hips move forward. This position comes from the lower body shifting and rotating, which creates trail-side tilt in your upper body.
0 Comments