
If your golf driver swing feels rushed, inconsistent, or too slidey in transition, a simpler sequence can help. One of the easiest ways to clean up your golf weight shift is to think of the downswing like an ignition button. You load, you move into the lead side, and only then do you unwind.
This approach is especially useful in golf if you tend to sway off the ball in the backswing or spin your shoulders open too early in the downswing. The goal is not more motion. The goal is better sequence with fewer moving parts.
Used correctly, the bump turn, bump turn pattern can make your golf swing feel more centered, more athletic, and more reliable with the driver.
Table of Contents
- Step 1: Understand what this golf move is trying to fix
- Step 2: Learn the bump turn, bump turn golf sequence
- Step 3: Use the ignition feel in your golf downswing
- Step 4: Keep your golf backswing centered instead of swaying
- Step 5: Start the downswing in golf without throwing your shoulders
- Step 6: Practice this golf move at home or on the range
- Step 7: Use simple training aids for golf feedback
- Step 8: Match this golf sequence to the driver
- Step 9: Avoid the most common golf mistakes with this drill
- Step 10: Use a quick golf checklist before every practice session
- Step 11: Know what success should feel like in golf
- Step 12: Bring this golf move onto the course
- FAQ about golf weight shift and transition
- Final takeaway on this golf sequence
Step 1: Understand what this golf move is trying to fix
Many golf players struggle with one of two timing problems:
They sway too much to the trail side in the backswing.
They unwind the shoulders too early in the downswing.
Both problems can make your golf driver contact feel weak or inconsistent. If you drift too far away from the target going back, it becomes harder to get back to the lead side in time. If your shoulders start first coming down, the swing often gets steep, rushed, or out of sequence.
The fix is a cleaner order of motion. In simple terms:
Bump into the trail side pressure in the backswing.
Turn to complete the backswing without swaying.
Bump into the lead side before the shoulders fire.
Turn through the shot.
That is the whole golf concept.
Step 2: Learn the bump turn, bump turn golf sequence
The phrase bump turn, bump turn is a simple way to organize your golf motion.
Here is what each part means:
Backswing bump
As you start back, feel pressure go into your trail foot. For a right handed golf player, that means the right foot. This is a pressure move, not a big body sway.
Backswing turn
Once you feel that trail side pressure, turn your body to the top. The important detail is that your body turns without letting your hips and torso drift excessively away from the target.
Downswing bump
Before your shoulders unwind, shift pressure into the lead side. For a right handed golf player, that means the left side. This is the ignition piece. It starts the downswing sequence.
Downswing turn
After you are moving into the lead side, unwind through the shot. This helps your golf swing happen in the right order instead of feeling like a frantic spin from the top.

Step 3: Use the ignition feel in your golf downswing
The ignition idea is a great feel for golf players who start down with the upper body. Imagine you must press a start button before the swing can fire.
In practical terms, that means this:
Reach the top of your swing.
Keep your shoulders and arms from immediately unwinding.
Shift into the lead side first.
Then rotate through.
This can be a game changer in golf because it gives you a clear transition checkpoint. Instead of trying to time everything at once, you give the body one job first: move pressure forward.
If you often feel like your driver swing starts with the chest and shoulders, this cue can help your sequence feel calmer and more powerful.
Step 4: Keep your golf backswing centered instead of swaying
A common mistake in golf is confusing pressure shift with lateral sway. You do want pressure to move into the trail foot in the backswing. You do not want your whole body sliding well off the ball.
A centered backswing usually feels like this:
Pressure increases into the trail foot.
Your chest and torso turn.
Your lower body stays stable enough that you do not drift excessively.
If you sway, you create extra recovery work in the downswing. In golf, extra moving parts usually mean extra timing issues.
A helpful checkpoint is to make your backswing turn while feeling loaded into the trail foot, but without letting your body crash into a barrier behind you. That encourages a turn instead of a slide.

Step 5: Start the downswing in golf without throwing your shoulders
This is where many golf players lose the sequence. From the top, the instinct is often to hit from the shoulders and arms. That usually causes a rushed transition.
Instead, rehearse this order:
Complete your backswing turn.
Pause for a split second in practice swings.
Move pressure into your lead side.
Allow the shoulders to unwind after that shift has started.
In golf, this creates a much better chain reaction. The lower body and pressure shift help support rotation, rather than forcing the upper body to do everything on its own.
If you do this correctly, the swing often feels less hurried even though the club can move faster through impact.
Step 6: Practice this golf move at home or on the range
You do not need a complicated routine to train this golf pattern. A few slow rehearsals every day can help.
Simple home drill
Set up in your normal golf posture.
Cross your arms over your chest.
Make a backswing by pressing into the trail foot, then turning.
From the top, shift into the lead side before you unwind.
Repeat slowly for 10 to 20 reps.
Range version
Hit short tee shots with a driver or fairway wood.
Make half speed swings.
Feel trail foot pressure going back.
Feel lead side pressure starting down.
Only add speed after the sequence feels natural.
For many golf players, going too fast too soon hides the problem. Slow reps make the order easier to feel.
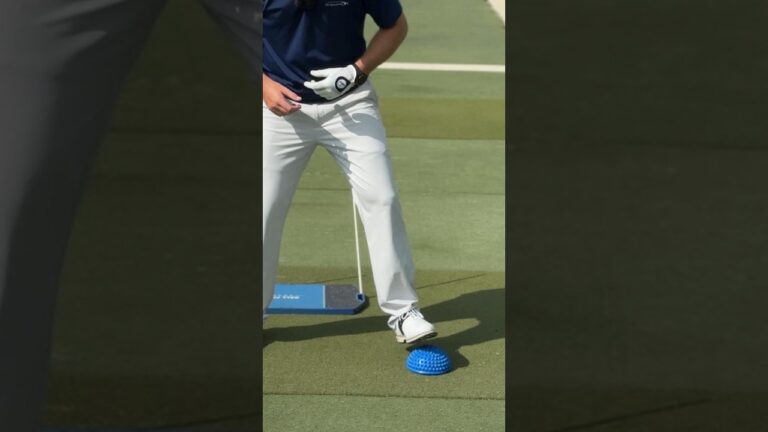
Step 7: Use simple training aids for golf feedback
Feedback can make this golf move easier to learn. The source material demonstrates a board with foot pressure cues and vertical sticks that create clear boundaries. The purpose is straightforward:
A pressure point under the trail foot teaches you to push down in the backswing.
A rear boundary helps you avoid swaying.
A front boundary gives you a target for shifting into the lead side before rotation.
You can create a similar golf practice station with alignment sticks and careful rehearsal, as long as safety comes first and you leave enough room to move freely.

Step 8: Match this golf sequence to the driver
This move is especially useful with the driver because driver golf swings often expose sequencing problems. When your weight shift and rotation are mistimed, the big stick tends to let you know quickly.
Good driver golf swings often have these traits:
A centered load into the trail side
A clear move into the lead side before the chest opens fully
Less wasted motion
A balanced finish
If your driver feels wild, start with sequence rather than chasing dozens of hand or club positions. In golf, better order often produces better motion.
Step 9: Avoid the most common golf mistakes with this drill
Even a simple golf cue can go wrong if the feel is exaggerated. Here are the main mistakes to avoid.
Turning the bump into a slide
The bump is a pressure shift, not a big lunge. If your whole body drifts too far, you may create the same problem you are trying to fix.
Spinning the shoulders from the top
If the shoulders start first, the ignition move never happens. Rehearse the transition slowly until the lead side shift comes before the unwind.
Forgetting to turn
Some golf players hear bump and only move laterally. The pattern is not bump, bump. It is bump turn, bump turn.
Adding speed before owning the feel
Sequence changes in golf need slow repetition first. Build the pattern, then build speed.
Using only your feet and ignoring your upper body position
The motion is not just about foot pressure. Your upper body also needs to get into a better position over the lead side before the shoulders fully unwind.
Step 10: Use a quick golf checklist before every practice session
If you want a simple golf reminder, use this checklist:
Backswing: pressure into trail foot
Backswing: turn without sway
Transition: shift into lead side first
Downswing: unwind after the shift starts
Finish: balanced and fully turned through
This kind of short checklist works well in golf because it keeps your mind on the motion that matters most.
Step 11: Know what success should feel like in golf
When this move starts working, your golf swing will usually feel:
More organized in transition
Less rushed from the top
More stable in the backswing
More powerful through the ball without forcing it
You may also notice that your driver swing feels simpler. That matters. Simpler is often better in golf, especially under pressure on the course.
Step 12: Bring this golf move onto the course
On the course, you do not want a long mechanical thought list. Pick one short golf cue from this lesson and commit to it.
The best on-course cues are usually:
Press, turn going back
Bump, turn starting down
Ignition first in transition
If you can keep the cue athletic and simple, you have a better chance of repeating it when the shot matters.
FAQ about golf weight shift and transition
How do you shift weight properly in golf?
Proper golf weight shift is a sequence of pressure and rotation. You load into the trail side in the backswing without swaying, then move into the lead side before fully unwinding in the downswing.
What does bump turn, bump turn mean in golf?
In golf, bump turn, bump turn means you first shift pressure, then rotate. You do it going back into the trail side and again starting down into the lead side.
Why do I slide in my golf backswing?
You may be trying to create a weight shift by moving your whole body laterally instead of creating pressure into the trail foot and turning. In golf, pressure shift and sway are not the same thing.
Should the shoulders start the downswing in golf?
Usually no. For many golf players, starting with the shoulders causes a rushed transition. A better sequence is to move into the lead side first, then let the shoulders unwind.
Is this golf move only for the driver?
The sequence is valuable throughout golf, but it is especially helpful with the driver because timing issues are easier to notice on full swings.
Final takeaway on this golf sequence
If your golf swing feels inconsistent, do not assume you need more complexity. Often you need a better order. The bump turn, bump turn pattern gives you a simple framework for pressure shift and rotation.
Load into the trail side. Turn without sway. Move into the lead side before the shoulders fire. Then unwind through the shot.
That single idea can make your golf swing feel more solid, especially with the driver.
0 Comments