
The “hip bump” is a simple checkpoint many golfers learn early, but the way it is applied often gets misunderstood. A common result is inconsistent contact, poor ball-first strike, or a swing that relies on shifting and manipulating instead of rotation.
This guide answers the key question behind your search: Is the hip bump relevant for just irons or just the driver? The practical answer is that a hip bump concept can apply across the bag, but it is not identical in feel, setup, and intent between irons and driver. You should use the same underlying idea while adjusting what the bump is supporting.
Focus keyphrase: hip bump for irons and driver
Table of Contents
- What is a hip bump in the first place?
- Step 1: Confirm whether the hip bump for irons and driver is “the same”
- Step 2: Use the iron version of the hip bump for better contact
- Step 3: Apply the driver hip bump with “bump and shift” intent
- Step 4: Fix the two biggest misconceptions that ruin hip bump for irons and driver
- Step 5: Use alignment and pressure checkpoints to self-diagnose
- Common mistakes to avoid
- How to practice the hip bump for irons and driver without getting worse
- Is the hip bump relevant for just irons or just the driver?
- Does a hip bump cause you to hit up on the golf ball with irons?
- Does a hip bump help you hit down on the golf ball?
- What is the best way to tell if the hip bump is helping?
- Takeaway: Use the hip bump to support rotation, not to replace it
What is a hip bump in the first place?
A hip bump is a small, controlled forward move of your pelvis during the transition into impact. The purpose is not to “add power” by sliding sideways. The purpose is to help your body organize around an efficient rotation pattern.
When done correctly, the bump supports:
- Centered turning so your chest and arms can rotate through with less drift.
- Pressure shifting from trail side toward lead side through rotation.
- Better body coverage so your torso can stay “on top” of your legs approaching impact.
- Ball-first strike more often, especially with irons.
Think of it as a brace and sequencing checkpoint. Your swing still needs to rotate and “cover” the ball. The hip bump helps make that easier.
Step 1: Confirm whether the hip bump for irons and driver is “the same”
It is tempting to treat the hip bump like a universal move. That is often what causes the problem suggested by the title.
Same principle, different job. In both irons and driver, the pelvis movement aims to keep you organized for rotation. But the swing intent and the setup geometry differ between club types.
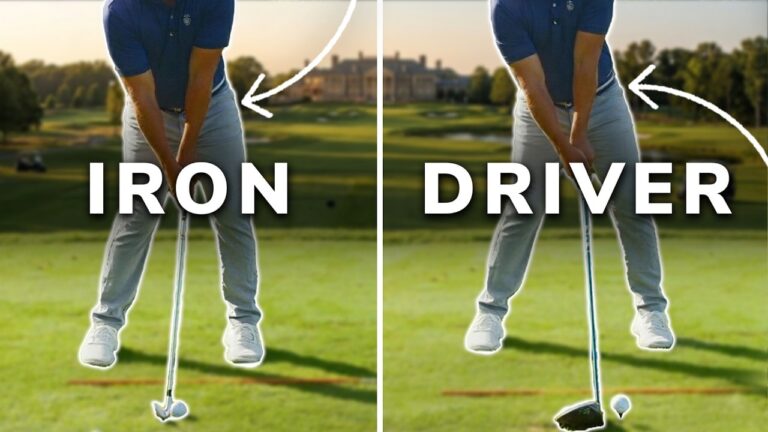
Irons: your bump supports an on-top-of-the-ball pattern
With irons, your goal is typically:
- Rotate without swaying away from the ball
- Get your lead-side support so you can sweep with the torso while staying stable
- Let the club interact with the ground after the ball (ball first, divot later)
Driver: your bump supports a turn that can still hit up
With driver, ball position and stance width change, and the launch window demands a different strike. Your hip bump still helps you rotate efficiently, but the “direction” of ball flight and contact quality are managed through setup and swing plane, not by forcing the same impact pattern you use with an iron.
Step 2: Use the iron version of the hip bump for better contact
For irons, the hip bump is usually most effective when you keep your upper body posture stable while shifting your pelvis forward slightly. This helps you avoid a common error: letting the spine follow the hips into a slide that ruins rotation.
Key checkpoints for the iron hip bump
- Upper body stays quiet: your sternum and shoulder plane do not “back up” during the bump.
- Pelvis turns with the rotation: the bump should feel like you create a bracing platform to rotate around.
- No sway to get there: the lead side brace comes from proper sequencing, not from moving your head off the ball.
- Trail hip to trail foot organization: your bump helps the outside of the trail hip relate to the inside of the trail foot so your turn can happen from the ground up.
Two simple drill frameworks (without “memorizing a move”)
Drill A: Step-to-step alignment to check the torso cover
- Set up an iron as you normally would.
- Place a club or alignment object on the ground to represent your spine angle line.
- Make a controlled backswing and return to the position where your lead hip starts to move back toward impact.
- Focus on the sensation of your right shoulder firing through (for a right-handed golfer) while the upper body stays over your stable base.
- Repeat until your impact torso position looks consistent.
Drill B: “Let rotation move you” rather than “push the hips”
- Start with an easy half swing.
- Initiate your transition with the hip bump feel, but do not try to increase it.
- Let your rotation shift pressure as you approach impact.
- Only add range if ball contact improves.
Why this works: Most inconsistent iron strikes come from shifting and reverse pivot patterns that cause you to spin or cast instead of covering through. A correct hip bump for irons supports a “body on top of legs” sequence that helps ball-first contact.
Step 3: Apply the driver hip bump with “bump and shift” intent
Driver requires slightly different geometry. If you use the same hip bump for irons and driver like a copy-and-paste move, you may lose your ability to hit up or may block the face timing because the body is not positioned correctly relative to the ball.
What changes with driver setup
- Ball position: typically more forward, inside the lead foot line relative to your irons.
- Stance width: often wider or narrower depending on your body and driver length, but the feet still need to support a stable turn.
- Pressure feel: you want to load into your trail side and then rotate and return over your lead side without drifting offline.
Driver hip bump feel: slightly different than the iron feel
For driver, the hip bump concept often pairs with a small “bump and shift” idea: pelvis movement plus a controlled posture change that supports a higher launch and more up-through impact.
The practical cue is this: keep your upper body stable enough to rotate, but allow slight changes in spine angle and head positioning consistent with a driver strike. You are still building a brace. You are not building a slide.
Step 4: Fix the two biggest misconceptions that ruin hip bump for irons and driver
Misconception 1: A hip bump is supposed to promote hitting up with irons
Irons do not generally need a strong “hit up” motion. Most golfers need enough angle and rotation to strike down after the ball is contacted first. A properly timed hip bump for irons helps you cover and rotate so the club can find the low point later, not so you steer your swing into a driver-like strike pattern.
Misconception 2: Lateral movement transfers weight more efficiently than rotation
If you sway or slide during the bump, you often cut your rotation short. The body then tries to compensate with the arms and hands to square the face at impact. That is when flips, early release, and inconsistent strike patterns appear.
Rule of thumb: If your lower body move feels like it happens before you rotate, it is often a sign the swing is being manipulated rather than sequenced.
Step 5: Use alignment and pressure checkpoints to self-diagnose
You can validate whether your hip bump is helping by checking a few repeatable swing behaviors.
Checkpoint 1: Spine and pelvis relationship
When the hips bump forward, your spine does not need to “chase” the pelvis into a reverse pivot slide. The goal is a braced pelvis that allows rotation around your spine angle, not a spine that tips or travels forward with the hips.
Checkpoint 2: Lead leg support (posting without forcing it)
A common outcome of a correct hip bump is that your lead leg posts up naturally during the turn. If you feel you must force the lead leg outward, or if your head moves away from your original posture, your sequence may be off.
Checkpoint 3: Rotation from the top moves you “half a hip width”
Many golfers overwork lateral motion and lose rotation. A better goal is small, efficient movement as a result of turning. Your lead femur should travel to a position that supports coverage, not to a position that stops your torso from rotating.
Common mistakes to avoid
- Reverse pivot: the spine follows the hips forward, then the lower body shoots and the upper body lags behind.
- Moving off the ball: hips and head drift together early, causing the club to miss the right ground interaction point.
- Changing shoulder plane during the bump: upper body “backs up” while the pelvis moves, making rotation inconsistent.
- Overbumping: adding too much forward pelvis shift to “create power,” which often blocks rotation and increases hand timing demands.
- Copying the iron pattern to driver: using the same strike intent and contact feel across club types, ignoring that ball position and posture requirements differ.
How to practice the hip bump for irons and driver without getting worse
If you feel you are “using the same hip bump” in both clubs and contact is inconsistent, use a short practice structure so you can isolate the fix.
Step-by-step practice plan
- Pick one club first: start with a mid iron. You are building the sequencing and coverage pattern.
- Limit the range: use half swings until contact quality improves (ball-first and consistent divot).
- Add one checkpoint cue at a time: upper body quiet, pelvis braced, then rotate and cover.
- Move to driver only after iron contact stabilizes: adjust setup for ball position and allow the small “bump and shift” feel consistent with hitting up.
- Track outcomes: for irons track strike location and divot quality, for driver track launch and face timing (start direction and ball flight).
Stop rule: If you notice more thin shots, fat shots, blocks, or hooks after increasing the hip bump amount, reduce it. More is not better with this move.
Is the hip bump relevant for just irons or just the driver?
It is relevant for both. The key is that the hip bump for irons and driver is not a single identical movement. You keep the same underlying sequencing goal: brace and rotation efficiency. Then you adjust setup and posture intent to match the strike requirements of each club.
Does a hip bump cause you to hit up on the golf ball with irons?
A properly timed hip bump does not automatically mean you will hit up with irons. With irons, the goal is usually ball-first then divot. The bump supports rotation and torso coverage so the club can interact correctly with the turf after contact.
Does a hip bump help you hit down on the golf ball?
It can, indirectly. When the bump helps you rotate and cover the ball, the club is more likely to reach its correct low-point position relative to the ball. That is how you get more consistent “ball first, divot later” with irons.
What is the best way to tell if the hip bump is helping?
You should see fewer strike pattern swings and better repeatability. With irons, that typically means more consistent divots and fewer thin or fat contacts. With driver, that typically means more consistent start direction and more stable launch without needing extreme hand compensation.
Takeaway: Use the hip bump to support rotation, not to replace it
The real problem is not that you use a hip bump. The problem is using the same hip bump in the same way for every club without accounting for setup and strike intent. When the pelvis bracing helps you rotate and cover through, the result is improved efficiency and better contact.
If you want one guiding idea, make it this: stay centered, rotate around your spine angle, and let the bump create a platform for coverage. Then adjust the driver version through ball position, stance, and a slight “bump and shift” feel that matches hitting up.
0 Comments