
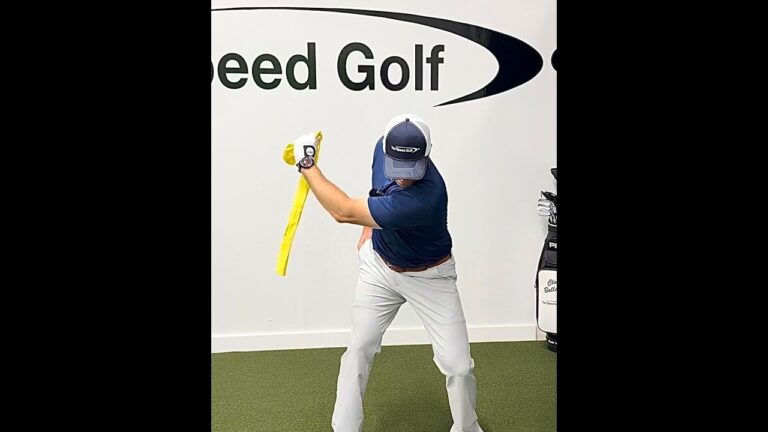

If your golf downswing feels dominated by your arms, your pressure shift may be arriving too late. The answer is not necessarily to pull harder or turn faster. Instead, practice getting pressure into the appropriate foot before the next part of your swing takes over.
The bump-and-turn drill gives you a simple sequence: a small pressure move into your trail foot, a backswing turn, a small pressure move into your lead foot with a slight squat, and then a turn through. Tiger Woods’ swing from 2000 provides the model for this practice feel.
Your goal is not to copy every detail of Tiger’s golf swing. It is to learn a useful order of movement without turning a small pressure shift into a large sideways slide.
Table of Contents
- Step 1: Understand the Golf Weight Shift You Are Practicing
- Step 2: Set Up a Clear Golf Practice Station
- Step 3: Begin With a Small Trail-Foot Press
- Step 4: Turn Back Without Continuing to Sway
- Step 5: Shift Into Your Lead Foot Before Your Arms Start Down
- Step 6: Turn Through and Let Your Arms Follow
- Step 7: Blend the Golf Drill Into Three Slow Practice Swings
- Step 8: Check the Mistakes That Change the Drill
Step 1: Understand the Golf Weight Shift You Are Practicing
For this drill, think of a “bump” as a small movement that helps you press into one foot. Think of a “turn” as the rotation that follows that pressure move. The distinction matters because shifting and swinging at exactly the same time can leave you feeling as though your arms are doing all the work.
The four-part sequence is:
- Trail-side pressure: Gently press into your trail foot before starting back.
- Backswing rotation: Turn back without continuing to slide away from the target.
- Lead-side pressure: Feel a slight squat and move pressure toward your lead foot before your arms start down.
- Through-swing rotation: Turn through and allow your arms to follow.
If you play right-handed, your trail foot is your right foot and your lead foot is your left. If you play left-handed, reverse those directions. Using lead and trail rather than left and right keeps the golf drill easy to apply either way.
Why the order matters
You may already feel your weight move back during the backswing and forward during the downswing. This exercise asks a more specific question: Does the pressure move start early enough to lead the swinging motion?
Rather than waiting for your hands to pull down and then trying to catch up with your lower body, rehearse the lead-foot pressure move first. That is the central lesson. You are practicing timing, not simply trying to move farther toward the target.
Step 2: Set Up a Clear Golf Practice Station
Start without a ball so you can concentrate on the sequence rather than the result of a shot. Take your normal golf setup and make sure you have enough room for a slow rehearsal.
You can begin without a club, then add one once the foot pressure changes feel understandable. This makes it easier to separate what your feet and legs are doing from what your hands want to do.
Using a Ball First Board
The Ball First Board provides a practice platform with upright reference sticks beside your stance. In this drill, those references help you distinguish a controlled pressure move from excessive sideways movement.
The trail-side stick is especially useful during the backswing. Your task is to press into the trail foot and rotate while keeping a gap between your trail leg and that reference. You are not trying to bump your body into it.
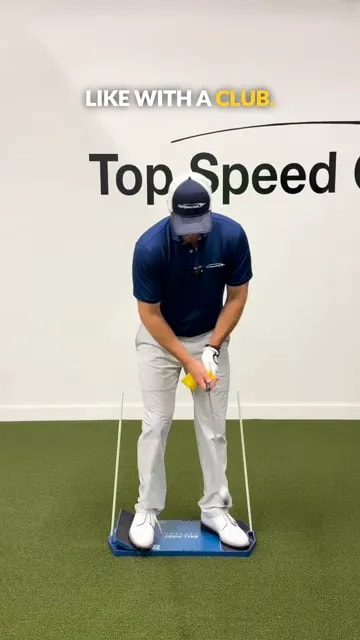
You do not need to begin by hitting golf balls on a training aid. First learn what you are trying to feel. The board is a reference for the movement, not a reason to exaggerate it.
Choose one checkpoint at a time
During your first rehearsals, focus on the small trail-foot press. Next, check that you can turn without swaying. Only then add the lead-foot pressure move. Trying to monitor every joint at once can make a simple golf drill unnecessarily complicated.
Step 3: Begin With a Small Trail-Foot Press
Before taking the club back, gently increase pressure beneath your trail foot. Imagine pressing a pedal under that foot. The action should feel deliberate but small.
A useful scale is a tiny bump, not a lunge. You should not need to throw your upper body sideways to recognize that pressure has increased under your trail foot.
Rehearse it in this order:
- Settle into your golf address position.
- Keep your arms quiet while you make a small trail-side pressure move.
- Notice the increased pressure under your trail foot.
- Allow that press to lead into your backswing turn.
At first, separating the press from the turn can make the sequence easier to learn. As you become comfortable, blend the two actions into a flowing start rather than keeping an obvious pause between them.
Avoid confusing pressure with distance
The point is not to see how far you can shift away from the target. If the initial bump carries your trail leg into the reference stick, make it smaller.
You want a noticeable change under your foot, not a dramatic change in your sideways position. That distinction keeps the first part of the drill useful rather than turning it into a sway rehearsal.
Step 4: Turn Back Without Continuing to Sway
Once you have pressed into the trail foot, rotate into your backswing. The first pressure move has already happened, so you do not need to keep drifting sideways as the club travels back.
This is where the trail-side reference earns its place. It gives you something concrete to check: can you turn while preserving space between your trail leg and the stick?
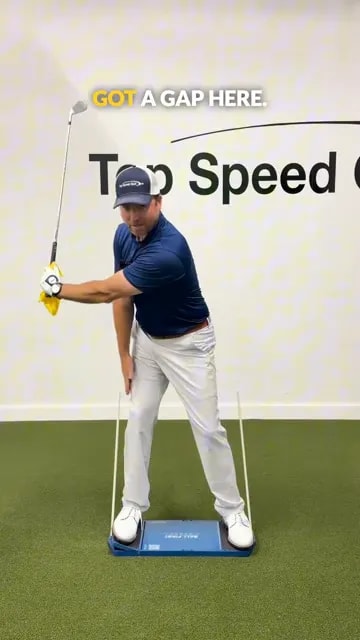
Use a slow, manageable backswing rather than immediately reaching for your longest motion. You are learning the relationship between pressure and rotation, not testing how much backswing you can make.
Your backswing checklist
- You felt the trail-foot press before the club moved back.
- Your body turned rather than continuing to slide sideways.
- Your trail leg stayed clear of the reference stick.
- You remained able to make the next pressure move toward your lead foot.
If you lose the sequence, return to address and repeat the small press followed by the turn. There is no need to rescue a poor rehearsal by rushing into a full golf swing.
Step 5: Shift Into Your Lead Foot Before Your Arms Start Down
The transition is the key part of this golf weight shift drill. From your backswing position, feel a slight squat while moving pressure toward your lead foot. For a right-handed player, the practice feel is gently down and left.
These are not two unrelated instructions. The small lowering action and the lead-side move belong together. Squatting straight down without moving pressure toward the lead foot misses the intended sequence.
Rehearse the transition slowly:
- Reach a comfortable backswing position.
- Keep your arms from immediately pulling the club down.
- Feel a small amount of additional knee flex as you move toward your lead side.
- Recognize pressure building under your lead foot.
- Then turn through.
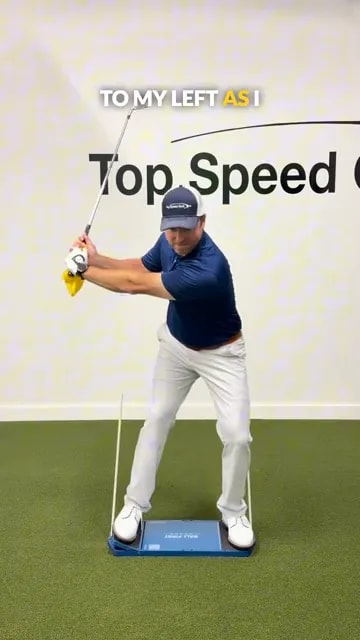
Use your lead knee as a visual checkpoint
Pay attention to your lead knee during this rehearsal. Its movement can help you recognize the combination of slight lowering and lead-side pressure.
Do not turn this into an effort to force your knee into a particular angle. The useful question is whether your lower body begins the transition before your hands rush downward.
Keep the squat modest
You are not performing a deep exercise squat. You are adding a small lowering feel as part of a golf transition. If the squat becomes the main event, reduce it and return your attention to pressure entering the lead foot.
Likewise, the downhill image is only a movement cue. You do not need an actual slope. It describes the gentle down-and-toward-the-target direction of the rehearsal.
Step 6: Turn Through and Let Your Arms Follow
After establishing lead-foot pressure, rotate through into your finish. This completes the sequence rather than leaving you stuck in a squat or a sideways shift.
The distinction is simple: the lead-side move prepares the through-swing; it does not replace the through-swing. A forward bump with no following turn is an incomplete rehearsal.
Let your arms participate as your body turns through. “Let the arms follow” does not mean holding them rigidly or preventing them from swinging. It means avoiding an immediate arm pull that starts before you have made the intended pressure move.
Use the finish to complete the rehearsal
Continue into a comfortable golf finish rather than stopping at the imagined ball. This helps you practice the whole sequence: pressure, turn, pressure, turn.
You do not need to manufacture a picture-perfect finishing pose. Your main check is whether the turn through followed the lead-side pressure move, rather than occurring while you were still trying to get off your trail side.
Step 7: Blend the Golf Drill Into Three Slow Practice Swings
Before hitting your first ball at the range, make three slow practice swings using the four-part rhythm. The purpose is to establish the order while there is no shot outcome competing for your attention.
Give each rehearsal a simple focus:
- First rehearsal: Recognize the trail-foot press before the backswing turn.
- Second rehearsal: Notice the slight squat and lead-foot pressure before your arms come down.
- Third rehearsal: Blend both pressure moves and both turns into one continuous golf motion.
You can use a brief verbal cue that matches those four actions. Keep the language simple enough that it supports rhythm instead of becoming a long technical checklist.
Move from rehearsal to a golf ball
Once you can reproduce the sequence slowly, bring the same intention to a shot. Avoid adding a separate demand to swing harder. Your immediate task is to preserve the order you just practiced.
If the ball makes you rush the transition, step away and return to a slow rehearsal. Compare the sequence you intended with the one you actually felt. In particular, ask whether your hands started down before you recognized pressure under the lead foot.
Practice at home without chasing impact
You can also rehearse the foot pressure changes and turns without hitting a ball. If space is limited, use a club-free motion rather than attempting a full golf swing near furniture or other objects.
The most useful repetition is one in which you can identify the order clearly. A faster rehearsal is not automatically a better one.
Step 8: Check the Mistakes That Change the Drill
A simple golf swing cue can become less useful when you exaggerate it. Check these common misunderstandings before adding speed or more repetitions.
Mistake: Making both bumps large
A large backswing slide is not the goal. Neither is an uncontrolled lunge toward the target. Keep the initial trail-side move small, then use a controlled lead-side pressure move before turning through.
Mistake: Waiting until the arms are already moving down
If your arms pull first and your pressure move follows, you have reversed the intended transition. Slow down and revisit the golf lead-pressure checkpoint before trying another full rehearsal.
Mistake: Squatting without shifting
More knee bend alone does not complete the transition. Pair the slight lowering action with pressure moving into your lead foot.
Mistake: Shifting forward but forgetting to turn
The second bump is a preparation for rotation. Finish the movement by turning through instead of continuing to travel sideways.
Mistake: Trying to duplicate Tiger’s entire swing
The Tiger 2000 reference gives you a model for sequencing. It does not require you to reproduce every position, swing length, or movement detail. Keep your golf practice focused on the pressure-before-swing relationship.
Your final checkpoint: Make a small trail-foot press, turn back without swaying, move gently down and toward your lead foot before your arms descend, then rotate through. If you can feel those actions in order, you are practicing the intended drill.
Step 9: Review Common Golf Weight Shift Questions
When should you shift pressure toward your lead foot?
For this drill, begin the lead-side pressure move before your arms start down. Pair it with a slight squat, then turn through. The emphasis is on pressure leading the swinging motion rather than arriving after an arm pull.
Is a backswing bump the same as swaying?
No. The intended bump is a small press into your trail foot before rotation. Swaying adds excessive sideways travel. If you use a trail-side reference stick, preserve a gap as you turn back.
Do you need a Ball First Board for this golf drill?
You can begin learning the sequence through slow, club-free rehearsals. The Ball First Board adds physical references beside your legs to help you check the movement, but understanding the pressure changes comes first.
Should your arms stay passive throughout the golf swing?
The drill does not ask you to immobilize your arms. It asks you to establish the pressure move before they start down, then allow them to swing as you turn through.
How should you start your next practice session?
Make three slow golf practice swings before your first ball. Use them to recognize the trail-foot press, the lead-foot transition, and finally the complete blended sequence.
0 Comments