


If your driver cuts across the golf ball, sends shots curving right, and leaves you short of the fairway, trying to swing harder is unlikely to solve the problem. You need to change how you deliver the club, starting with your setup and finishing with a clubface that matches your new swing path.
Hitting driver from the inside becomes easier when you connect four pieces: upper body alignment, backswing depth, downswing sequence, and clubface control. Each supports the next. A good address position helps, but you can still come over the top. A better path helps, but you can still miss right if your clubface stays open.
The directions below describe a right-handed golf swing. Your trail side is your right side, and your lead side is your left. If you play left-handed, reverse the directional references.
Drill credit: Chris Ryan (ChrisRyanGolf). Watch his full breakdown above.
Understand the delivery position first
Before changing your golf swing, establish what you are trying to achieve. From a down-the-line angle, look at the final moment in the downswing when the shaft is approximately parallel to the ground. This is your delivery position.
If the clubhead sits behind your hands, you have the inside delivery being trained here. If the clubhead moves outside your hands, you are approaching from the outside. The inside position gives you a better opportunity to swing out toward the right and produce a draw, provided you also manage the face.
Use the following sequence rather than treating the downswing as an isolated fix:
- Build your golf setup.
- Create depth in your golf backswing.
- Train the downswing with the 5 o’clock drill.
- Match the clubface to your new path.
Quick answer: To hit driver from the inside, (1) set up with your shoulders slightly closed and your trail elbow lower, (2) turn and lift so the club gets deep behind you, (3) start down by lowering the club toward 5 o’clock before you rotate, and (4) keep the clubface closed to that new path. Steps 1–3 fix the path; step 4 stops the push-slice.
Table of Contents
- Step 1: Build a Golf Setup That Supports an Inside Delivery
- Step 2: Create Depth in Your Golf Backswing
- Step 3: Train Your Golf Downswing With the 5 O’clock Drill
- Step 4: Match Your Golf Clubface to the New Path
Step 1: Build a Golf Setup That Supports an Inside Delivery
Your first checkpoint comes before the club moves. If your trail elbow sits high and forward, with your trail shoulder also high, your upper body can make an outside approach harder to escape.
Rather than adjusting several positions individually, use a simple standing rehearsal to organize your shoulders and arms.
Use the 11 o’clock setup rehearsal
Imagine a clock face on the ground as you look down. Twelve o’clock is directly in front of you, and 11 o’clock is slightly toward the target side.
- Stand upright and balanced, with your shoulders level.
- Hold your driver out in front of you.
- Turn your chest slightly toward the target, toward the imagined 11 o’clock position.
- Lower your trail elbow so it sits below your lead elbow.
- Allow your trail shoulder to settle slightly lower as a result.
- From there, move into your address position and place the club behind the golf ball.
The important detail is the relationship between your arms and shoulders. You are not simply pushing your hands lower. You are using the lower trail elbow to help establish a different upper body position.
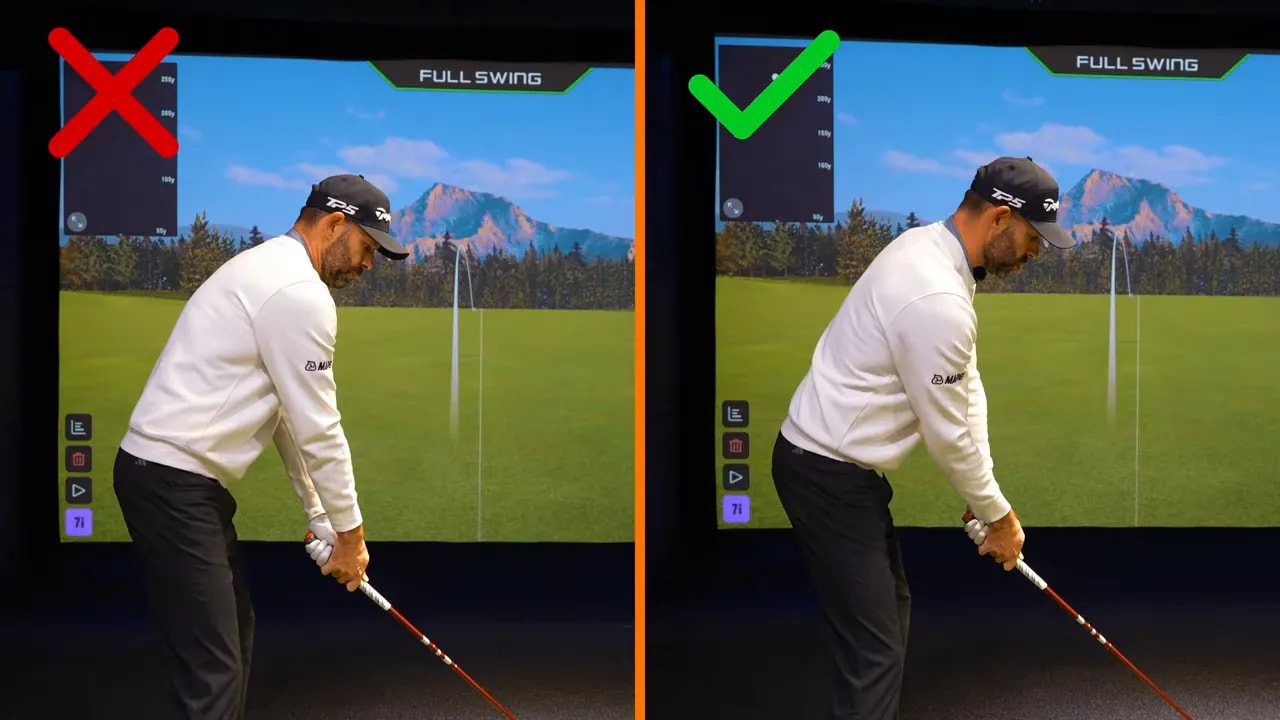
Check your arms from down the line
At address, you should be able to see the top of your lead forearm from the down-the-line angle, with your trail arm sitting lower. Compared with your usual setup, your upper body may feel a little more closed.
If you normally set your trail elbow high and in front, this can feel unfamiliar. Use the rehearsal to establish the position rather than immediately returning to what feels normal.
Then make a short, low-speed swing. You do not need a full drive to begin exploring the change. The purpose is to experience how a better setup can make a right-to-left golf shot feel more available before you add a longer backswing.
Your setup checkpoint: trail elbow lower, trail shoulder slightly lower, and an upper body position that does not encourage you to cut across the ball.
Step 2: Create Depth in Your Golf Backswing
Your downswing becomes more difficult if your hands and club finish excessively upright. From that position, you have a long way to move the club back toward an inside delivery, particularly once your body starts rotating toward the target.
Instead, create depth. Here, depth describes how far your hands and club move behind you rather than remaining high and in front of your body.
Establish a useful reference line
From down the line at address, imagine a line running from the club’s hosel through your trail elbow and continuing upward. Delivering the club around that line is a useful reference. For this exercise, you are exploring a delivery with the club slightly behind it.
If your hands finish far above that reference with insufficient turn, getting back to it requires a substantial adjustment. A backswing with better depth puts you in a more helpful starting position.
Separate arm lift from body turn
Although your golf backswing contains several movements, you can simplify this rehearsal into two components:
- Arm lift: your arms rise relative to your chest and move toward your trail side.
- Body turn: your torso rotates to help carry your hands and club into a deeper position.
Start at address and rehearse lifting your arms toward your trail side without immediately adding the turn. This isolated movement may look unusual. Next, add your body rotation. The combination should look much more like a complete backswing, with your hands farther behind you.

Repeat the two parts slowly: lift, then turn. You are learning how much each contributes to your top position. Eventually, you will blend them into one movement rather than making a deliberately segmented golf swing.
The contrast matters. If you lift your arms but barely turn your body, your hands can remain too upright. You then have to make a difficult recovery to approach from the inside.
Use a wall to check the blend
You can explore this relationship at home without hitting a golf ball:
- Stand in your golf posture with your tailbone lightly touching a wall.
- Rehearse lifting your arms toward your trail side.
- Add enough body turn for your trail elbow to just about touch the wall.
- Return to the start and repeat, noticing how the turn creates depth.
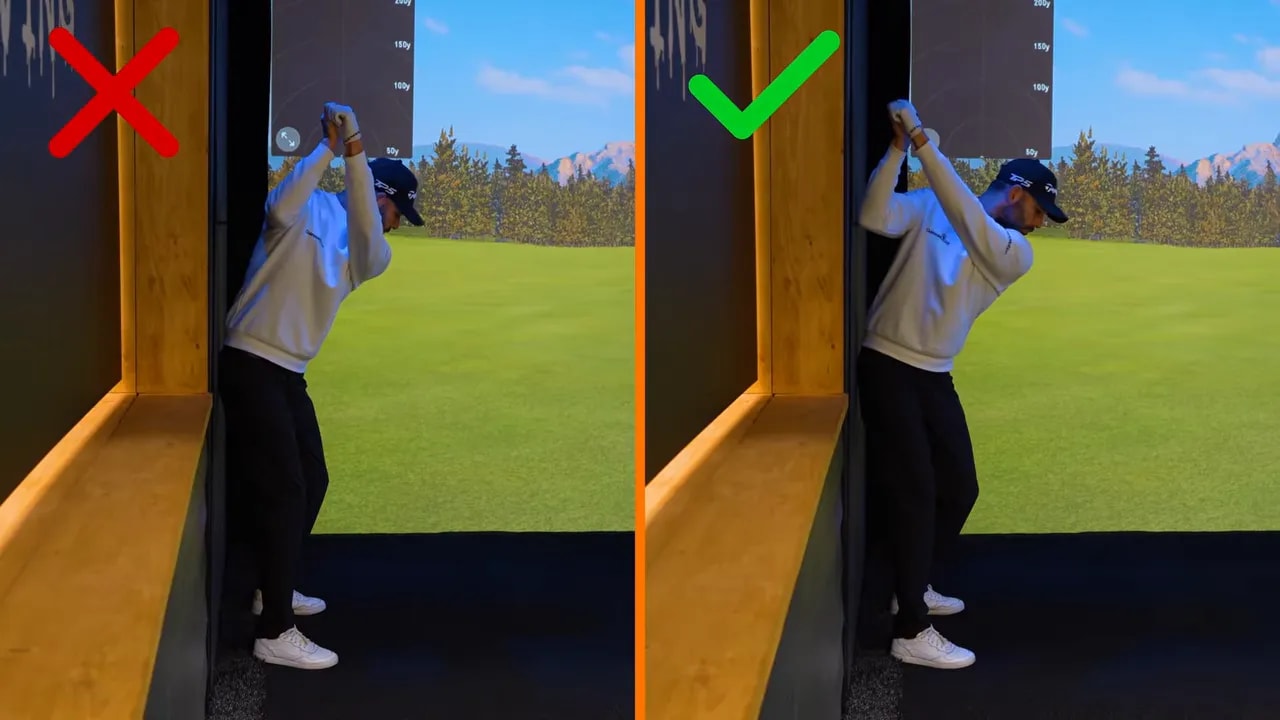
Use the wall as feedback, not as something to force your elbow against. The goal is to understand how arm lift and rotation work together.
In the demonstrated comparison, a deeper backswing helped produce a club path approximately 13.5 degrees from the inside during an exaggerated practice swing. With reduced turn, the path changed to roughly 5 degrees from the outside, accompanied by a higher, right-curving shot.
Those numbers illustrate how strongly the movement can influence delivery. They are not a recommendation to take an extreme path onto the golf course.
Step 3: Train Your Golf Downswing With the 5 O’clock Drill
A sound setup and plenty of backswing depth improve your chances, but they do not guarantee an inside approach. You can reach a good top position and still throw the club outside as you start down.
This is where the 5 o’clock drill becomes the key exercise. It trains the order in which you lower your arms and turn your body.
Locate your 5 o’clock reference
Imagine the clock face again, with 12 o’clock directly in front of you. For your right-handed golf swing, 5 o’clock sits behind you and toward your trail side.
You can place a spare golf ball there as a visual reference. It is not the ball you intend to hit. It gives you a direction for the lowering movement during your rehearsal.
Your backswing involved lifting your arms and turning your body. To return to impact, your arms must lower relative to your torso and your body must turn back toward the target. The drill exaggerates which action you feel first.
Lower first, then add the turn
If you immediately unwind your shoulders while your arms stay high, you can move the club outside. Dropping your arms afterward does not necessarily recover the delivery.
Instead, rehearse this order:
- Move to the top of your backswing with good depth.
- Keep your shoulders feeling back as you lower your arms toward 5 o’clock.
- Continue until the shaft feels approximately parallel to the ground.
- Then add your body turn to move through the ball.

At the lowered position, the club should feel much farther behind you than in an over-the-top motion. You have still used arm lowering and body rotation, but you have changed their order in the rehearsal.
This is an exaggerated training feel, not a demand to freeze your body during a full-speed swing. Your eventual golf swing will blend the movements rather than display two completely separate stages.
Add a pumping rehearsal before hitting
Once you understand the position, rehearse lowering the club toward 5 o’clock a couple of times. Keep the shoulders feeling back during those pumps. After the final rehearsal, add your turn and swing through.
This can produce a substantial change. One demonstration produced a path around 13.8 degrees to the right. That is useful evidence that the drill can shift an established outside pattern, but it would be an excessive playing path to chase.
If you have cut across the golf ball for years, an exaggerated opposite feel can help you discover a delivery you have not previously experienced. As you build speed and blend the motion, the intended result is a more moderate inside-out path, perhaps around 3 to 5 degrees rather than 14.
Keep the distinction clear: you exaggerate during practice to change the pattern, then blend the movement for play.
Step 4: Match Your Golf Clubface to the New Path
Your final adjustment is essential. Changing your path without changing your clubface can replace one right-sided miss with another.
If you swing from outside to inside, your club travels left of the target. An open face relative to that path can curve the golf ball back toward the right. It may be a compensation, but it can help bring a leftward swing back toward the fairway.
Once you start swinging from the inside, that same open-face relationship no longer serves your intended draw. You can send the ball right and have it stay there or curve farther right.
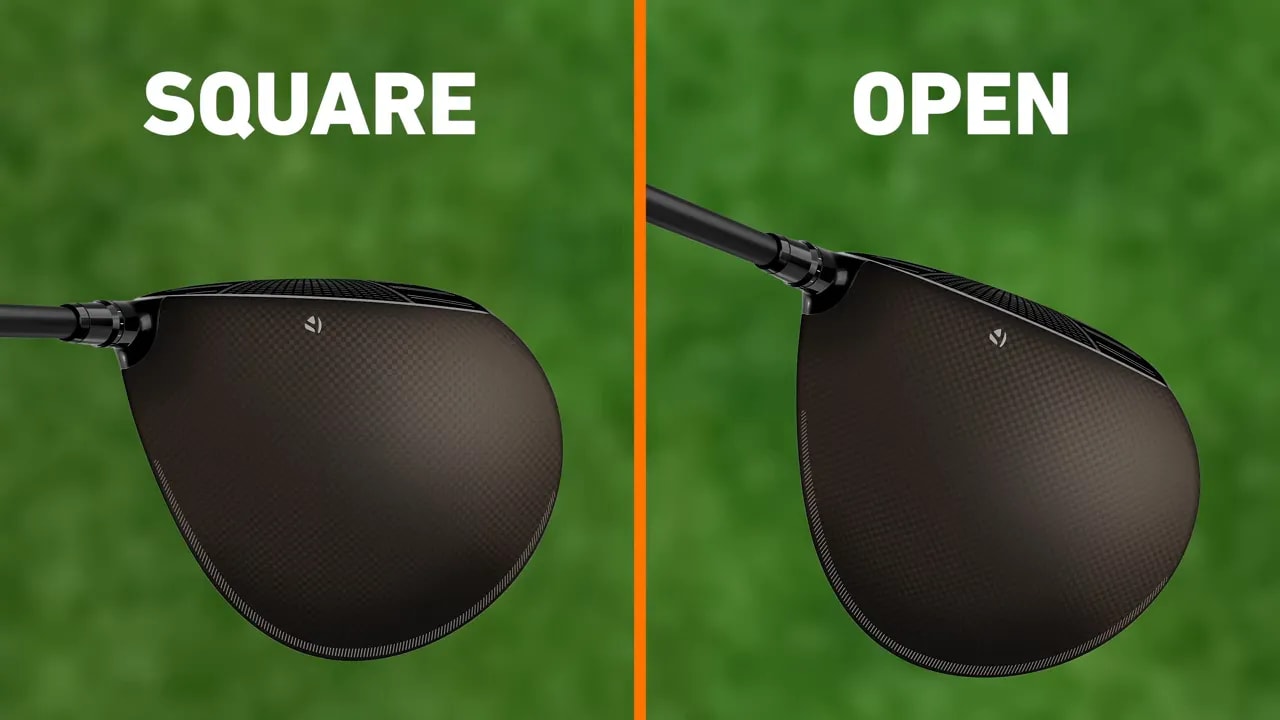
Feel the toe win the race
Use one simple external cue: let the toe of the driver win the race against the heel.
The toe is the end of the clubhead farther from the shaft. The heel is the end nearest the shaft. With an open face, imagine the heel arriving at the golf ball first. To encourage the face to close, reverse that picture and feel the toe arriving first.
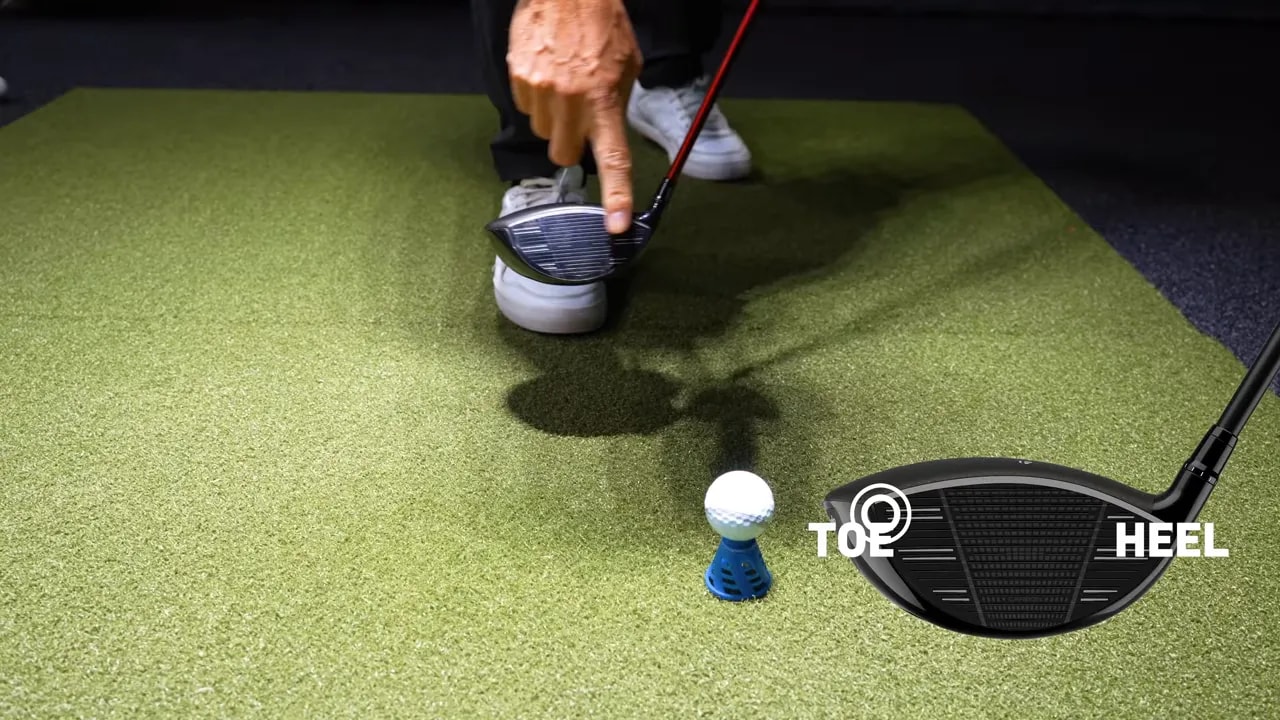
This is a concept to influence the face through your hands and their connection to the club. You are not trying to strike the ball with the toe. You are encouraging the face to return less open.
For your intended draw, the important relationship is a face closed relative to the swing path. Do not confuse that with needing to point the face left of the target. Your path and face need to work together so the shot can start right and turn back left.
Bring all four pieces into practice
Work through the sequence without asking yourself to master every detail at full speed immediately:
- Set up: use the 11 o’clock rehearsal and lower your trail elbow.
- Build depth: combine arm lift with body turn.
- Change delivery: pump the club toward 5 o’clock before adding rotation.
- Manage the face: use the toe-winning cue to support the draw.
If your golf shot still curves right after the path improves, revisit the face rather than assuming the inside delivery has failed. If you still cut across the ball, return to the downswing rehearsal and check whether your shoulders are unwinding before your arms have lowered.
Your goal is not the biggest inside-out number possible. It is a coordinated golf swing that delivers the driver from the inside with a face that suits the path. Build the position slowly, use the drills to make the difference clear, and then blend those feelings into a playable motion.
Driver From the Inside: FAQ
Why does my driver still go right when I swing from the inside?
Your clubface is open relative to your new path, which produces a push or push-slice. Work on step 4 and match the face to the path.
What is the 5 o’clock drill?
From the top of your backswing, lower the club toward 5 o’clock (for a right-handed golfer) before you turn through. This lets the club approach the ball from the inside instead of over the top.
How long does it take to fix an over-the-top swing?
Most golfers feel the change within one session of slow rehearsals. Making it hold up at full speed usually takes two to four weeks of regular practice.
0 Comments