


Your backswing, tempo, grip, and body type may not resemble another golfer’s. That is normal. The part of the swing worth making more repeatable is the golf impact position: the brief moment when the club meets the ball.
A sound impact position helps you strike the ball before the turf with irons, control the clubface more reliably, and produce the solid, compressed feel most golfers want. Rather than trying to rebuild every movement in your swing at once, you can work backward from impact and train the positions that matter most.
This step-by-step guide explains how to build a better golf impact position, what forward shaft lean should feel like, and how to practice without forcing a stiff or artificial swing.
Table of Contents
- Step 1: Understand What a Good Golf Impact Position Looks Like
- Step 2: Fix Ball Position Before Trying to Create More Shaft Lean
- Step 3: Build the Body Support for a Better Golf Impact Position
- Step 4: Train the Hands With the Knuckles-Down Feel
- Step 5: Use the Reverse-Engineering Impact Drill
- Step 6: Add the Hold-Off Shot to Stop an Early Release
- Step 7: Learn to Feel Compression Without Digging Excessively
- Step 8: Carry the Same Principles Into Your Driver Swing
- Step 9: Avoid These Common Golf Impact Position Mistakes
- Step 10: Build a 15-Minute Impact Practice Routine
- Takeaway: Make Impact Your Main Reference Point
Step 1: Understand What a Good Golf Impact Position Looks Like
For a right-handed golfer, a productive iron impact position generally has several connected features:
- Lead hip open: Your left hip has begun rotating behind you rather than sliding excessively toward the target.
- Chest over the lead side: Your upper body stays organized over your lower body instead of hanging back behind the ball.
- Hands ahead of the ball: The grip end of the club is ahead of the clubhead at impact.
- Forward shaft lean: The shaft leans toward the target, helping the club strike down and compress the ball.
- Square clubface: The face needs to be sufficiently square to the intended start line while the handle leads.
- Trail wrist bent: Your right wrist retains some bend through the strike instead of straightening too early.
These features work together. Forward hands without good body position can leave you stuck or excessively steep. Open hips without the hands leading can still produce a flip. Think of the golf impact position as a matched-up package, not a single isolated pose.
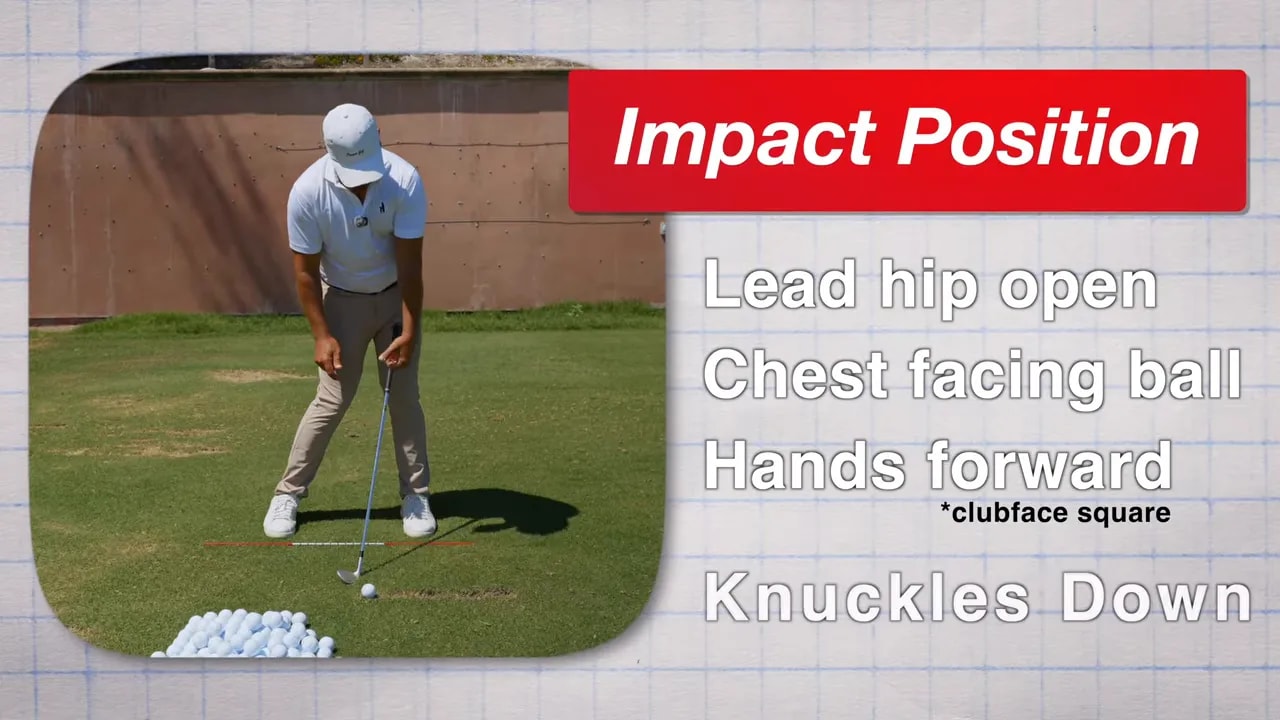
With an iron, the goal is to contact the ball first and then brush the turf after it. That sequence is a practical sign that your low point is ahead of the ball.
Step 2: Fix Ball Position Before Trying to Create More Shaft Lean
Ball position can either support your impact motion or force you to make compensations. If you play an iron ball too far back in your stance, you may feel compelled to release the clubhead early just to reach the ball. That early release often removes forward shaft lean and makes centered contact harder.
Start with a sensible iron setup and avoid making dramatic changes immediately. The ball should not feel crammed against your trail foot. From there, make small adjustments based on strike quality, turf contact, and start direction.
Use this simple test during practice:
- Hit a few relaxed half swings.
- Notice whether the club contacts the ball before the turf.
- Check whether divots, when present, begin after the ball.
- If you are consistently striking the ground behind the ball, assess ball position and your ability to get pressure into the lead side.
Do not solve every poor strike by moving the ball farther back. A ball that is too far back may disguise a low-point problem while encouraging an early release or a body that stays behind the strike.
Step 3: Build the Body Support for a Better Golf Impact Position
Many golfers try to create forward shaft lean entirely with their hands. But your body movement determines whether your arms have room to arrive in a strong position.
During the downswing, shift toward your lead side while maintaining support on the inside of your trail foot. From there, rotate your lead hip behind you. This helps your chest move over the lead side and allows the hands to travel forward without excessive effort.
A useful feel is that your trail leg and foot provide a brace. You are not simply lunging toward the target. You are using the ground to help your hips open while your upper body stays balanced over the shot.
What to avoid: sliding and hanging back
When your pelvis slides too far targetward without enough rotation, your upper body can remain behind. Your arms may then lag behind your body, making it difficult to reach the ball with a stable, forward-hand impact. This pattern can lead to thin shots, inconsistent strike, toe contact, or a late flip.
Instead of thinking, “Drive my hips forward,” try this sequence:
- Move pressure toward the lead foot.
- Keep the trail side braced long enough to stay balanced.
- Turn the lead hip back and open.
- Allow the chest to arrive over the lead side.
The goal is not a rigid lower body. It is a stable pivot that gives your hands and club a consistent route into the ball.
Step 4: Train the Hands With the Knuckles-Down Feel
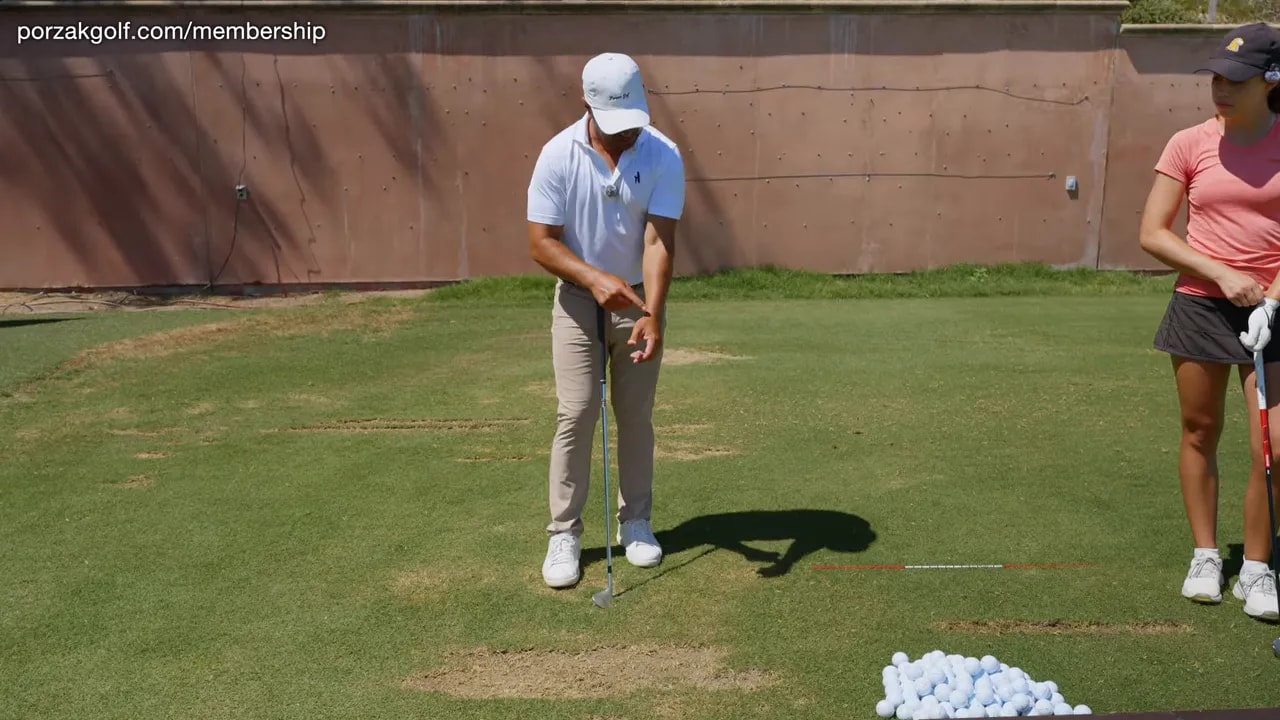
At a good iron impact position, the lead hand is not cupped upward with the knuckles pointing toward the sky. A more useful feel is lead-hand knuckles down, with the trail palm feeling more on top of the handle.
This hand structure supports a square clubface while the handle stays ahead. It also helps preserve the bend in the trail wrist through impact.
For a right-handed golfer, rehearse this without hitting a ball:
- Set up in an athletic golf posture.
- Move into a mock impact position with your hands ahead of your lead thigh.
- Open your lead hip slightly and position your chest over the lead side.
- Feel the back of your left hand angled down toward the ground.
- Keep your right palm feeling as though it supports the shaft from above.
- Hold the position for two seconds, then reset.
Do not overdo the hand angle. The purpose is not to twist the clubface shut or drag the handle indefinitely. It is to learn the relationship between the hands, shaft, clubface, and body at impact.
Step 5: Use the Reverse-Engineering Impact Drill
The fastest way to learn a new sensation is often to start in the destination position. Instead of making full swings and hoping to find a better strike, place yourself in the desired golf impact position first.
This drill is especially useful if you tend to flip, scoop, lose posture, or struggle to feel what compressed iron contact should be like.
How to do the impact-to-impact drill
- Take a short iron and set up to a ball.
- Move into your impact rehearsal: lead hip open, chest over the lead side, hands forward, and trail wrist bent.
- Make a very small backswing while maintaining the connected feeling in your arms and core.
- Return to the exact impact position you rehearsed.
- Hit short, controlled shots rather than trying to create maximum speed.
- Hold the finish briefly with the clubhead staying behind the hands through the strike.
Start with no ball if necessary. Then hit low, short shots at a comfortable pace. The priority is not distance. It is returning to the same organized delivery position again and again.
Once you can create clean contact with small swings, gradually extend the backswing. If the ball striking gets worse, shorten the motion again and restore the impact rehearsal.
Step 6: Add the Hold-Off Shot to Stop an Early Release
A hold-off shot is a practical way to feel extension through impact. Instead of allowing the club to whip quickly around your body, make a three-quarter swing and keep the club traveling more toward the target after contact.
Your arms and club should finish below shoulder height. The club does not need to be frozen or forced straight down the target line, but you should feel that your body and core are controlling the club through the strike.
This drill can help you recognize the difference between:
- Trailing the club into impact: The hands lead, the clubhead follows, and extension develops after the strike.
- Releasing too soon: The clubhead passes the hands early and the arms may fold up quickly around the body.
Hit several three-quarter shots with a modest target. Judge success by solid contact and a controlled flight, not by whether you can hold the club in a perfect-looking finish.
For more range-session ideas, explore golf ball striking drills that build centered contact and a predictable low point.
Step 7: Learn to Feel Compression Without Digging Excessively
Compression is not about trying to bury the leading edge into the turf or forcing a huge divot. It comes from delivering the club with forward hands, a square face, and a low point ahead of the ball.
A helpful practice sensation is pressure traveling down the shaft through the ball and into the ground after impact. On grass, you may see a shallow divot or a small brush mark after the ball. The exact turf pattern will vary with the club, lie, and swing shape.
Focus on this order:
- Ball first.
- Turf second.
- Club extending toward the target.
If you are taking deep divots before the ball, do not simply lean the shaft farther forward. Recheck your balance, ball position, and body rotation. Good compression is a coordinated motion, not a downward chop.
Step 8: Carry the Same Principles Into Your Driver Swing
The driver is different from an iron because of the longer club and tee height. You are not trying to create the same ball-first, turf-after strike. Still, the core lesson remains valuable: avoid an uncontrolled early release and maintain an organized body-and-hand relationship through impact.
Your driver may feel as though it releases farther back than an iron because the longer clubhead needs more time to catch up. Feel is highly individual, so do not copy another golfer’s release sensation exactly.
Use the same foundation:
- Balanced setup.
- Stable lower-body support.
- Rotating hips rather than an excessive slide.
- Hands and club working together through impact.
- Control before speed.
If you naturally drag the handle or leave the face open, you may need a different release feel than a golfer who flips early. This is why impact drills should improve your actual strike and ball flight, not just create a position that looks good in a still image.
Step 9: Avoid These Common Golf Impact Position Mistakes
Trying to hold shaft lean all the way to the finish
Forward shaft lean is an impact condition, not a demand to keep the handle ahead forever. The club will release after impact. Your task is to prevent the release from happening too early.
Forcing the hips open without turning the chest
If your hips race open while your chest and arms stay behind, you can get stuck and lose control of the clubface. Rotate in sequence and keep your upper body moving over the lead side.
Using only your hands to create compression
Hand action matters, but it cannot replace a supported pivot. Build the body movement first, then match the hands to it.
Making full-speed swings before you own the drill
Slow rehearsals and short shots give you feedback. Full-speed swings can hide the very compensation you are trying to change. Earn more speed by producing repeated solid contact at smaller swing lengths.
Chasing a universal driver feel
Driver and iron impact have shared principles, but the longer club changes what you feel. Use your ball flight and strike quality as the final test.
Step 10: Build a 15-Minute Impact Practice Routine
Use this concise routine when you need to sharpen your golf impact position without overloading your swing thoughts.
- Three minutes: Rehearse the impact pose without a ball. Check lead hip, chest, forward hands, and knuckles-down feel.
- Four minutes: Hit short impact-to-impact shots with a wedge or short iron.
- Four minutes: Make three-quarter hold-off swings. Keep the arms and club below shoulder height in the finish.
- Three minutes: Hit normal iron shots while carrying only one cue, such as “chest over lead side.”
- One minute: Review strike quality. Keep the feel that produced the best contact and release the rest.
Improvement comes from clarity. Instead of searching for a perfect backswing thought every time you practice, build a repeatable delivery position that helps the club meet the ball with structure and purpose.
Takeaway: Make Impact Your Main Reference Point
A better golf swing does not require every golfer to move the same way going back. But a reliable golf impact position gives you a clear destination: open lead hip, chest over the lead side, hands forward, stable wrists, and a clubface that can strike the ball cleanly.
Rehearse that position first, make shorter swings until you can return to it, and then allow your speed to build around a strike you trust. The result can be simpler practice, cleaner iron contact, and more confidence when the shot matters.
Golf Impact Position FAQ
Should my hands be ahead of the ball at impact with irons?
For most iron shots, your hands should be ahead of the ball at impact. This creates forward shaft lean and supports ball-first contact. The amount of lean varies by club, shot, and individual swing.
What does forward shaft lean do in golf?
Forward shaft lean places the handle ahead of the clubhead at impact. With irons, it helps position the low point ahead of the ball and can improve compression when combined with a square clubface and stable body motion.
Why do I flip the club at impact?
Flipping often happens when the body stays behind the ball, the arms lag too far behind, or the clubhead is released early to reach the ball. Start by checking ball position, lead-side pressure, chest position, and trail-wrist structure.
Should my hips be open at impact?
Yes, your lead hip should generally be opening at impact on full iron swings. The key is rotation with balance, not an excessive slide toward the target.
Is iron impact the same as driver impact?
No. Iron shots are designed around ball-first contact and a low point after the ball, while a driver is struck from a tee with a longer club. Both benefit from an organized pivot and avoiding an uncontrolled early release.
0 Comments