
Focus keyphrase: trail knee downswing drill
If your golf swing feels stuck, weak, or inconsistent through impact, there is a good chance your lower body is not doing its job in the downswing. One of the simplest ways to clean that up is to focus on what your trail knee does as you move into and through the ball.
The key idea is simple: your trail knee should move toward your lead knee early enough in the downswing that it reaches the ball line before your hands do. That single move can help you improve sequence, free up your hips, and create a more athletic strike.
For many amateur golfers, the opposite happens. The hands race down first, the lower body stalls, and the trail side hangs back. The result is familiar: poor contact, inconsistent face control, limited power, and a swing that feels like it has to be saved at the last second.
This guide breaks down the trail knee downswing drill step by step so you can train it correctly and turn it into a more reliable golf swing.
Table of Contents
- Step 1: Understand what the trail knee downswing drill is trying to fix
- Step 2: Learn the “finish line” checkpoint for the trail knee downswing drill
- Step 3: Build the correct feel by closing the gap between your knees
- Step 4: Rehearse the trail knee downswing drill without overthinking the club
- Step 5: Hit short shots while keeping the trail knee downswing drill feel
- Step 6: Check your finish to confirm the trail knee downswing drill is working
- Step 7: Use video feedback to measure the trail knee downswing drill
- Step 8: Understand why this move helps golfers who feel stuck and powerless
- Step 9: Avoid the most common mistakes with the trail knee downswing drill
- Step 10: Turn the trail knee downswing drill into a repeatable practice routine
- FAQ
- Final takeaway
Step 1: Understand what the trail knee downswing drill is trying to fix
Before you work on mechanics, it helps to know the pattern you are trying to change.
In a good downswing, the lower body does not stay passive while the arms and club take over. Better ball strikers move pressure and rotation in a way that brings the trail knee inward and forward. That closes the space between the knees and helps the body keep moving through the shot.
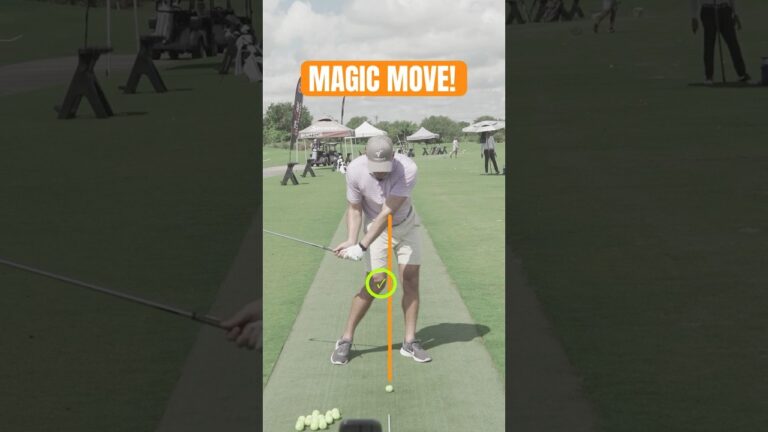
In this drill, that movement is described as getting the trail knee to the finish line. The finish line is the vertical line that runs up from the golf ball. The goal is to move your trail knee toward that line before your hands get there.
Why does that matter?
- It encourages proper lower-body motion in the downswing.
- It helps prevent your body from stalling under the pressure of the hit.
- It improves sequencing so the club is not thrown from the top.
- It can add power because your body keeps moving instead of stopping.
- It often improves contact because your pivot supports the strike.
When amateur golfers struggle, the common pattern is this: the hands get to the ball first, or even pass the ball line while the trail knee has barely moved. That leaves the lower body stuck. From there, you are forced to flip, stall, or make compensations through impact.
Step 2: Learn the “finish line” checkpoint for the trail knee downswing drill
The most useful part of this concept is how easy it is to measure.
Picture a straight line extending upward from the golf ball. That is your finish line. During the downswing, your trail knee should move toward that line aggressively enough that it arrives there before your hands.
This is not about sliding wildly toward the target. It is about a coordinated lower-body motion that gets the trail knee moving inward and forward instead of leaving it behind.
Think of it as a checkpoint:
- Better pattern: trail knee reaches the ball line before the hands.
- Common amateur pattern: hands get there first, lower body hangs back.
This checkpoint gives you a simple lens for evaluating your downswing. If your hands are dominating early and your trail knee is still far from your lead knee, your sequence is probably off.
That is one reason this trail knee downswing drill can be so effective. It replaces vague advice like “use your legs” or “clear your hips” with a specific movement you can feel and check.
Step 3: Build the correct feel by closing the gap between your knees
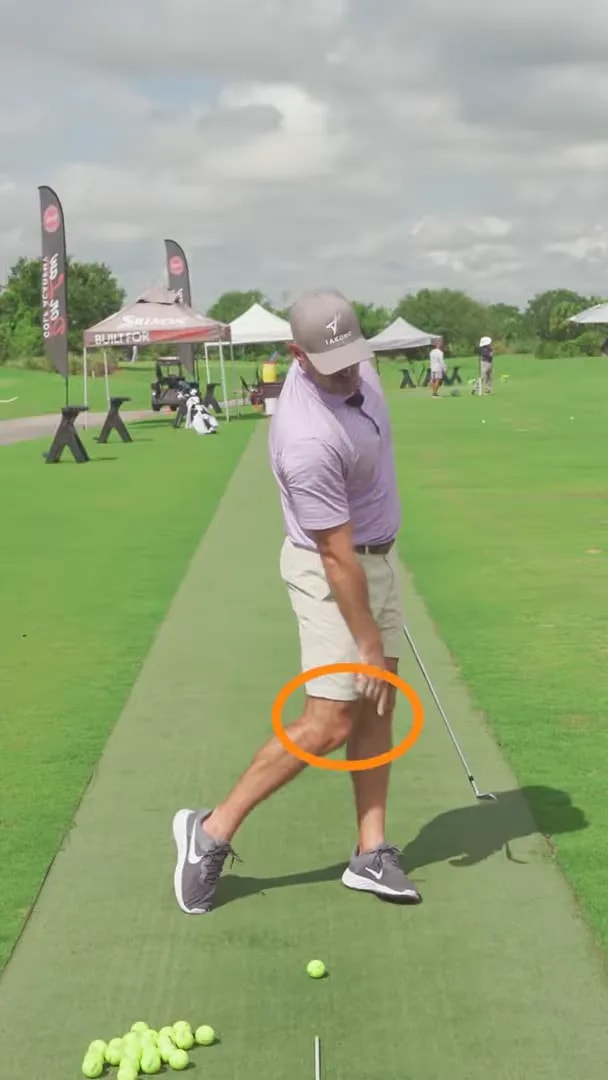
The easiest feel for this move is to close the gap between your trail knee and lead knee.
Rather than trying to think about a dozen pieces at once, focus on one simple intention on the way down and through:
Feel like your trail kneecap is moving toward your lead kneecap.
That cue helps in several ways. It gives you a directional feel, it keeps the motion simple, and it promotes the kind of lower-body action that many golfers are missing.
At first, this may feel exaggerated. That is normal. Golf swing changes often need to feel bigger than they really are. If your current pattern is to leave your trail knee back, even a correct move may seem dramatic.
Do not worry about making it look perfect at first. Focus on producing the right intention:
- Trail knee moves inward
- Trail knee moves forward
- Space between the knees shrinks
- Lower body keeps moving through impact
This is the heart of the trail knee downswing drill. If you can learn to close that gap earlier, you can improve the entire motion through the strike.
Step 4: Rehearse the trail knee downswing drill without overthinking the club
A good way to start is by making simple rehearsal swings where the only priority is the trail knee.
Set up normally. Make a backswing. Then, from the top, focus on driving the trail knee toward the lead knee as you swing through. Keep the motion smooth and balanced.
Your goal is not to hit a perfect shot immediately. Your goal is to train the body motion.
Use these practice reps:
- Address the ball as usual.
- Make a relaxed backswing.
- Start down by feeling the trail knee move toward the lead knee.
- Continue through until your finish shows the knees much closer together.
- Repeat several times before hitting a ball.
If you tend to be very handsy, make slow-motion swings first. That will help you notice whether the trail knee is actually leading the change of direction or whether your hands still jump out first.
This kind of rehearsal is especially useful if your lower body has felt “stuck” for a long time. You are teaching your body a new sequence, and that takes focused repetition.
Step 5: Hit short shots while keeping the trail knee downswing drill feel
Once the rehearsal starts to feel familiar, move into short shots. Do not jump straight to full speed.
Start with half swings or controlled punch shots. Your only job is to keep the same feel you had in practice swings: close the gap.
As you do this, pay attention to a few things:
- Does your trail knee move forward earlier?
- Do your knees finish closer together?
- Does the strike feel more compressed and less slapped?
- Does your body continue rotating instead of stopping?
Many golfers immediately notice that the swing feels more connected. The club is no longer being thrown at the ball by the hands alone. Instead, the body is supporting the motion all the way through.
This can be particularly helpful for golfers who struggle with:
- Thin shots
- Flippy impact
- Loss of posture through the strike
- Poor pressure shift
- Inconsistent low point control
If the ball flight is not perfect yet, that is okay. The first win is changing the movement pattern. Better contact often follows once the body starts organizing the swing correctly.
Step 6: Check your finish to confirm the trail knee downswing drill is working
Your finish position gives you a simple built-in feedback system.
After the swing, your trail knee should be very close to your lead knee. If there is still a big gap, there is a good chance you did not move the trail side well enough during the downswing.
This matters because the finish often reflects the motion that created it. If your trail knee stays back, your lower body probably stayed passive too long. If your knees come together naturally, it is a strong sign that your body kept moving through the ball.
Use this finish checklist:
- Trail knee is near the lead knee
- Body is fully through the shot
- Balance is stable
- Rotation continues instead of freezing at impact
A good finish does not guarantee a perfect downswing, but it is a reliable clue. For many golfers, this one checkpoint instantly exposes why impact has been so inconsistent.
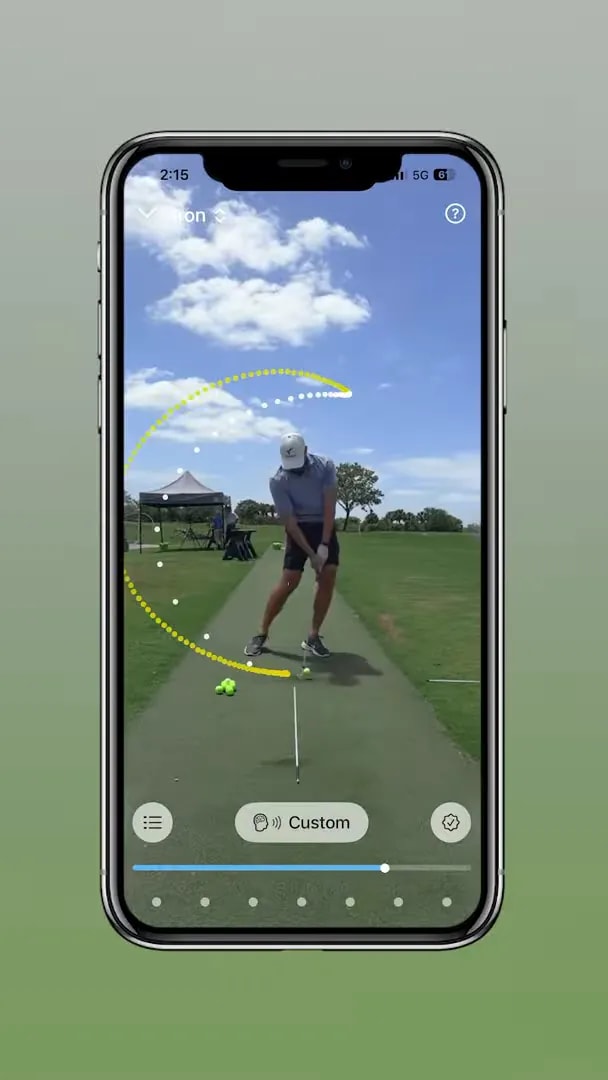
Step 7: Use video feedback to measure the trail knee downswing drill
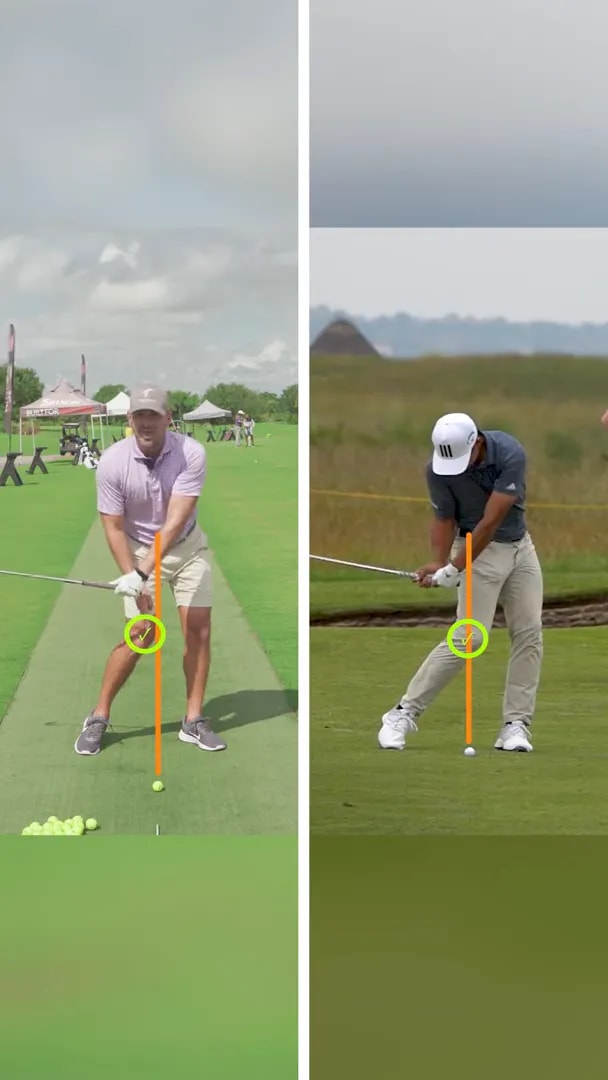
One of the smartest ways to train this move is to record your swing from face-on.
Why face-on? Because that angle makes it easier to compare your trail knee and hands relative to the ball line. You can pause the downswing and ask a clear question: Did the trail knee get to the finish line before the hands?
This is much more helpful than relying on feel alone. Many golfers think they are moving the lower body aggressively when, on camera, the hands are still outracing everything.
When reviewing your swing, look for these checkpoints:
- At the start of the downswing, the trail knee begins moving inward and forward.
- As the club approaches impact, the trail knee is advancing toward the ball line.
- The hands are not racing independently past the lower body.
- By the finish, the gap between the knees is clearly reduced.
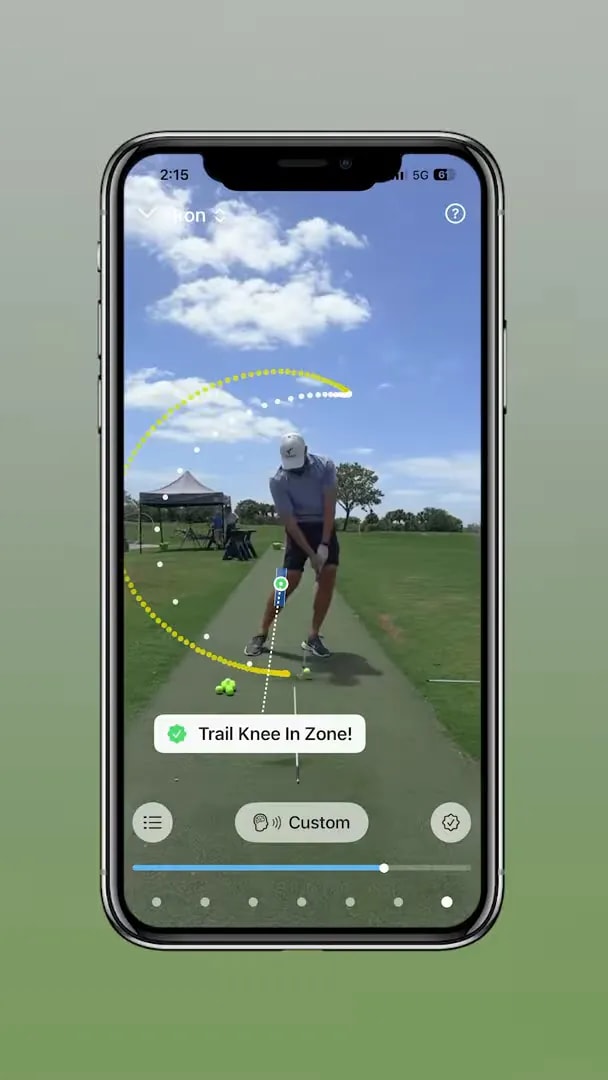
If you have access to a swing analysis app or simple smartphone video, use it. A movement this specific becomes easier to improve when you can actually see it.
Step 8: Understand why this move helps golfers who feel stuck and powerless
The trail knee downswing drill is effective because it addresses several swing problems at once.
First, it helps with lower-body sequencing. A lot of golfers know they need to “use the ground” or “shift pressure,” but those ideas can be too abstract. Moving the trail knee toward the lead knee gives you a practical action that organizes those concepts into something usable.
Second, it can improve hip motion. When the trail side moves correctly, the hips are more likely to keep working through the shot instead of stalling. That can create a more open, athletic impact without forcing a complicated lead-side thought.
Third, it can increase consistency. When the lower body works better, the hands do not need to save the strike. That usually leads to more predictable contact and face control.
Fourth, it can help with power. A stuck lower body often means your swing leaks speed. Better sequencing allows you to transfer energy more efficiently through the ball.
This is especially useful for golfers who feel they have lost speed or mobility over time. A simple trail-side focus can often be easier to feel and repeat than highly technical swing thoughts.
Step 9: Avoid the most common mistakes with the trail knee downswing drill
Like any golf drill, this one works best when you understand what not to do.
Mistake 1: Letting the hands still dominate the transition
If your first move from the top is to throw the club down with your arms, the drill will not stick. You must give the trail knee a chance to start the change of direction.
Mistake 2: Only thinking about the finish
Yes, the finish matters. But the real key is when the trail knee moves. It is not enough for your knees to come together late. The trail knee should be advancing early, before the hands get to the ball line.
Mistake 3: Sliding without control
The goal is not a reckless lunge toward the target. The trail knee is moving inward and forward as part of a coordinated pivot. Stay balanced and athletic.
Mistake 4: Expecting full-speed success immediately
If your old pattern is deeply ingrained, start with slow swings and short shots. Build the movement first, then add speed.
Mistake 5: Ignoring feedback
Because feel can be misleading, use your finish position or video to confirm the move. Do not assume you are doing it correctly just because it feels different.
Step 10: Turn the trail knee downswing drill into a repeatable practice routine
To make this change last, practice it with structure.
Here is a simple routine you can use on the range:
- 5 slow rehearsals
Make swings with no ball and exaggerate the trail knee moving toward the lead knee. - 5 half shots
Hit short shots while preserving the same feel. - 5 normal swings
Add speed only if your finish still shows the knees closing properly. - Video check
Record one or two swings from face-on to see whether the trail knee is winning the race to the finish line. - Repeat
Go back to rehearsals any time the hands start taking over.
This type of cycle keeps the drill connected to a real swing without letting old habits creep back in too quickly.
If you are playing a round and need a simple on-course thought, use this one: close the gap. It is compact, clear, and directly tied to the movement you want.
FAQ
What is the trail knee downswing drill?
The trail knee downswing drill teaches you to move your trail knee inward and forward during the downswing so it gets to the ball line before your hands. The goal is to improve lower-body sequence, free up your hips, and create better contact.
Why should the trail knee reach the ball line before the hands?
That sequence is a useful marker of efficient lower-body motion. When the trail knee gets there first, it usually means your body is helping deliver the club. When the hands get there first, the lower body often stalls and the swing becomes inconsistent.
How should this move feel during the swing?
A simple feel is to move your trail kneecap toward your lead kneecap. You are trying to close the gap between your knees on the way down and through, not leave the trail knee hanging back.
Can this drill help with power and consistency?
Yes. A better lower-body sequence can help you avoid a stuck pivot, support a more stable impact, and allow your body to keep moving through the shot. That often leads to stronger strikes and more consistent contact.
What is the easiest way to check if I am doing it correctly?
Use a face-on video view and compare your trail knee and hands as they move toward the ball line. You can also check your finish. If your trail knee ends up very close to your lead knee, that is a good sign the motion is improving.
Should I start with full swings?
No. Start with slow-motion rehearsals and short shots. Once you can keep the trail knee moving properly and your finish looks better, gradually build up to full swings.
Final takeaway
If your downswing has been driven mostly by your hands, the trail knee downswing drill can be a simple but powerful reset. Your job is to get the trail knee moving toward the lead knee early enough that it reaches the ball line before your hands.
That one checkpoint can help you solve several common swing problems at once:
- Stuck lower body
- Inconsistent strikes
- Weak through-impact motion
- Poor sequencing
- Lost power
Keep the feel simple. Close the gap. Rehearse it slowly. Check it on video. Then build speed once the movement starts to stick.
For many golfers, better contact does not come from adding more thoughts. It comes from giving the lower body one clear job and training it until the motion becomes natural.
0 Comments