
Focus keyphrase: move your hips forward
Solid contact is not a mystery of perfect timing or magical hand speed. For most golfers, the difference comes earlier in the swing. The most reliable ball strikers consistently move your hips forward in the downswing while keeping their head stable. That combination improves strike quality, shallow your angle of attack, and helps your club work low and inside instead of cutting across the ball.
If your shots are inconsistent, thin, or come out fat, a common cause is that you are hanging back and letting your hips stay too far behind your body rotation. The fix is not complicated, but it must be specific: you need your hips to travel several inches forward, and you need your head to stay back over your ball line long enough for the club to arrive correctly.
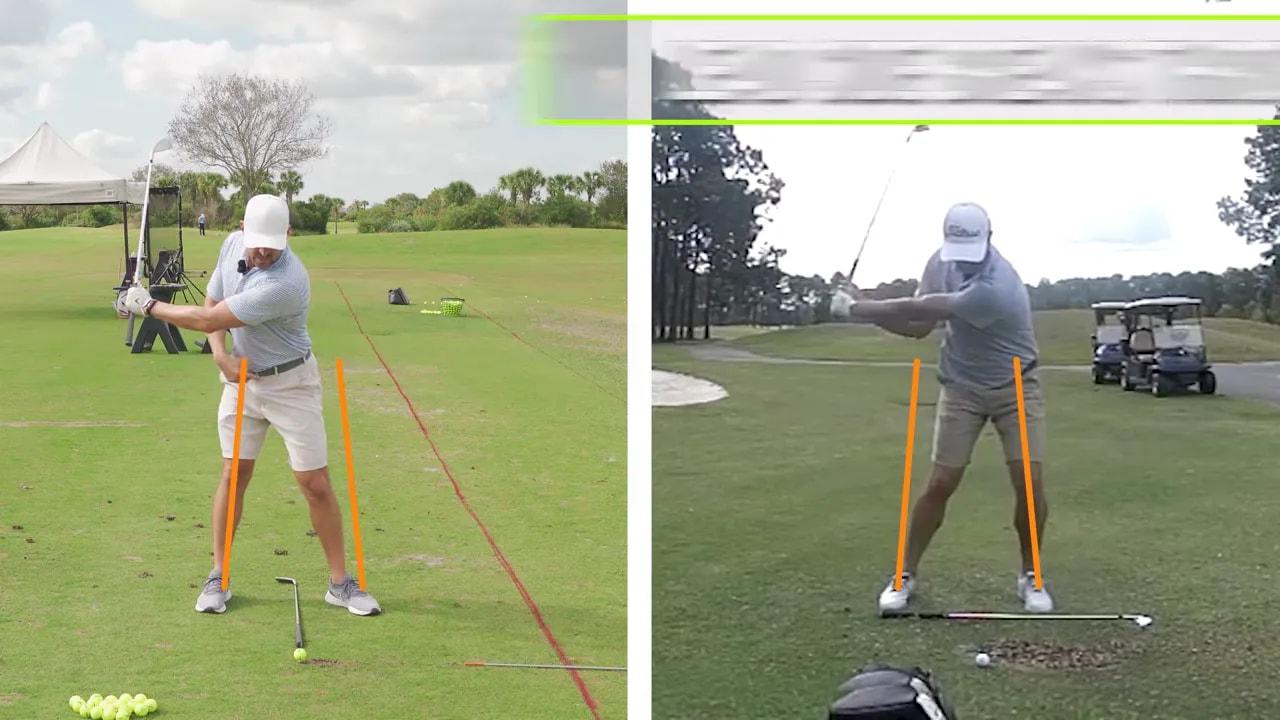
Table of Contents
- Step 1: Diagnose the problem with a simple hip-line check
- Step 2: Understand the goal: hips forward plus rotation, head stable
- Step 3: Use the two ways to move your hips forward
- Step 4: Lead-side drill (Weight Scale) to make your hips forward happen
- Step 5: Add the key finishing position while keeping your head back
- Step 6: Trail-side push drill (Pitcher feel) for when you prefer the right-leg movement
- Step 7: Combine shift and rotation so your low point moves forward
- Step 8: Your practice routine to ingrain the one move that matters
- FAQ
- Key takeaways
Step 1: Diagnose the problem with a simple hip-line check
Elite players move differently in the downswing. A helpful way to understand what you need is to compare your hip position to what you see from players like Adam Scott and Grant Waite. The key observation is that pros push their hips forward toward the target while their head stays back over the ball line.
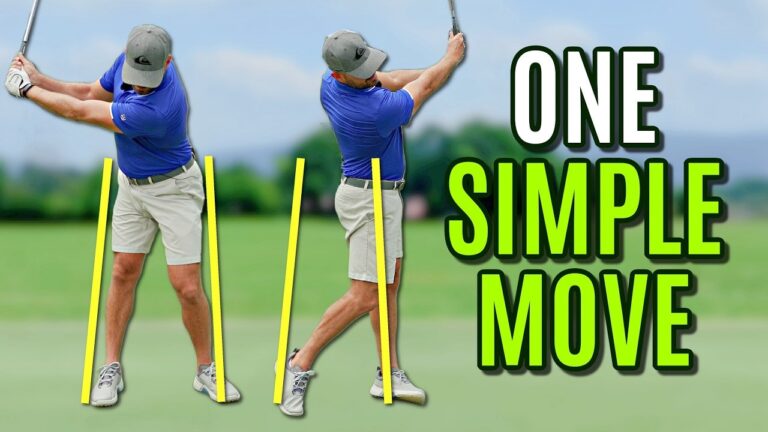
On your own swing, use a “hip-line check” mindset. Imagine two vertical lines drawn up your legs:
- Lead-side line (left leg for a right-handed golfer): pros break through this line as they shift and rotate.
- Trail-side line (right leg for a right-handed golfer): pros create space as their right hip moves away from where it started.
Most amateurs struggle with consistent solid contact because their hips stay more back throughout the downswing. That keeps the low point too far behind the ball and often pushes your club path out of the correct inside delivery.
Before changing anything, record your swing from down-the-line and face-on angles. Watch specifically where your belt buckle and hips are relative to your legs, not just where your hands are.
Step 2: Understand the goal: hips forward plus rotation, head stable
The downswing needs more than “weight shift.” You need a combination:
- Move your hips forward toward the target.
- Rotate as you shift so your pelvis and torso work together.
- Keep your head back over your ball line so the club can drop low and inside.
When your head goes forward too early, your club usually comes out over the top and steepens the angle of attack. That often produces low pulls or forces compensations like early extension to “get back” at impact.
In other words, pros do not “throw” their head at the ball. They push the hips forward while the head stays back until at least the arms are parallel to the ground.
Step 3: Use the two ways to move your hips forward
You have two practical paths to achieve forward hip motion. Many golfers can improve either one, but the best results come from understanding which movement you are missing.
Option A: Fall into your lead side
This is the “left first” feel for right-handed golfers. Your lead knee moves forward and your lead foot receives pressure early in the downswing. That forward pressure helps your hips travel ahead of your old position.
Option B: Push off your trail side
This is a “right-side push” feel. You straighten and drive from the trail leg as your hips turn and move forward. Think of it like a pitcher pushing off the rubber to send the body forward.
Both options can produce excellent ball striking. The important part is not the name of the feel. The important part is that your hips move several inches forward and your head stays back.
Step 4: Lead-side drill (Weight Scale) to make your hips forward happen
If you are hanging back, this lead-side rehearsal is a high-return place to start. The cue is simple:
- Imagine your feet are on a weight scale.
- As the downswing starts, push so the weight spikes onto your lead foot.
- Specifically feel your left knee forward of your ankle (for a right-handed golfer).
Here is the drill in a clear sequence:
- Halfway backswing: stop and rehearse the moment right before full speed.
- Press into the lead foot: feel pressure under your left foot.
- Move the lead knee: feel the left knee go outside the left ankle.
- Keep the belt buckle tracking forward: notice it aiming more toward your lead ankle and the target.
Do two rehearsals, then hit balls feeling the same timing:
- Rehearsal 1: weight spikes left, knee forward
- Rehearsal 2: weight spikes left, knee forward
Timing matters. You want this forward-lead-side move to start right away at the beginning of the downswing, not halfway through.

Step 5: Add the key finishing position while keeping your head back
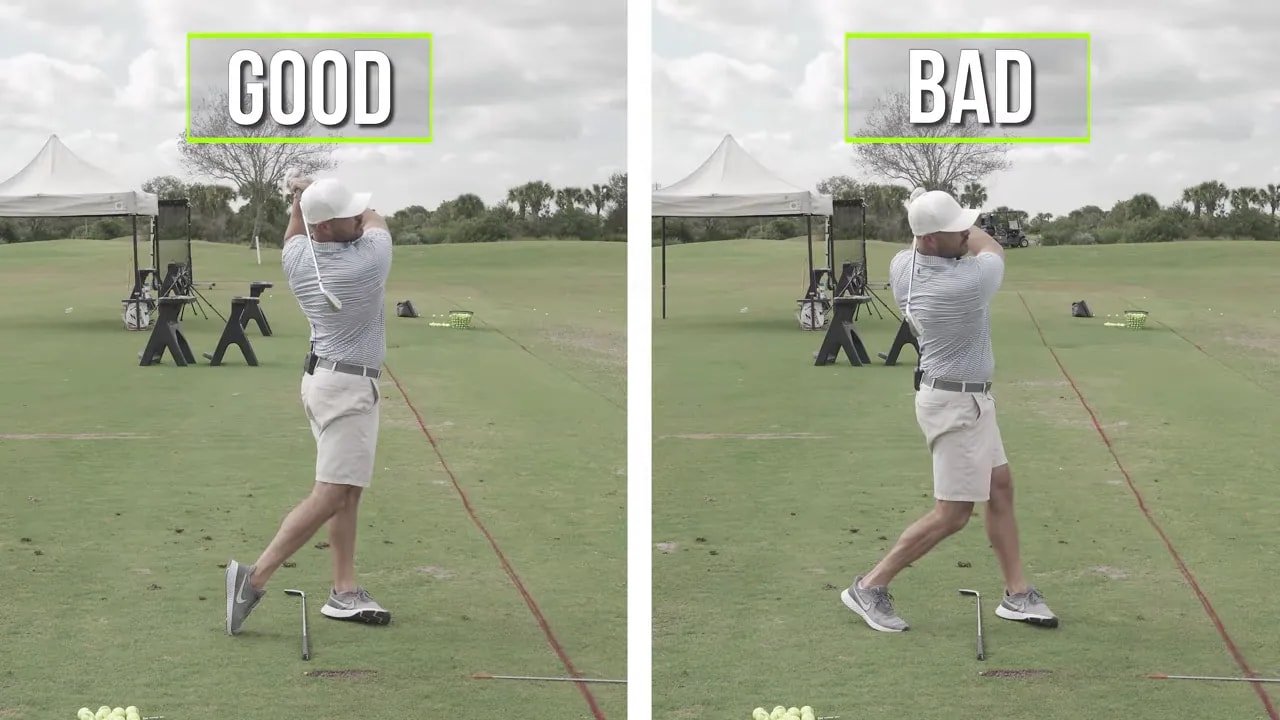
Now connect the drill to what you see in better ball strikers at impact and finish. A common finish checkpoint is:
- Most of your weight on the left foot (right foot supports).
- Belt buckle closer to the target than your shirt buttons.
- Body fully turned through.
During the real swing, you can allow a small amount of upper body movement early to create momentum. What you cannot allow is your head to move forward with the hips all the way.
Use this practical rule:
- Continue moving the hips forward while the head stays back over the ball line until the arms are at least parallel to the ground.
This head-back strategy helps the club work from low and inside. When the head stays back, your body turn has room to shallow the angle of attack naturally, and your club arrives more compressed.
Step 6: Trail-side push drill (Pitcher feel) for when you prefer the right-leg movement
If lead-side “falling” feels awkward, or you notice you still do not get the hips forward enough, switch to a trail-side feel. The goal stays identical: move your hips forward and keep your head centered.
Here is the visualization:
- Imagine a wall or object next to your right hip.
- From the start of the downswing, try to get your right hip as far away from that object as possible.
Then add the “pitcher” push:
- Feel your right leg straighten as you push your belt buckle toward the target.
- Extend the right leg on a slight angle, as if pushing off a mound.
- Keep your head staying over your ball line while you fire the lower body forward.
Try the drill like this:
- Make a normal setup and backswing.
- From the top, initiate with the right-leg push feel.
- Notice if your right hip creates separation from the imaginary wall.
- Check that your hips end up turned and forward.
- Then hit a shot maintaining the head-back condition.
This trail-side feel is especially helpful if you struggle with early extension knee behavior. When your hips move forward correctly, you often remove the need to “stand up” through impact to find space.
Step 7: Combine shift and rotation so your low point moves forward
The forward hip move is not only a shift. It must blend with rotation. In elite patterns, the belt buckle rotates toward the target while the hips travel forward. That creates a forward-moving low point, better compression, and a divot that travels past the ball instead of cutting behind it.
When your low point moves forward, you typically see improvements in:
- Contact quality: fewer thin and fat strikes.
- Club delivery: more inside-out or inside delivery feel (depending on your swing).
- Power: better sequencing and more efficient energy transfer.
- Angle of attack: improved shallow delivery and strike consistency.
If your hips are not moving forward, you cannot fix compression with only arms and hands. The pelvis has to go forward several inches in a way that matches how the pros rotate.
Practical expectation: your hips should move roughly 3 to 6 inches forward like the best ball strikers. That is the range where many golfers start to notice meaningful changes in strike location and trajectory stability.

Step 8: Your practice routine to ingrain the one move that matters
You do not need hundreds of balls. You need a repeatable process that checks the right things.
Routine for the range (10 to 15 minutes)
- Rehearse the lead-side drill (knee outside ankle) for two swings without hitting a ball.
- Hit 5 balls focusing on: hips forward, belt buckle toward the lead ankle, head stays back.
- Switch to the trail-side push feel and hit 5 balls.
- Compare by checking divots (is your low point moving forward?) and shot shape consistency.
Routine at home (2 to 5 minutes)
- Do 10 lead-side knee-forward rehearsals slowly.
- Do 10 trail-side “wall separation” rehearsals slowly.
- Record one swing per day on your phone to monitor the hip-line and head position.
Use video to confirm the hip move is happening. Feels are useful, but outcomes matter. Draw lines on your legs and see if your hips are actually traveling forward toward the target during the downswing.
FAQ
How do I know if I’m not moving my hips forward enough?
If your impact position feels “stuck” or your contact is inconsistent, you are likely not getting enough forward hip travel. A video check often reveals hips staying too centered or too far back relative to your lead leg. You may also see thin shots, fat shots, or divots that start behind the ball because the low point is not moving forward.
Should I use the lead-side feel or the trail-side feel?
Choose the one that reliably sends your pelvis forward while keeping your head back. If you struggle with hanging back, the weight scale knee-forward (lead-side) rehearsal often works well. If lead-side feels make you lurch or stand up, the trail-side pitcher push can help you create forward hip motion with better balance.
Why is keeping your head back over the ball line so important?
When your head moves forward too early, the club often comes out over the top and your angle of attack steepens. Keeping your head back gives the arms and club time to reach the low and inside delivery position, improving compression and reducing the need for compensations like early extension.
Will moving my hips forward fix early extension?
It can. Early extension often happens when your body does not have the space created by forward pelvic movement. When you successfully move your hips forward and maintain the head-back constraint, you often reduce the tendency to “stand up” into impact.
How far forward should my hips move?
A common benchmark is roughly 3 to 6 inches forward, similar to how elite ball strikers move. The exact number varies by body type and swing, but the key is that it is noticeably forward and not just a small shift.
Key takeaways
- Consistent solid contact starts with moving your hips forward toward the target during the downswing.
- Pros combine forward hip travel with rotation, while their head stays back over the ball line.
- You can drive forward hip movement through two feels: fall into the lead side or push off the trail side.
- Use the weight scale knee-forward drill or the pitcher wall-separation drill, then hit with the same timing.
- Video your hip-line and head position so you confirm the movement, not just the sensation.
If your swing has been “almost right” but never truly consistent, make this the priority move. When your hips go forward and your head stays back, your club is more likely to deliver correctly, your low point moves forward, and your ball striking becomes repeatable.
0 Comments