
Focus keyphrase: trail arm golf swing
This article explains the trail arm golf swing — what the trail arm should do, why it matters for connection and swing plane, and how to fix the most common mistakes. If your shots are inconsistent, you cast the club, or you feel like your dominant arm takes over the backswing, this guide gives clear, step-by-step instruction, drills, and a practice checklist to build a more reliable, powerful swing.
Table of Contents
- What is the trail arm and why it matters
- Step 1: Setup — preset the trail arm for success
- Step 2: Establish connection without pinning the arm
- Step 3: Takeaway and backswing — keep the trail arm working properly
- Step 4: Drill sequence to train the trail arm
- Step 5: Transition and downswing — reduce manipulation
- Step 6: Common faults and targeted fixes
- Practice checklist: 8-point drill routine
- How to know you are improving
- Common misconceptions about the trail arm
- Quick troubleshooting guide (2-minute checks)
- FAQ
- Summary and final checklist
What is the trail arm and why it matters
The trail arm is the arm on the same side as your trail shoulder — for a right-handed player, the right arm. Its structure during setup and the backswing greatly affects:
- Connection — whether your hands stay in front of your body’s center during the swing.
- Width — the distance between your hands and the center of your body, which affects power and swing radius.
- Swing plane and hand path — a properly rotated trail arm helps place the club on the correct plane and stabilizes the face.
When the trail arm is positioned and rotated correctly, you get a compact, consistent takeaway, a stable top of swing, and a simpler path down through impact. When it is wrong, you can end up with a narrow, rushed swing, inconsistent face control, and a lot of “catch-up” on the downswing.
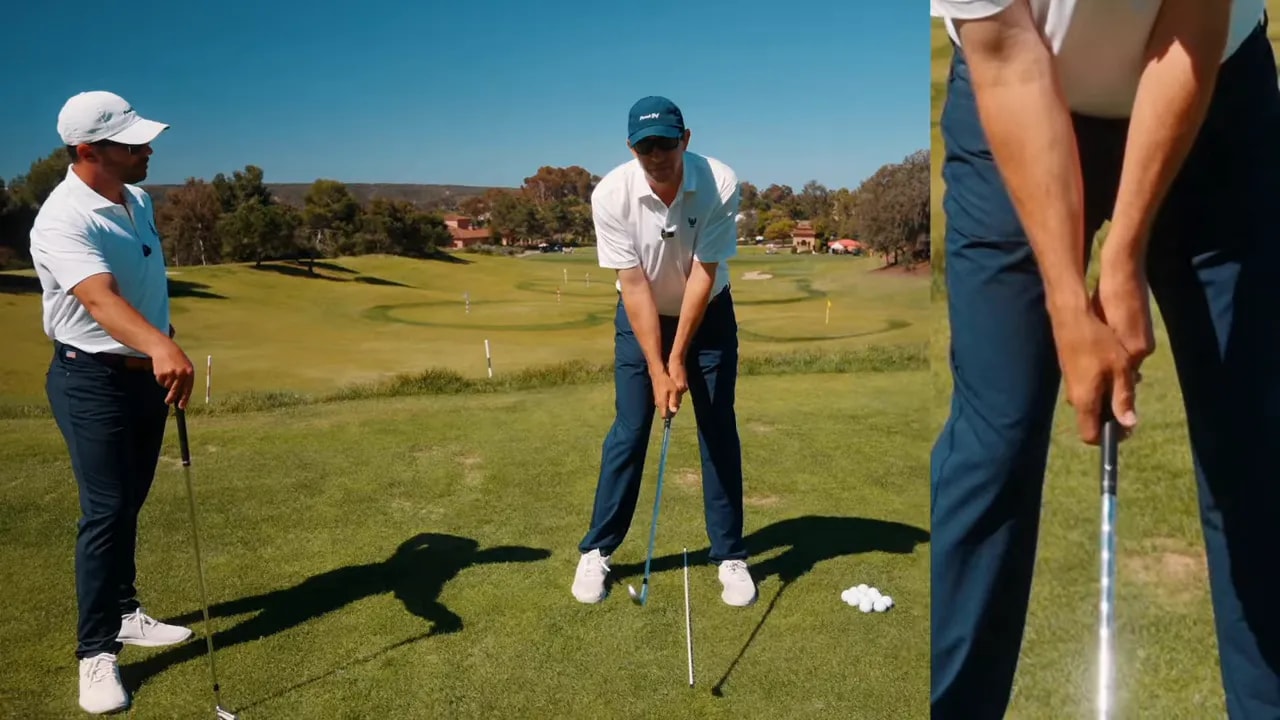
Step 1: Setup — preset the trail arm for success
The foundation of a good trail arm golf swing is the setup. Preset your trail arm so it can rotate correctly during the backswing without extra manipulation.
- Grip first, then arm position. Hold the club with your normal grip. Do not let a preset arm position force your hand under the grip.
- “Giving blood” feeling. Slightly externally rotate the trail elbow so the inner elbow shows a subtle vein or crease — imagine you could give blood from that arm. This is a cue for external rotation of the elbow, not for collapsing the wrist.
- Point the ulna or “funny bone” down toward the ball. Rotate the forearm so the ulna bone is oriented slightly down. This helps set the club on plane and keeps the hands forward of the center.
Presetting the trail elbow keeps the club on plane and prepares the hand path for a connected backswing.
Step 2: Establish connection without pinning the arm
Connection means your hands stay in front of the center of your body (sternum). It does not mean pinning the trail arm tight to the side. Two mistakes are common:
- Pinning the trail arm too close to your side, which reduces width and forces a narrow swing.
- Flaring the trail elbow too far out, which opens the face and creates an inconsistent path.
To get the balance right:
- Keep your hands ahead of the sternum at address and maintain that relationship through the backswing.
- Allow a small gap between the trail elbow and torso so you keep width while the hands remain in front.
- Rotate the trail forearm inward toward the ball, not into your body. The cue “in” refers to rotation, not collapse.

Hands in front of the center with modest elbow clearance preserves width and connection.
Step 3: Takeaway and backswing — keep the trail arm working properly
How the trail arm behaves during the takeaway defines your hand path and swing plane. Follow these actions:
- Start with the body. Initiate the takeaway with a gentle turn of the shoulders while the trail elbow stays rotated and slightly away from the body.
- Avoid pulling the club with the trail hand. If the trail arm tries to “do the work,” it will alter the path and the face. Try a few one-arm takeaways using the lead arm only to feel the ideal path.
- Maintain the preset rotation. Keep the ulna pointed down and the elbow soft but rotated. This keeps the club on plane as the hands move to the top.
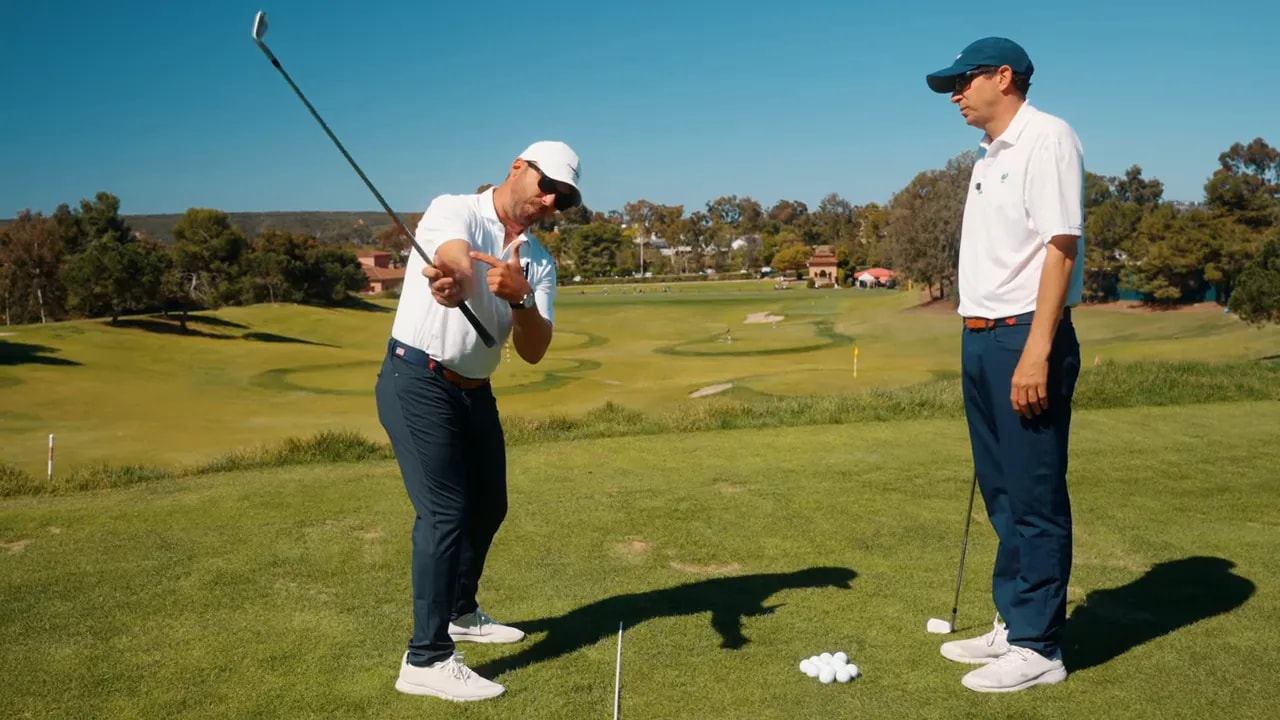
Use one-arm takeaways to feel the correct path and remove early trail-hand manipulation.
Step 4: Drill sequence to train the trail arm
Practice these drills in sequence. Start slow, build tempo, and add a ball only after consistency appears.
Drill A: Lead-arm-only backswings
- Take the club with only your lead arm (left arm for right-handed players) and make 10 slow backswings to waist height, then to shoulder height.
- Focus on the body turn creating the path. This frees the trail arm to remain soft on real swings.
Drill B: Elbow-behind-the-lead-hand cue
Place your lead hand behind your trail elbow and gently pull it toward the center of your body at address to feel the elbow staying in front of the torso. This creates a “tight but soft” connection that forces a proper body turn to reach the top.
This drill trains the trail elbow to remain forward of the body and prevents it from falling behind the seam of the shirt.
Drill C: Head-cover or small object in front-of-pec drill
- Place a head cover or small object just in front of your lead pec at address.
- Make slow backswings. The trail elbow should remain forward enough to avoid dislodging the object while still allowing clearance.
Drill D: Mirror-check rotation
Use a mirror to confirm that the trail forearm rotates inward toward the ball, keeping the ulna pointed down at setup and during the early backswing. The wrist position should not be forced under the grip.
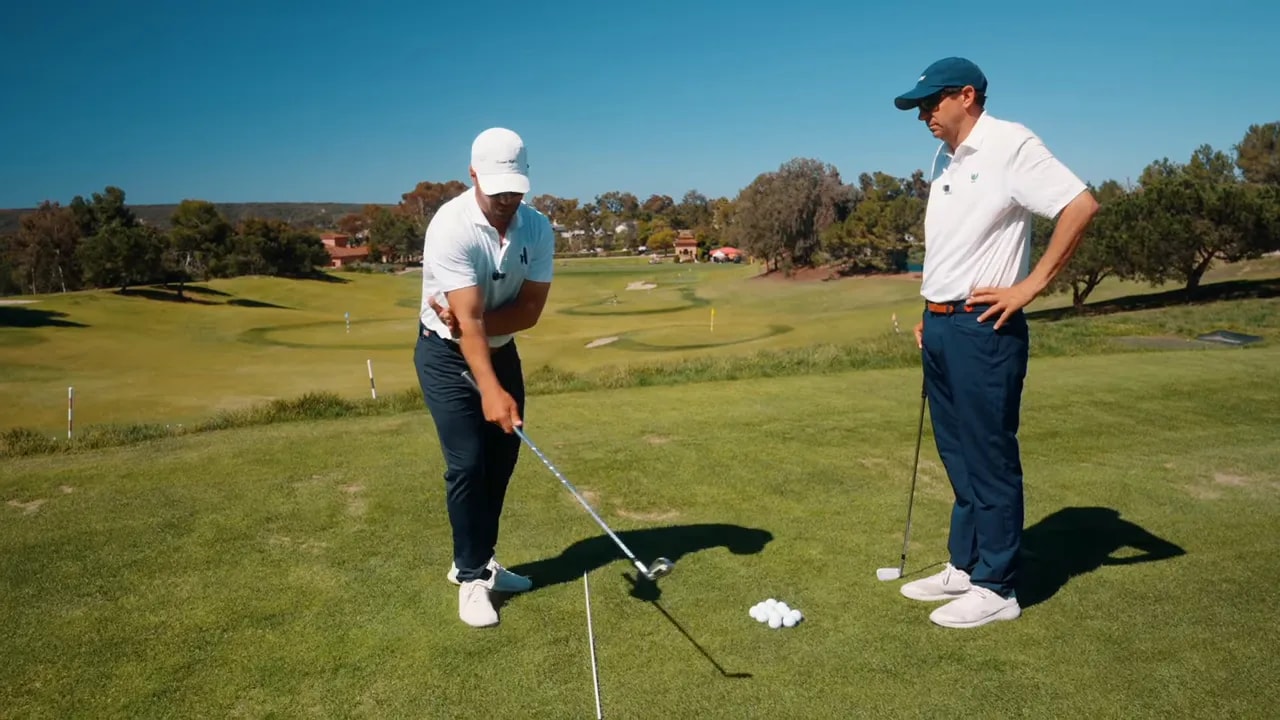
Step 5: Transition and downswing — reduce manipulation
The goal of correct trail arm work is to make the downswing simple. When the trail arm is set correctly:
- Weight moves forward naturally with minimal arm manipulation.
- The clubface remains more stable through impact.
- You create forward shaft lean and consistent contact.
To get this result:
- Keep the trail arm soft at the top rather than grabbing or pulling the club.
- Start the downswing with a lower-body shift and rotation; let the lead arm guide the club down the plane established by the trail arm.
- Resist the urge to “flip” the wrists early — the preset rotation and width help the club return square.
Step 6: Common faults and targeted fixes
Below are the most common trail arm faults and immediate fixes you can apply on the range.
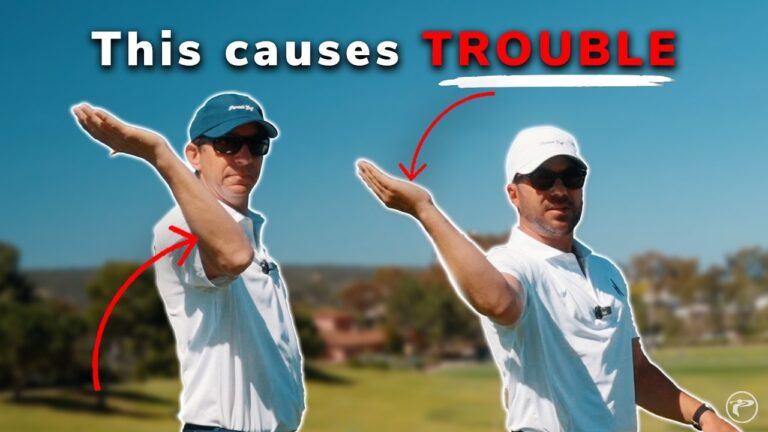
Fault: Trail elbow pinned to your side (too narrow)
Symptoms: Loss of width, weak or blocked shots, late release and inconsistency.
Fix: Reestablish the ulna-down preset and allow a small gap between elbow and rib cage. Practice lead-arm-only takeaways until you can feel the correct width.
Fault: Trail elbow flares out (too wide)
Symptoms: Open clubface at the top, slices, or overly outside-in swings.
Fix: Use the lead-hand-behind-elbow drill and the head-cover drill to bring the elbow to a slightly tacked-in but rotated position. Focus on soft tension, not locked muscles.
Fault: Over-rotated wrist under the grip
Symptoms: Grip underside shows, loss of wrist hinge control, inconsistent face control.
Fix: Check that the trail hand remains on top of the grip. Separate wrist and elbow cues — rotate the forearm (ulna down) while keeping the grip neutral.
Fault: Trail arm trying to do the takeback
Symptoms: Quick, arm-dominated takeaway; plane shifts; inconsistent contact.
Fix: Practice slow one-arm backswings with the lead arm. Use a metronome or count to ensure tempo while the body initiates rotation.
Keep the wrist and elbow as independent elements. Give the elbow the rotation cue while the hand stays on top of the grip.
Practice checklist: 8-point drill routine
- Grip and setup: normal grip, feel the ulna pointing down toward the ball.
- Preset: feel a subtle “giving blood” rotation in the trail elbow.
- One-arm lead takeaways: 10 reps slow to shoulder height.
- Lead-hand-behind-elbow pull: 10 slower reps to ingrain elbow in front of body.
- Head-cover drill: 10 reps ensuring the cover is not kicked forward.
- Mirror rotation check: verify trail forearm rotation and hand-on-top grip.
- Half-swings with a focus on width: 10 reps, maintain distance between hands and sternum.
- Full swings with impact focus: 20 balls, aiming for forward shaft lean and a stable face.
How to know you are improving
Signs your trail arm golf swing is improving:
- Consistent ball flight and strike quality.
- More forward shaft lean at impact and reduced flipping.
- Better tempo and fewer “catch-up” swings.
- Less need to manipulate the club with the hands during the downswing.
Common misconceptions about the trail arm
Clarifying three frequent misunderstandings:
- “Connected” means the arm must be glued to your side. Wrong. Connection means hands stay in front of the body’s center. Maintain width while keeping hands forward.
- “Rotate the elbow in” means shove it into your ribs. No. “In” means rotate the forearm inward toward the ball. The elbow should remain slightly away from the torso to preserve width.
- More tension equals more control. Not true. You want necessary tension to preserve position but overall softness for fluid rotation. Rigid muscles will restrict the turn.
Quick troubleshooting guide (2-minute checks)
- Address the ball and check the ulna direction. If it points up, adjust forearm rotation.
- Make a slow takeaway to waist height. If the trail hand tries to dominate, do three lead-arm-only reps immediately.
- At the top, check distance from elbow to side. If elbows are wrapped behind the body, work on width drills for 10 minutes.
FAQ
How do I preset the trail arm without gripping the club incorrectly?
Preset the trail elbow rotation first by externally rotating the elbow and pointing the ulna down. Then place your trail hand on top of the grip in a neutral position. The wrist and elbow are independent; a rotated elbow does not require the hand to move underneath the club.
Is it bad if my trail elbow is away from my body?
Not necessarily. A small gap preserves width, which helps power and a consistent swing arc. The problem is when that gap becomes either too large (causing a flared elbow and an open face) or too small (pinning the arm and creating a narrow, trapped swing).
Should I practice with only my lead arm every session?
Use lead-arm-only drills regularly, especially when retraining the trail arm. Short, focused sessions (5 to 10 minutes) several times per week are effective. Alternate these with full-swing sessions to integrate the feeling.
What if I lack the range of motion to get the ideal trail elbow position?
Work within your available range. Even a small improvement in rotation or width yields benefits. Incorporate mobility work for the shoulders and thoracic spine, and use drills that emphasize the body turn so you do not rely solely on arm position.
How long does it take to change a trail arm habit?
Habit change varies by player. With focused practice and drills, noticeable changes can appear in weeks. For durable motor learning, practice consistently for several months and use video or mirror checks to reinforce the new position.
Summary and final checklist
Fixing the trail arm golf swing is one of the highest-leverage changes you can make. Focus on these essentials:
- Setup: ulna pointed down, trail elbow externally rotated, hand on top of the grip.
- Connection: hands stay in front of the sternum while maintaining width.
- Drills: lead-arm-only takeaways, lead-hand-behind-elbow pull, head-cover drill, and mirror checks.
- Practice: short, focused repetitions, gradually integrate full swings with tempo and impact focus.
Use the drill sequence and checklist above for range sessions. Track your ball flight and contact quality to measure progress. With consistent practice, the trail arm will stop being a liability and start delivering more stable power and control.
0 Comments