

The wrist set is one of the simplest changes that delivers the biggest improvements in ball striking and distance. When you hinge your wrists the right way, you produce speed through a natural up-and-down motion, square the club face, and place the shaft on plane so the downswing becomes a reliable repeatable action. This guide breaks the move into clear checkpoints, body-free drills, and a practice sequence you can use on the range today.

Table of Contents
- Step 1: Wrist hinge in golf swing — identify the three checkpoints
- Step 2: How much hinge — reach 90 degrees by left arm parallel
- Step 3: Hammer drill — feel the vertical hinge with your lead wrist
- Step 4: Flatten the lead wrist — remove the cup
- Step 5: The 45-degree drill — hinge left wrist up and right wrist back
- Step 6: On-plane hinge — align the shaft to the target line
- Step 7: Practice sequence — rehearsals into live swings
- Step 8: Troubleshooting — common problems and fixes
- Step 9: Grip strength matters — adjust hinge to your grip
- Step 10: What success looks like — outcome expectations
- FAQ
- Practice checklist — a quick means to measure progress
Step 1: Wrist hinge in golf swing — identify the three checkpoints
Before changing anything, learn the three checkpoints you must hit on the way back. Hitting all three makes the downswing simple and powerful.
- Takeaway checkpoint: When your hands reach just outside your thigh, the club shaft should be parallel to the ground.
- Halfway back checkpoint: By the time your left arm is parallel to the ground, the wrists should be hinged to roughly a 90 degree angle from face-on view.
- On-plane checkpoint: The butt of the club should point roughly at the target line (the ball-target extended line) as you hinge and turn.
If you miss any of these three, expect inconsistency, thin contact, and lost distance. Use these as measurable checkpoints during practice.

Step 2: How much hinge — reach 90 degrees by left arm parallel
A solid target is roughly a 90 degree wrist hinge when your left arm is parallel to the ground. Some tour players hinge a touch more as they finish, but the crucial mid-backswing checkpoint is 90 degrees. From a typical setup angle between the lead arm and shaft (often around 140 degrees), you will progressively increase hinge early in the takeaway to reach that 90 degree mark.
Practically, this looks like about 50 degrees of hinge during the initial turn and only another 10 to 15 degrees as you finish the backswing. You should feel the hinge happen steadily — not all at once — during the first half of the backswing.
Step 3: Hammer drill — feel the vertical hinge with your lead wrist
Isolate the vertical hinge before adding the face-squaring motion. Hold the club in front of you with both hands and simulate raising the club so the shaft becomes parallel to the ground. This motion is a simple up and down feel — like using a hammer.
- Grip the club and hold it in front of your chest so the lead arm and shaft create the starting angle.
- Raise the club using mainly the left wrist so the butt of the club becomes parallel to the ground.
- Repeat the up-and-down motion and let the club thud the ground a few times to feel the vertical hinge and the follow-through down motion.
That up-and-down creates the necessary “what goes up must come down” speed that lets you hit down on irons and produce more power. If you struggle to hit the ground with irons, this drill is the first place to start.
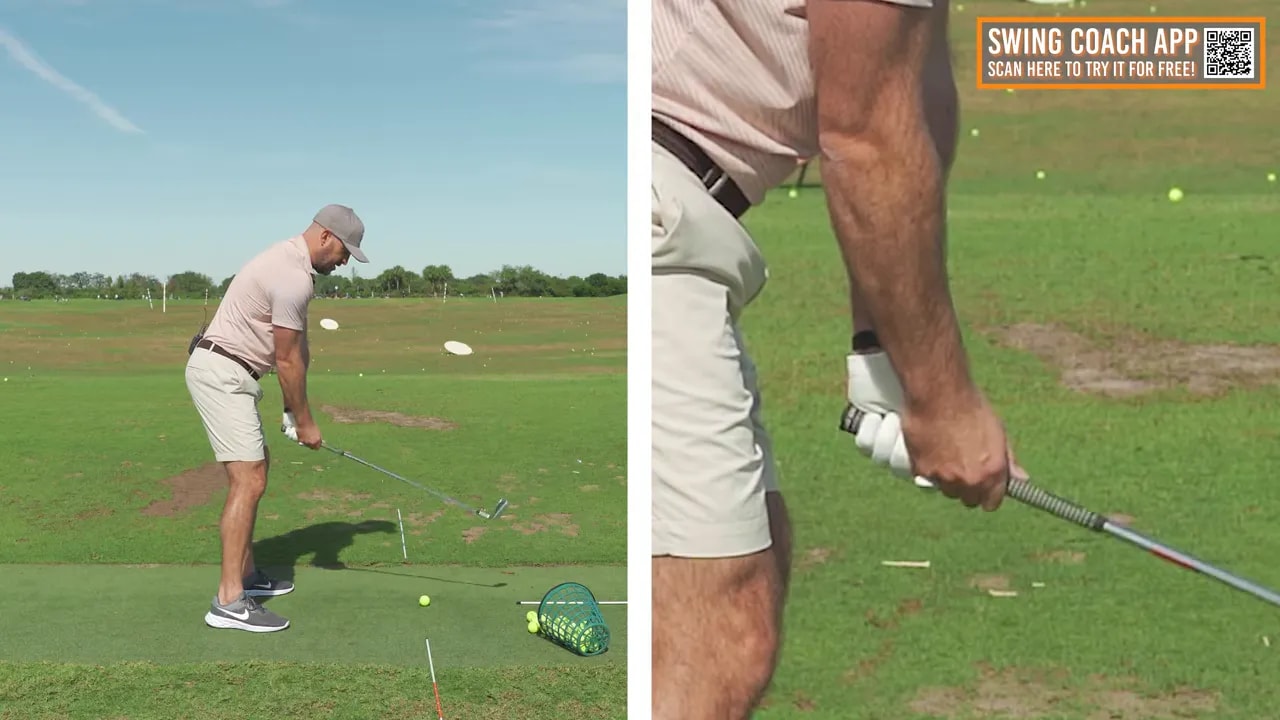
Step 4: Flatten the lead wrist — remove the cup
Hinging the left wrist vertically alone will usually create an unwanted cupping of the lead wrist. As the wrist cups, the club face tends to open, which results in shots that miss right or lack compression. To prevent cupping, add the right wrist motion.
The left wrist controls the vertical up-and-down component. The right wrist controls face angle by bending back or “bowing” the right wrist. When you blend left wrist up with right wrist back, the lead wrist flattens and the face squares.

Step 5: The 45-degree drill — hinge left wrist up and right wrist back
Combine the two wrist feels so the shaft is hinged on approximately a 45-degree angle relative to vertical when you first rehearse. This keeps the club face square while still building vertical hinge.
- Start with the hammer feel: left wrist lifts the club.
- Add a deliberate right wrist bend so your right palm points slightly away from you.
- The blended motion should place the butt of the club at a 45-degree angle when the arms are away from the body.
Practice this without turning the torso at first. Feel left wrist up, right wrist back. Then add a modest chest and core turn away from the target. The body turn pulls that 45-degree hinge down onto the plane line so the butt of the club points at or just inside the target line.

Step 6: On-plane hinge — align the shaft to the target line
Getting the hinge on plane prevents swings where the club points too vertical or too flat. Use a simple alignment rod, spare club, or the butt of a club behind the ball to visualize the plane line. The butt of the club should track to that line as you hinge and turn.
Checkpoints recap:
- Takeaway: Shaft parallel to ground as hands pass outside your thigh.
- Halfway back: 90 degree hinge, flatish lead wrist, butt of club pointing on plane.
- Top of backswing: Slightly more hinge (approximately 75 degrees face-on for many players) with consistent on-plane orientation.

Step 7: Practice sequence — rehearsals into live swings
Make a short, repeatable practice routine to build the feelings into your muscle memory. Use this sequence every range session.
- Three hammer-only reps: left wrist up, club thuds the ground. Focus on vertical feel only.
- Three 45-degree reps: left wrist up, right wrist back. No body turn, just arm motion.
- Three reps with a small body turn: blend the hinge with chest/core rotation to place the butt of the club on-plane.
- Full swings: take the blended feel into full shots and check results on camera or with alignment aid.
Film short practice clips from face-on and down-the-line to confirm the shaft angle at the checkpoints. If you do not have video, use an alignment rod or another club placed on the ground to verify the butt of the club is on the target line as you hinge.

Step 8: Troubleshooting — common problems and fixes
Problem: Ball curving right or missing right
If you swing with a neutral grip and the ball fades or misses right after adding hinge, the club face is likely too open. The fix is to increase the right wrist bend back during the hinge. More right wrist back returns the face to square at the halfway point.
Problem: You feel like you are hinging a lot but it still looks neutral
Many players who habitually avoid wrist hinge will need to exaggerate the feeling to reach a neutral hinge. Use video to confirm you are actually achieving 90 degrees by left arm parallel. Trust camera feedback rather than feel alone during the early stages.
Problem: Too much cup remains
Add more right wrist bend back to flatten the lead wrist. Practice the 45-degree drill slowly until the lead wrist looks flat from face-on view at the halfway point.

Step 9: Grip strength matters — adjust hinge to your grip
Grip influences how much wrist bow or cup you need to square the face. A stronger grip allows more natural cup while maintaining a square face. A weaker grip requires more right wrist bend to produce the same face squaring.
- Stronger grip: Less right wrist bow required; some cup can remain while the face stays square.
- Weaker grip: More right wrist bow required; less vertical hinge may be needed to keep the face square.
Use the 90-degree by left arm parallel checkpoint as your baseline and tune small adjustments to fit your unique grip.
Step 10: What success looks like — outcome expectations
When you hinge correctly and square the face while keeping the shaft on plane, expect:
- More consistent, solid contact with irons.
- Increased distance due to improved leverage and down-on-the-ball compression.
- More predictable shot shape and easier transition into an efficient downswing.
The goal is not a dramatic mechanical change every swing but a repeatable checkpoint system: Shaft parallel at the takeaway, 90-degree hinge at left arm parallel, and the butt of the club pointing at the ball-target line.

FAQ
How much wrist hinge should I have by left arm parallel?
Aim for roughly a 90 degree hinge face-on by the time your left arm is parallel to the ground. This is the most reliable mid-backswing checkpoint for consistent power and compression.
What causes cupping and how do I fix it?
Cupping happens when the lead wrist bends backward toward the forearm during hinge, opening the club face. Fix it by adding right wrist bend back during the hinge so the lead wrist flattens. Practice the 45-degree drill until the face looks square at left arm parallel.
How can I practice the hinge without a full swing?
Use the hammer drill. Hold the club in front of you and practice the vertical up-and-down motion. Then add right wrist back to reach the 45-degree feel. Finally, add a small torso turn and then full swings once the feeling is consistent.
Does my grip change the hinge I should use?
Yes. A stronger grip allows more cup while maintaining a square face, so you may need less right wrist bow. A weaker grip needs more right wrist bow to square the face. Keep the 90-degree by left arm parallel target and adjust small amounts to fit your grip.
How do I know if the club is on plane during the hinge?
Use an alignment rod or spare club on the ground pointing down the target line. With the club in your hands, the butt should point at or just inside that line as you reach left arm parallel. Filming from down-the-line confirms the butt of the club tracks on plane.
Practice checklist — a quick means to measure progress
- Shaft parallel to the ground when hands are outside the thigh on the takeaway.
- 90 degree hinge by left arm parallel from face-on view.
- Lead wrist is flatish and the butt of the club points at the target line.
- Repeatable feel: left wrist up, right wrist back, blend, then add body turn.
- Confirm with camera or alignment rod during practice sessions.
Spend solid time on rehearsals: three hammer reps, three blended 45-degree reps, three with the body, then full swings. Film the key checkpoints. Consistency will translate to better ground contact and reliable distance.
This wrist-set approach simplifies the backswing by turning multiple vague cues into three straightforward checkpoints. Use the drills, trust the feel of left wrist up and right wrist back, and make the 90-degree half-backswing your new standard. The result should be straighter, longer, and more satisfying shots.
0 Comments