


A reliable driver swing can transform your golf, but better drives rarely come from fixing impact alone. Your setup influences your backswing, and your backswing determines how easily you can deliver the club. If an earlier piece is out of place, you often spend the rest of the swing compensating.
Think of your driver swing as a house. Your setup provides the foundations, your backswing builds the walls, and your downswing and impact complete the roof. You need to build them in that order.
The following steps give you practical checkpoints for each stage. Rather than chasing a complicated collection of positions, you can work toward a golf swing that creates space, loads correctly, and lets you release the driver freely.
Table of Contents
- Step 1: Position the Golf Ball Relative to Your Upper Body
- Step 2: Balance Your Golf Setup and Add a Little Tilt
- Step 3: Make Your Clubface and Body Alignment Agree
- Step 4: Give Your Arms Enough Room with the Driver
- Step 5: Load Your Trail Side During the Golf Backswing
- Step 6: Maintain Your Relationship with the Ground
- Step 7: Organize the Takeaway and Arm Lift
- Step 8: Shift and Turn While Keeping Your Head Behind the Ball
- Step 9: Bring Your Trail Elbow Back Toward Your Hip
- Step 10: Release the Driver Freely and Check Your Progress
Step 1: Position the Golf Ball Relative to Your Upper Body
You have probably been told to position your driver opposite the inside of your lead heel. That is a useful starting point, but it does not tell the whole story. Your stance width changes where the golf ball sits relative to your upper body, even when its position beside your heel stays unchanged.
With an excessively wide stance, the ball can become too far forward relative to your torso. With a very narrow stance, your lead shoulder can move ahead of it. The foot reference looks correct in both cases, yet the relationship that matters has changed.
Use your lead armpit as your main reference. The ball should sit approximately beneath it, while remaining just inside your lead heel.

Build a simple checking station:
- Place an alignment stick or spare golf club on the ground to mark the ball position across your stance.
- Set your lead heel just forward of that reference.
- Hang your driver vertically from your lead armpit.
- Adjust your stance width until the hanging club falls approximately over the reference.
This connects your stance width to your upper body instead of treating them as separate setup decisions.
Step 2: Balance Your Golf Setup and Add a Little Tilt
Check your ball position while your weight is balanced approximately 50/50 between your feet. If you lean heavily toward either side, your shoulders move, changing the reference you have just established.
A small shuffle of your feet can help you settle into a balanced address position. You are looking for stability, not a forced lean onto your trail leg.
Next, position your sternum fractionally behind your belt buckle. This creates a slight upper-body tilt away from the target. Your trail hand sits lower on the grip, so a little shoulder tilt should follow naturally.
- Weight: approximately even between both feet.
- Upper body: tilted slightly away from the target.
- Ball: approximately beneath your lead armpit.
- Shaft: neutral rather than deliberately pressed forward.
Avoid exaggerating the tilt. You only need enough to establish the appropriate driver setup. Combined with the forward ball position, this helps you meet the golf ball later in the swing arc and encourages an upward strike.
Step 3: Make Your Clubface and Body Alignment Agree
A driver face can point at your target while your upper body points somewhere else. This is a common source of confusion when your golf shots leak right despite an apparently square setup.
Because the ball is forward, reaching across with your trail hand can push your trail shoulder and forearm outward. For a right-handed golfer, this opens the upper body toward the left, even when the feet, knees, and hips appear aligned.
If you then return your arms to a more neutral relationship during the swing, the clubface can become open. You have not necessarily made a poor swing correction. You may have started with a mismatch.
Use this upright alignment check:
- Stand upright with the driver held in front of you and its face square.
- Check that your forearms are approximately level, allowing the trail side to sit slightly lower.
- Use an alignment stick across your forearms as a temporary reference if helpful.
- Tip forward into your golf posture without changing that relationship.
Your clubface should aim at the target while your forearms and body lines run parallel to the ball-to-target line. Check the whole arrangement, not just the driver head.
Step 4: Give Your Arms Enough Room with the Driver
The advice to let your arms hang freely from your shoulders works differently with a driver than with an iron. With your driver, your arms should reach slightly farther away from your body.
You need room to swing the longer club and create speed. Standing too close leaves your hands cramped against you, reducing the space available for the movement.
Once you have established your golf setup, remove your trail hand from the grip and relax that arm. It should hang inside the grip, closer to your body. You should then be able to swing the relaxed hand gently toward the target and just miss the grip.

If your hand hits the grip, you are likely standing too close. Adjust your spacing and check again.
The goal is not an exaggerated reach or rigid arms. You want a comfortable gap that gives your hands and the golf club enough room to move freely.
Step 5: Load Your Trail Side During the Golf Backswing
With the foundations established, separate your backswing into two parts: your body movement and your arm movement. Start with your body, because the club is difficult to organize when your turn is poorly balanced.
Place an alignment stick on the ground just inside your trail heel, then hold your driver across your shoulders. Turn into your backswing and, from your own perspective looking down, try to position the grip approximately above the ground stick.
This gives you a reference for loading into your trail side without drifting excessively away from the target.
- If you load too much onto your lead side, you may create a reverse pivot.
- If you sway too far away, the shoulder-level club moves beyond the ground reference.
- A small amount of head movement is acceptable. You do not need to hold your head completely still.
As you begin the turn, feel pressure building beneath your trail foot and leg. Think of pushing down into that side rather than simply moving your torso sideways. Your golf backswing should feel loaded, not displaced.
Step 6: Maintain Your Relationship with the Ground
Loading your trail side is only part of an effective turn. You also need to preserve the relationship with the ground that you established at address.
Your setup includes knee flex, hip bend, and a torso inclined toward the golf ball. If your shoulders turn too level, or you dip excessively, you alter that relationship and make the return to the ball more difficult.
To feel the appropriate movement, extend your arms out to your sides and rehearse your backswing turn:
- Let your lead hand move closer to the golf ball.
- Let your trail hand move farther away from it.
- Build pressure beneath your trail side while maintaining your overall inclination toward the ground.
This is not about freezing your spine into one rigid position. It is about turning while retaining your address relationship with the ball.
Combine the two body rehearsals: load into your trail side, then check that you have not stood up or collapsed downward to achieve it.
Step 7: Organize the Takeaway and Arm Lift
Your arms have a job in the golf backswing. Body rotation alone does not guarantee a useful position at the top.
Begin with a checkpoint when the shaft first reaches approximately parallel to the ground. At this stage, look for two things:
- Shaft direction: approximately parallel to your ball-to-target line.
- Clubface direction: angled slightly downward toward the ground.

If you tend to slice, check whether you pull the club too far inside while rolling the face upward. That combination leaves you needing a recovery later.
The early takeaway comes largely from your body turn. Beyond that, your arms need to lift as you continue turning. Too much lift places your lead arm very upright; too little carries it excessively around your body.
At the top, aim for your lead arm to sit at an angle broadly similar to your shoulder angle. A useful reference is the sensation that the grip sits above your trail ankle or heel. Treat this as an approximate checkpoint, not an exact position you must force.
Step 8: Shift and Turn While Keeping Your Head Behind the Ball
Your golf downswing needs pressure moving toward your lead side without your upper body lunging ahead of the ball. You can feel this distinction with two alignment sticks.
Place one through your belt loops and hold the other across your shoulders, with both extending farther on your trail side. Notice the gap between their trail-side ends at address. That gap grows as you complete your backswing.
From the top:
- Move pressure toward your lead foot.
- Begin rotating your hips toward the target.
- Bring the trail-side ends of the sticks together.
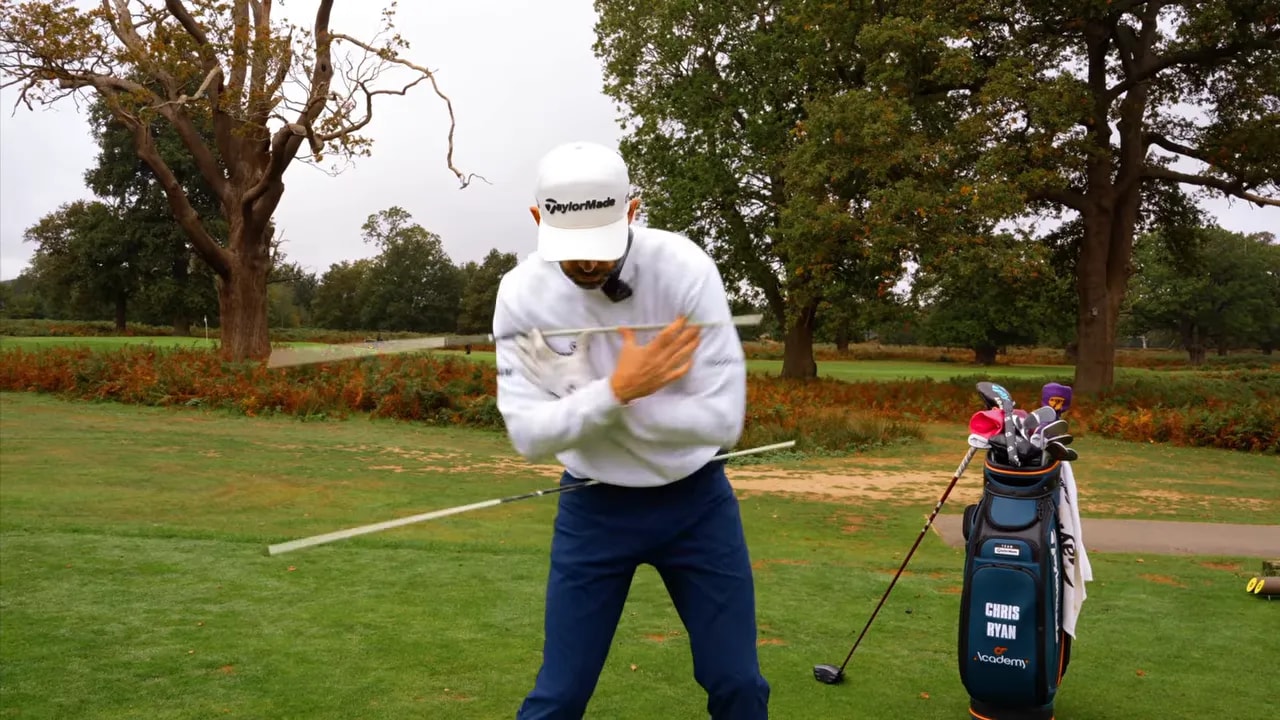
The rehearsal encourages side bend, with your trail shoulder lower than your lead shoulder. Your lower body moves toward the target while your head remains behind the golf ball.
If your head and chest move too far forward, you can meet the ball too early in the arc, encouraging a downward strike and leaving less opportunity to square the face.
Keep your head back without hanging all your weight back. The pressure shift, rotation, and side bend work together. You are not trying to leave your entire body on your trail foot.
Step 9: Bring Your Trail Elbow Back Toward Your Hip
A good body motion does not mean your arms can remain passive. If your torso moves into position but your arms stay high, you can still deliver the driver down and across the golf ball.
During the backswing, arm lift moves your trail elbow away from your trail hip. During the downswing, that relationship needs to close again.
As you shift and turn, feel your trail elbow moving down toward your trail hip. Combine that arm movement with the body action from the previous step, rather than treating it as something that happens afterward.

This helps you reach a delivery position with your head behind the ball and the club approaching from the inside. If your arms return too late, you may find yourself producing slices, pulls, or low golf shots despite a better body position.
Once the pieces are coordinated, you have less to rescue through impact. That is your opportunity to add speed rather than make another correction.
Step 10: Release the Driver Freely and Check Your Progress
The final piece is allowing the club to release. You do not want to guide the golf ball by driving the handle forward and holding the clubhead back through impact.
Put a tee in the end of your grip as a visual reference. At address, it points roughly toward your body. In your delivery position, it points more toward the target. From there, rehearse bringing that tee back to point toward you as the clubhead swings through.
A split-hand grip can help you feel this action. The intention is to let the clubhead release, rather than force forward shaft lean with the driver. Through the follow-through, the tee continues turning toward your trail hip and eventually toward the ground.
Bring your golf practice back to the same building order:
- Foundations: ball position, balance, alignment, and space.
- Walls: trail-side loading, an inclined turn, and coordinated arm lift.
- Roof: pressure shift, rotation, arms lowering, and a free release.
If you have access to launch-monitor feedback, use attack angle, clubface delivery, speed, and strike location to check whether your changes are helping. Those measurements can connect what you feel with how you actually deliver the golf club.
When your driver becomes inconsistent, return to the foundations first. A sound setup makes the rest of your swing easier to build and gives you a better chance of producing longer, straighter, more repeatable drives.
0 Comments