


If your driver produces a weak fade that peels right and finishes short, swinging harder may not solve the problem. You need a setup, swing path, and release that work together rather than force you into last-second compensations.
These driver swing tips focus on three common issues: shoulders that sit too level and open at address, a downswing that travels too steeply and left, and a hold-on release that leaves the clubface open. The practice sequence tackles them in reverse: learn to close the face, improve your path, then refine your setup.
That progression helped one student move from roughly 220-yard fades to 270-yard draws, with about 20 yards gained from the clubface change alone. Your results will depend on your starting point, but the example highlights an important lesson: better driving does not always begin with more effort.
The directions below describe a right-handed swing. If you play left-handed, reverse the left and right references while keeping the same lead-side and trail-side principles.
Table of Contents
- Step 1: Identify What Your Driver Swing Tips Need to Fix
- Step 2: Start Your Driver Swing Tips With Clubface Control
- Step 3: Keep Your Head Back and Trail Shoulder Down
- Step 4: Rehearse an Inside-Out Path With the Clock Drill
- Step 5: Add Body Turn, Then Use a Stick for Feedback
- Step 6: Refine Your Setup to Support the New Motion
- Step 7: Put the Driver Swing Tips Together in One Practice Sequence
Step 1: Identify What Your Driver Swing Tips Need to Fix
Before changing your motion, understand how the three faults connect. Your weak fade may look like a single problem, but it can be the result of a chain that begins before the club moves.
- Poor setup: Your shoulders sit too level and open, with your trail shoulder high and forward.
- Poor path: Your club approaches from high and outside, then cuts across the ball toward the left.
- Poor release: You hold the face open through impact instead of allowing gradual arm rotation.
With that combination, simply trying to swing from the inside can feel uncomfortable. If the face remains open, an inside approach can feel as though it will send the ball even farther right. You may instinctively return to cutting across it.
That is why your first practice task is not a bigger turn or a different address position. It is learning to square the face through the hitting area.
Use this order during practice:
- Driver swing tips for controlling the clubface
- The inside-out path drill
- Your driver setup checkpoints
Your learning order and playing order are different. You learn face control first, but when you eventually hit a shot, you still set up first, swing from the inside, and release through the ball.
Step 2: Start Your Driver Swing Tips With Clubface Control
An open clubface is a major part of the weak-right pattern. In the delivery position demonstrated here, the toe trails behind the heel. That open presentation can also add loft, contributing to a shorter, weaker flight.
Your goal is to replace the feeling of holding the face off with a natural, gradual closing motion. Start without a ball so you can concentrate on the movement rather than the result.
Use the lead-arm-only drill
- Hold your driver with your lead hand only, which is your left hand if you play right-handed.
- Grip down until your thumb is near the lower end of the grip. This makes the club easier to manage with one arm.
- Make small, controlled rehearsal swings.
- As your arm moves through the hitting area, feel your lead elbow and glove logo rotate slightly down and left.
- Allow the clubface to close as a result of that arm rotation.
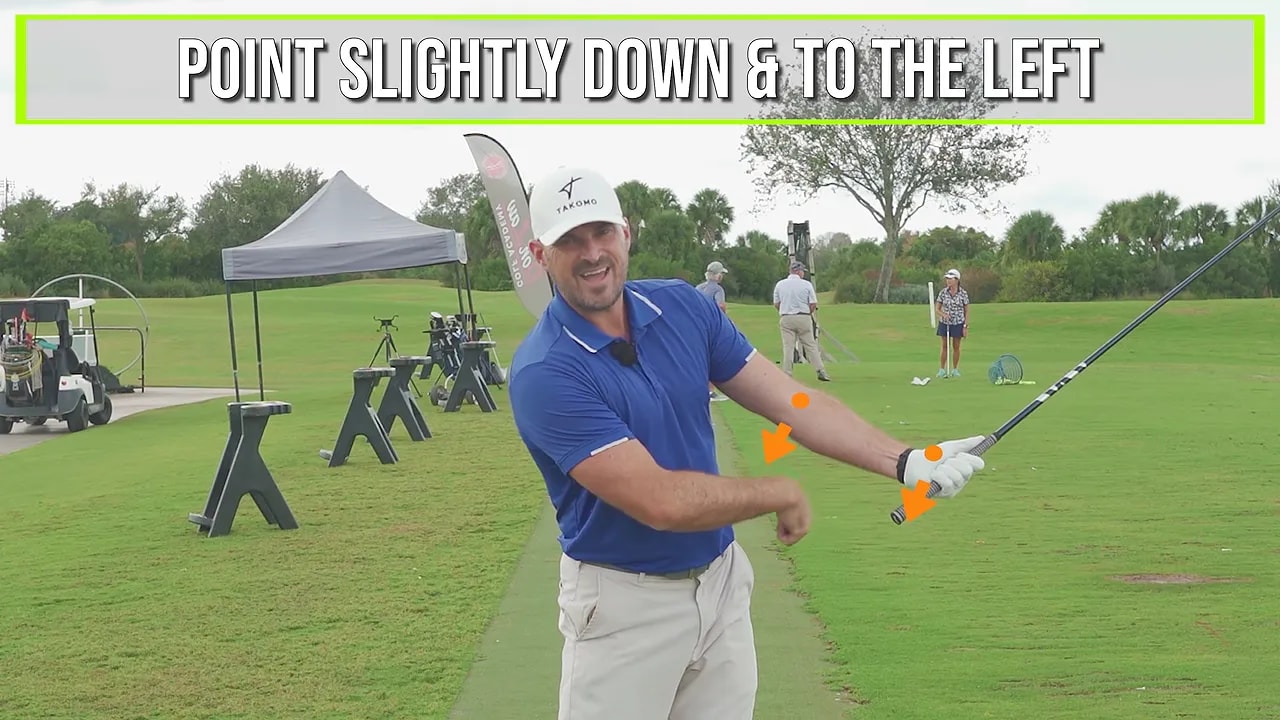
The down-and-left cue is a feel, not a demand to twist your arm as far as possible. Think of a modest rotation, roughly toward a diagonal down-left direction, rather than leaving your elbow and glove logo pointing upward.
Without a ball, the face may look noticeably closed during an exaggerated rehearsal. You are learning the opposite of your usual hold-open pattern, not trying to deliver a dramatically shut face at impact.
Also, allow your lead arm to fold a little on the way through. You do not need to keep it rigidly locked straight. A small amount of normal folding can accompany the rotation.
Make three to five repetitions, then put your trail hand back on the club. Repeat the same motion with both hands, keeping your attention on the lead arm and clubface rather than adding several new swing thoughts.
Step 3: Keep Your Head Back and Trail Shoulder Down
As you work on the release, pay attention to what your upper body does. The arm rotation should not pull your head well forward or lift your trail shoulder high through the hitting area.
Keep two simple checks attached to every rehearsal:
- Your head stays back rather than lunging toward the target.
- Your trail shoulder stays down rather than moving high and forward.
These feels support the low, inside approach you will build next. They also help you separate arm rotation from an upper-body movement that makes your delivery steeper.
You are not trying to freeze your whole body. At this stage, you are simply reducing variables so you can learn how the arms release. Body turn comes later in the progression.
A useful rehearsal sequence is three to five lead-arm-only swings, followed by two-handed swings with the same release feel. Ask yourself whether your glove logo rotates down and left while your head stays back and your trail shoulder remains lower.
Once that feels manageable, hit some balls concentrating on this piece alone. In the student example, the drives improved from about 220 yards to about 240 yards, and the right miss became smaller, although it had not disappeared.
That is a useful way to judge your own early progress. A stronger flight with less rightward movement can indicate improvement even before you produce a draw.
Step 4: Rehearse an Inside-Out Path With the Clock Drill
Once you can close the face, add the path change. The aim is to stop delivering the driver from high and outside, cutting left across the ball.
Use alignment sticks on the ground to create a clock-face reference around the ball. Follow the demonstrated diagonal: your clubhead approaches through the 4 o’clock area and continues outward through the 10 o’clock area.
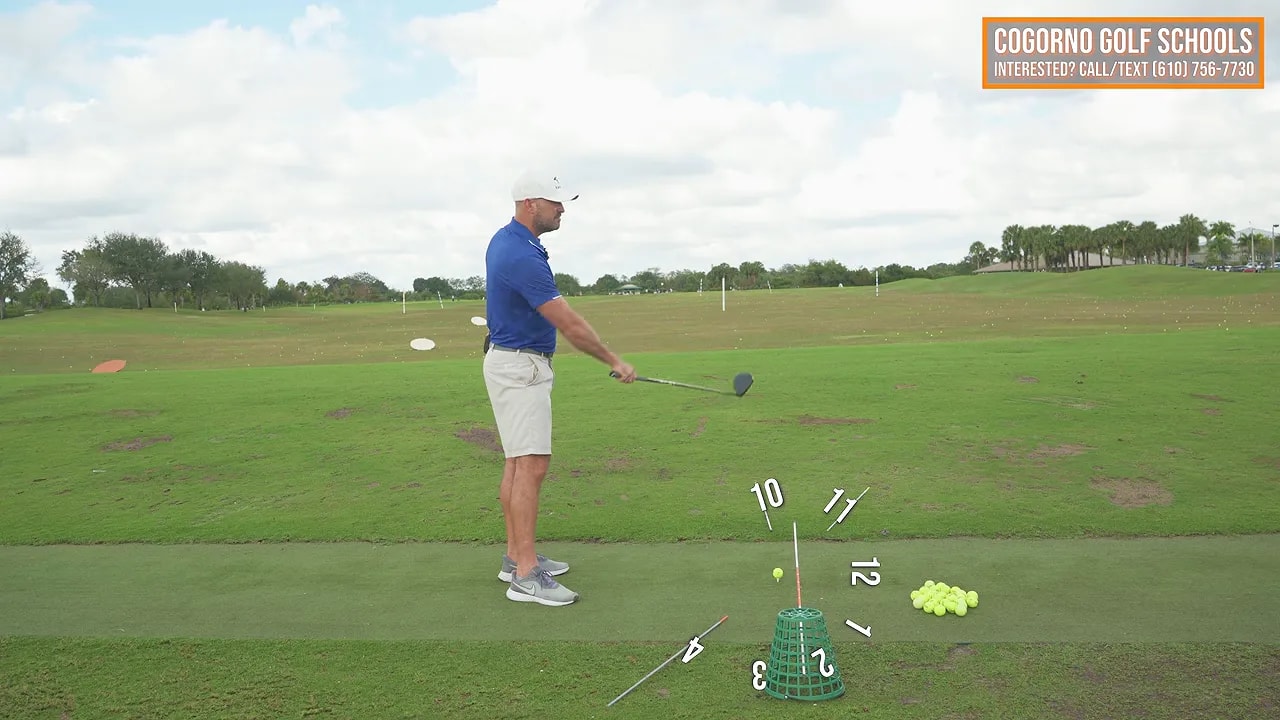
This is deliberately an exaggerated inside-out rehearsal. It gives you a clear contrast if your normal arm swing travels sharply outside-in. You are not trying to make every full-speed drive follow that exaggerated diagonal.
Build the path without losing the release
- Return to a lead-arm-only rehearsal.
- Feel the clubhead approach through the inside, 4 o’clock reference.
- Continue through the ball area toward the 10 o’clock reference.
- Keep rotating your lead elbow and glove logo slightly down and left.
- Add your trail hand and repeat the same motion.
Continue checking your head and trail shoulder. Your head stays back, and your trail shoulder stays down as your arms swing more from in to out.
The important detail is that path and face control stay together. Do not replace the release drill with a path drill. Add the inside-out motion to the face rotation you have already learned.
If you concentrate only on swinging outward and return to holding the face open, you have lost the first part of the sequence. Go back to a few simple lead-arm rehearsals before rebuilding the path.
Step 5: Add Body Turn, Then Use a Stick for Feedback
After rehearsing the arms independently, start blending in your chest turn. Turn your chest back as the club swings back, then turn your chest through as the club moves through.
Keep the progression clear:
- Rotate your lead arm to close the face.
- Swing your arms from inside to out.
- Add your chest turning back and through.
The exaggerated arm path has a purpose. As you add body rotation in the downswing, the club moves more out in front of you. Feeling your arms swing independently from the inside helps balance that influence and brings the overall motion closer to neutral.
This is why copying a dramatic inside-out rehearsal directly into a full swing misses the point. Your rehearsal feel and your finished swing do not have to look identical.
Check the approach with an elevated stick
The feedback station uses a stick positioned essentially over the back of the golf ball, a little more than one grip length above the ground. From the side, it provides a reference for approaching low and from the inside.
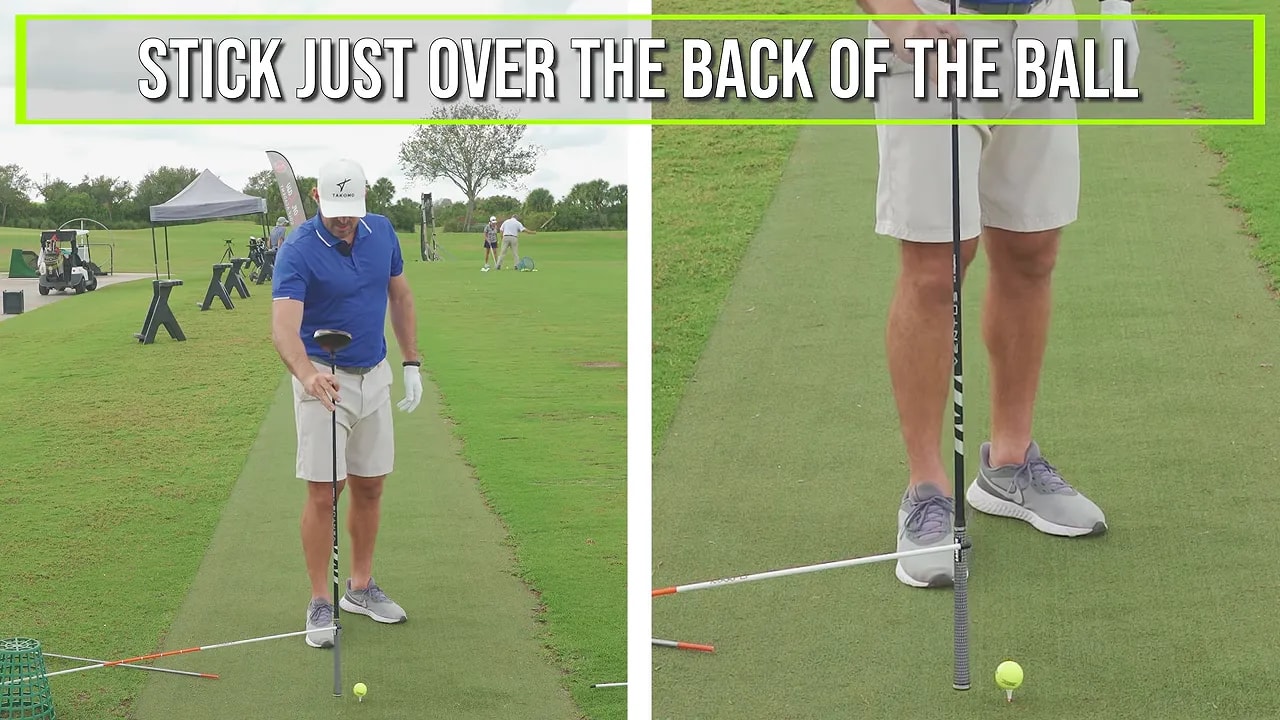
Rehearse your clubhead approaching along the inside reference and passing beneath the elevated stick. Begin slowly so you can confirm the position and clearance rather than rushing straight into a full-speed swing.
Use the same short sequence: one or two lead-arm rehearsals, add the trail hand, feel the inside-out arm swing, then add the body turn.
The stick gives you feedback that a swing thought alone cannot. If you lift your trail shoulder and move into a steeper, outside approach, contact with the stick alerts you that the motion has changed.
Step 6: Refine Your Setup to Support the New Motion
Your setup is the final learning piece, but it becomes the starting point for every actual drive. A better address position makes it easier to repeat the path and release you have rehearsed.
The pattern to avoid is shoulders too level and open. If your left shoulder sits level with or lower than your right, while your right shoulder moves forward, your upper body can look ready to send the club outside-in before you start.
That setup can feed the entire weak-fade chain: a steep, leftward path followed by a hold-on release.
Create tilt through your lead side
For this correction, feel your lead side sit slightly higher than your trail side:
- Your lead knee is higher than your trail knee.
- Your lead hip is higher than your trail hip.
- Your lead elbow is higher than your trail elbow.
- Your lead shoulder is higher than your trail shoulder.

A simple cue ties those positions together: pull your trail shoulder back and down. If you play right-handed, feel your right shoulder move a little back and lower, while your left shoulder and left hip sit slightly higher.
You do not need to manufacture an extreme position. Use enough tilt to move away from the high, forward trail shoulder that encourages your usual cutting action.
Then revisit the release. With a steep outside-in delivery, you may hold the face open and finish with a pronounced chicken wing. For the weak-fade pattern addressed here, the alternative is gradual arm rotation supported by a more favorable setup and path.
Step 7: Put the Driver Swing Tips Together in One Practice Sequence
Now combine the pieces without turning every shot into a long mechanical checklist. Use your rehearsals to establish the motion, then step in with a simpler intention.
Complete your rehearsal progression
- Lead arm only: Make three to five swings feeling the elbow and glove logo rotate slightly down and left.
- Both hands: Preserve the same face rotation with your head back and trail shoulder down.
- Add the path: Feel the club approach through 4 o’clock and continue toward 10 o’clock.
- Add the turn: Turn your chest back and through while retaining the arm action.
- Set up: Place your lead side slightly higher and your trail shoulder back and down.
- Hit the shot: Blend setup, inside approach, and release into one motion.
When the pieces were combined in the demonstration, the resulting shot was described as roughly a 10-yard draw toward the middle. That is the direction of change you are seeking: a stronger flight that replaces the weak fade with controlled curvature.
If your ball begins hooking left, you have moved beyond neutral with the correction. Treat that as feedback to moderate the exaggerated feels, not as a reason to abandon everything and return immediately to holding the face open.
Equally, do not make a 50-yard gain your pass-or-fail standard. The student example shows what happened in one case, not what every golfer should expect in a day.
Your practical goal is to leave the range with a clear process: control the face, improve the path, and support both with your setup. Rather than chasing more speed through the same weak-fade pattern, give your existing swing a better chance to produce a solid drive.
0 Comments