

Unlocking Consistency in Golf: Are you tired of guessing every time you chip or pitch? Discover the ‘penny window’ drill, your key to mastering first ground contact for a more reliable short game.
Why Club-to-Ground Contact Timing is Crucial
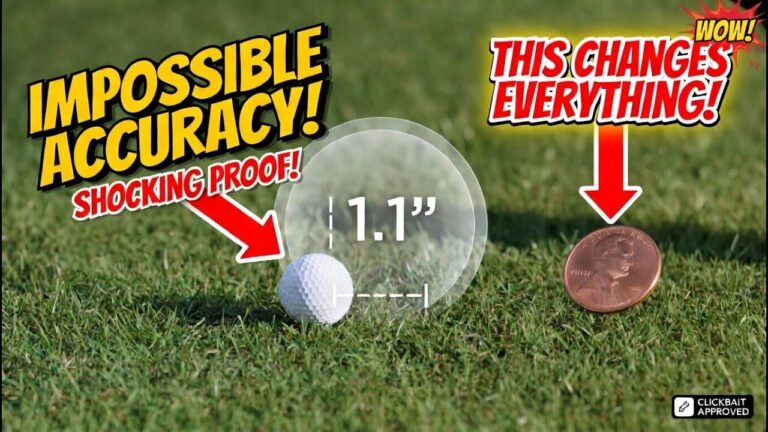
Consistent golf chipping and pitching hinges on precise club-to-ground contact. The top golfers manage to land their club just an inch from the ball, ensuring reliable depth control without unnecessary speed. By practicing this, you enhance your contact quality effortlessly.
Step-by-Step: Set Up and Master the Penny Window Drill
Step 1: Set up the Penny Window Drill
- Place two pennies in a row as your target.
- The pennies represent a chipping ‘window’ just three-quarters of an inch wide.
- Aim for the club to first strike within this narrow span.
While pros aim for a 1.1 to 1.2 inch contact, your initial goal is to develop consistent contact.
Step 2: Score Your Attempts
- Perform 20 consecutive shots.
- Record how many land the clubhead inside your penny target.
- Tweak one element—like stance or weight shift—and retry, comparing results to measure improvement.
Scoring ensures you focus on validated change rather than arbitrary advice.
Step 3: Integrate a Small Weight Shift
Remaining rigid can hinder consistency. A small weight shift during your swing improves your contact point. If you’re striking from the inside and struggling with contact, adjust slightly forward to change where your club hits the ground.
Streamline Your Swing with Natural Release
Stop trying to ‘hold angles.’ Instead, envision a controlled hinge that releases fluidly. Allow the club to swing freely post-weight shift, aiding in consistent turf contact.
Integrating the Brick Alignment Guide
Visually align a small ‘brick’ or line to keep your club on top of the swing path. This setup focuses on short-game precision by ensuring the divot consistently lands in front of the ball.
Advanced Techniques: Ball Progression and Common Errors
Step 6: Progress with a Ball
- Once proficient, move a golf ball one penny’s width in front of your pennies.
- Reapply the drill with the alignment guide to prevent hitting behind the ball.
- Focus on rhythmic hinge-and-release motion.
Full Swing vs Short Game
Achieve success by emphasizing contact depth over speed. Adjustment for pitches involves reduced speed emphasis and precise timing.
Avoid These Mistakes
- Overly Rigid Posture: Introduce slight movement for balance.
- Dragging from Inside: Adjust path and release for a fresher strike.
- Mismanaged Angle Holding: Allow the club to release freely.
- Lack of Scoring: Quantifying reps ensures you adapt positively.
Effective Practice Plan
- Begin with easy wedge shots.
- Conduct the penny drill—20 reps per form change.
- Compare adjustments on subsequent sets.
- Gradually push the ball position forward with each iteration.
FAQs on the Penny Drill
How many reps for the penny drill?
Complete around 20 reps per set change. Monitor which adjustments improve first contact depth.
Inconsistent penny hits—solution?
Treat inconsistencies as issues of timing and path. Test singular cue adjustments, confirming refinements through scores.
Is high speed necessary for effective chipping?
No, focus on precise contact rather than speed to ensure shot consistency.
Does the brick drill apply to full swings only?
Its primary focus is short-game precision, aiding in maintaining optimal club position.
Next Steps for Your Golf Short Game
Using the drills and strategies discussed, transform your short game. Experiment with alignment sticks or visual references to reinforce timing and accuracy.
0 Comments