

Unlock the secret to more consistent golf ball striking with this simple yet powerful backswing technique. Discover how a minor adjustment in your hip movement can lead to cleaner iron shots, better compression, and fewer mishits. Keep reading to transform your game.
The Key to Consistent Golf Ball Contact
Achieve solid contact in your golf game by focusing on the low point of your swing. This crucial element determines the quality of your shots, allowing you to avoid fat or thin hits. In this guide, we will explore a straightforward drill using a small ball to help perfect this skill and bring about dramatic improvements in your play.
Step 1: The Importance of the Low Point in Golf
Understanding the low point is essential for effective ball striking. It’s the lowest part of your club’s arc and should ideally be just ahead of the ball for iron shots. This ensures the club hits the ball before the turf, optimizing compression and shot consistency.
Step 2: Setting Up the Ball Drill
Use a small, compressible ball in a tactile drill that provides immediate feedback. Place it between your trail hip and a wall to monitor and adjust your hip movement during the backswing. This will help you develop the subtle repositioning that leads to optimal shot placement.
- Select a soft practice ball for ideal feedback.
- Position it between your trail hip and a wall in your golf posture.
- Focus on compressing the ball slightly early in the backswing before allowing it to drop as you complete the movement.
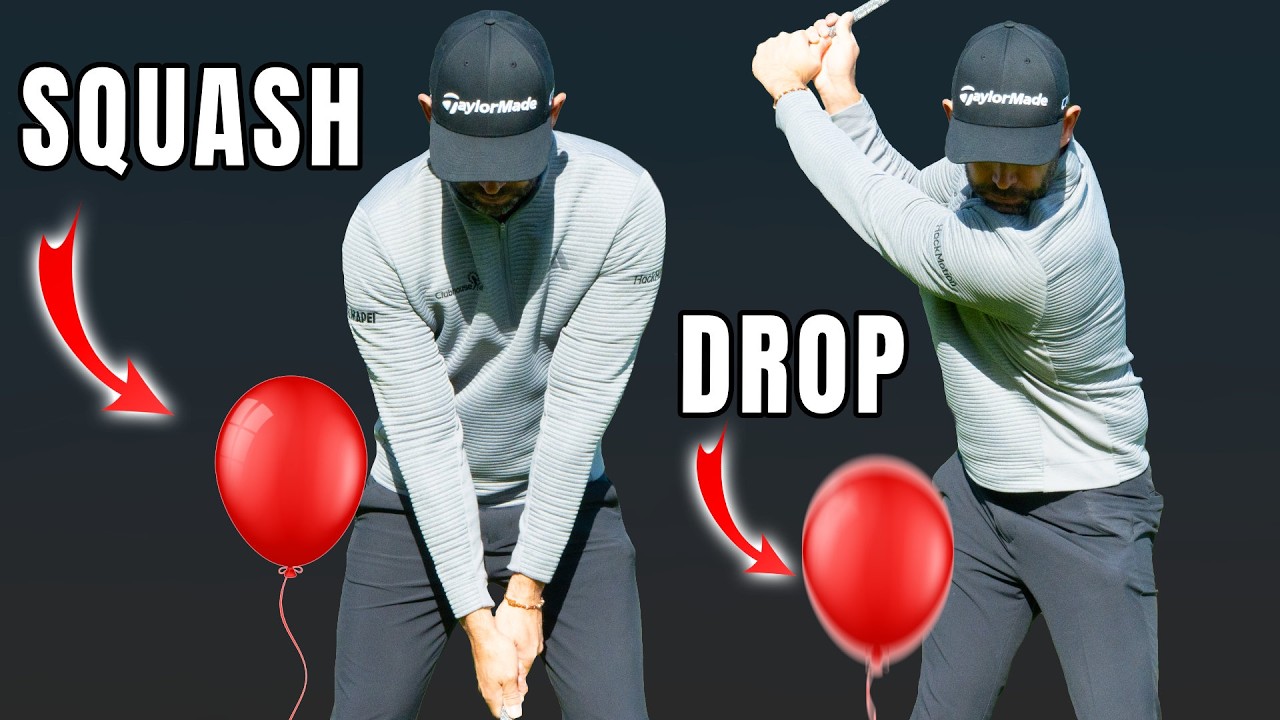
Step 3: Mastering the Squash-Drop Sequence
Refine your swing with this two-part movement: squash into the ball to load your trail side, then allow the hip to shift slightly forward. Practicing this sequence will help you develop a naturally consistent low point for enhanced ball striking.
- Start slowly, focusing on squashing the ball as you rotate.
- Complete the rotation, letting the ball drop with a slight forward hip movement.
- Rehearse the squash-drop rhythm until it becomes instinctive.
Step 4: Integrating the Drill with a Club
Transitioning this drill into your full swing with a club is crucial. Start by practicing with an 8-iron, focusing on feeling the squash at the start of the backswing and maintaining that rhythm through the swing. This integration helps in aligning your low point with the ball position for improved shot quality.
- Practice with a slower, controlled swing at first.
- Gradually increase speed, paying attention to the swing’s natural flow.
- Monitor the sequence, ensuring the club impacts the ball before the turf for irons.
Step 5: On-Course Application for Irons
Visualize a wall near your lead shoulder to simulate this drill on the course. It helps reinforce proper shoulder path and low point control for improved iron shots.
- Use the wall as a mental guide for shoulder movement.
- Ensure your shoulder reconnects with the wall during impact for consistent swings.
Step 6: Adapting the Drill for Your Driver
For drivers, adjust your upper body while maintaining the hip movement to achieve an upward attack angle. This customization allows for a better launch and more effective drives.
- Maintain hip movement but keep your lead shoulder back.
- Use a slight tilt for optimal launch conditions while preserving the core mechanics.
Step 7: Troubleshooting and Common Errors
Address issues like excessive sway or incorrect weight shift by focusing on accurate squash-drop mechanics. This attention will refine your swing and correct common mistakes, leading to improved consistency and power.
Step 8: Practice Plan for Lasting Improvement
Create a consistent practice routine to reinforce this move and ensure lasting improvement.
- Warm-up with basic exercises and short chips.
- Perform the ball drill in slow, deliberate reps.
- Integrate rehearsal swings before hitting full shots.
- Utilize video or launch monitors for feedback.
- Regularly alternate between irons and drivers to adapt the drill appropriately.
Tracking Progress
- Ensure early backswing pressure on the ball.
- Monitor ball drop at the top of the backswing.
- With irons, check for divots starting past the ball position.
- For drivers, adjust for a neutral to positive attack angle.
FAQs on Improving Your Backswing
Learn how slight changes in your backswing can revolutionize your golf game. Proper tilt and hip repositioning ensure better compression and minimized mishits.
What Type of Ball is Best for This Drill?
Use a slightly compressible ball for clear feedback, like a soft practice or toy ball.
Is This Drill Effective for Correcting My Sway?
Yes, it helps reduce sway by focusing on squash-drop actions, promoting a more stable swing base.
Will This Drill Affect My Driver Swings Negatively?
When adapted properly, it will optimize your driver’s launch angle. Ensure lead shoulder adjustments are made for the driver.
How Quickly Can I Expect Results?
Most golfers notice improvements within weeks with consistent practice — some feel immediate changes.
Can Overdoing the Movement Be Detrimental?
Yes, however maintaining subtle shifts prevents common pitfalls such as excessive sway or forceful hip movements.
Conclusion: Elevate Your Golf Game with a Simple Move
The profound impact of a subtle backswing change can redefine your golf game. By adopting this small but crucial adjustment, you’ll enjoy more consistent ball striking and superior control on the course. Start practicing this drill today, integrate it into your routine, and watch your confidence soar as your play transforms.
0 Comments