
Master the PGA Line of Compression: Your Path to Perfect Ball Striking
Discover the secret behind elite golf shots with the PGA line of compression. Learn step-by-step drills to harness this technique and revolutionize your game.
Welcome to the ultimate guide on the PGA line of compression—a drill that distinguishes the best ball strikers. I’m Eric Cogorno, teaming up with Craig Hanson to guide you through a simple, yet effective practice progression designed to improve your impact position, enhance compression, and maximize distance and accuracy. If mastering ball striking is your goal, this methodology is your key.
Step 1: Grasp the Concept of the PGA Line of Compression
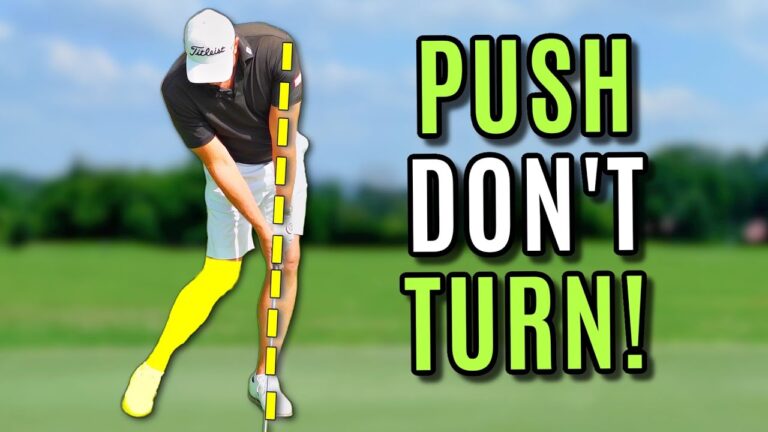
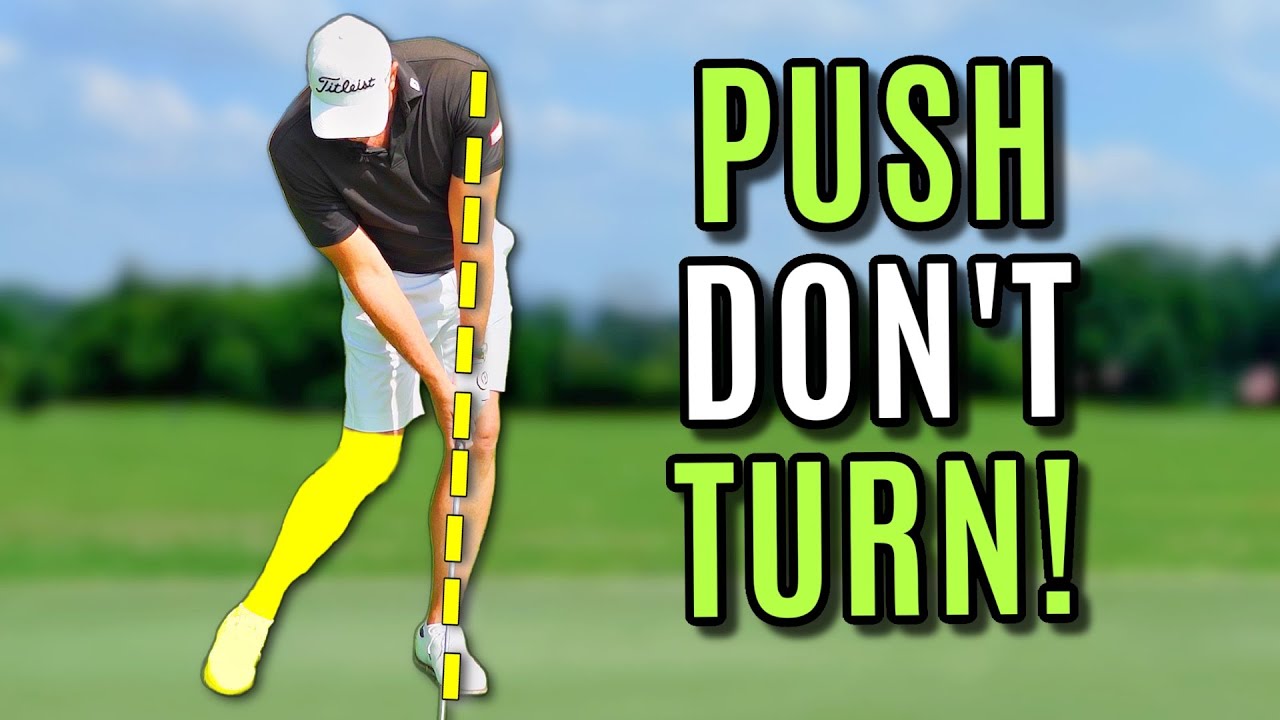
The PGA line of compression is more than a technical term—it’s the secret of pros. It’s about aligning your lead arm, shaft, and lead leg at impact to compress the ball into the turf efficiently. This combination results in cleaner contact and optimized ball control.
- Shaft and Lead Arm Alignment: At impact, align the shaft and lead arm toward the ball through the lead leg.
- Lead Hip and Ankle Alignment: Position your lead hip slightly ahead of the ankle to set the ideal impact tilt.
- Right Knee Action: The trail knee should progress toward the finish line, enhancing rotation and weight transfer.
- Closed Knee Gap: Ensure your knees close in as you follow-through to maintain pressure and control.
Step 2: Set Up the PGA Drill with Static Positional Training
Begin this drill with a mid-iron to develop a feel that transitions into your full swing.
- Initiate with your normal stance.
- Position the clubhead about six inches ahead of the ball.
- Lower your body slightly by closing your knees, creating a downhill tilt.
- Shift your hands forward to form a straight line with the shaft and lead arm.
- Align your lead hip slightly forward of the lead ankle for precise compression.
This static hold helps embed the motion into muscle memory, making it a powerful technique for immediate improvements.
Step 3: Practice Shaft Lean and Lead-Arm Alignment
Elite players consistently feature a strong shaft lean at impact.
- From the static setup, move your hands for noticeable shaft lean.
- Maintain the line that runs from the shaft, through the lead arm, and over the lead thigh.
- Practice transitioning from address to the static compression position repeatedly.
Step 4: Feel and Time the Right Knee—The Finish Line Principle
The right knee’s timing and path distinguish amateur golfers from professionals.
- Begin the downswing with a hip lead, allowing the knees to move forward subtly.
- Inwardly direct the right knee towards the left as you approach the finish line.
- Ensure the right knee precedes the hands at this imaginary finish line.
Step 5: Use the Right-Knee Tap to Build Timing and Sequence
This drill ensures proper body sequencing with clear cues.
- Execute a backswing from your normal stance.
- On the downswing, tap outside your right knee as it moves inward.
- Start with half-swings to get down the timing.
- Gradually extend your swing as timing improves.
Step 6: Close the Gap Between Knees at Arms-Parallel
Ensure the knees close together during follow-through to avoid common amateur pitfalls.
- Check the knee gap when your hands are parallel in the follow-through.
- If needed, adjust your knee movement inward earlier during the downswing.
Step 7: Create a Repeatable Practice Routine
- Warm-up Mobility: Spend 5–10 minutes on mobility exercises for better movement.
- Static Positional Holds: Practice static positions repeatedly for embedded muscle memory.
- Right-Knee Tap Drill: Focus on sequencing through cued knee taps.
- Static-to-Swing Reps: Alternate between static holds and swings to retain the feel.
- Full Swings and Checkpoints: Conduct swings with intervals to check follow-through knee positions.
Step 8: Troubleshooting Common Errors
Head Drops Excessively
Focus on subtle tilts with your spine rather than dropping the head. Maintain spine angle and emphasize shaft lean.
Right Knee Doesn’t Move Inward
Utilize the knee-tap drill with half-swings, focusing on inward movement of the knee and initiating downswing with hips.
Step 9: Measure Progress and Speed Up Learning
Objective measurements accelerate improvement. Use video analysis to compare impact positions, assess ball flight and sound, and employ tech tools for instant biofeedback.
Step 10: On-Course Application with a Simplified Pre-Shot Routine
- Align the ball and take a calming breath.
- Execute a brief static compression feel.
- Visualize your knee alignment and shaft line.
- Commit to the swing with confidence.
FAQ — PGA Line of Compression
What is the PGA Line of Compression?
A: It’s a specific impact alignment that enhances compression and energy transfer, creating better golf shots.
How Should I Practice This on the Range?
A: Combine static positional training with dynamic drills for a comprehensive practice routine.
Conclusion: Make PGA Line of Compression Your Default
Embrace the simplicity of PGA line of compression to enhance your ball striking. Begin with static holds and integrate drills like the right-knee tap for lasting improvements both on the range and on the course. Reinforce this feel through video feedback and make it your new standard for every shot.
0 Comments