
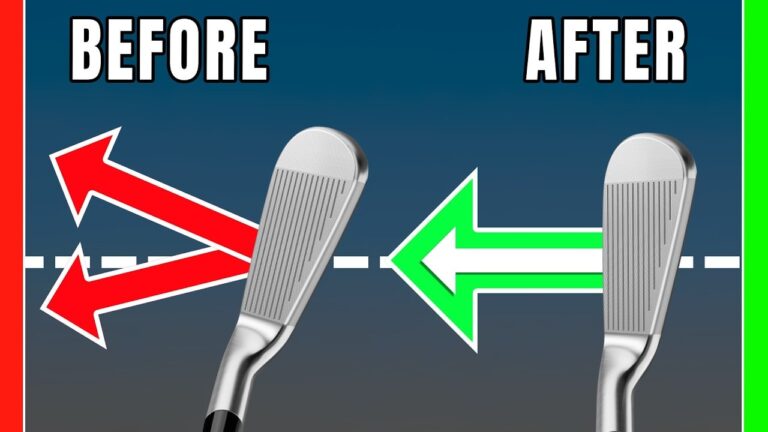
Straight golf shots are not the product of a perfect, mysterious swing. Most golfers overcomplicate direction and chase flashy fixes when the true control points are simple and repeatable. This article gives you a clear, three-step practice blueprint to stop fighting your club path and start hitting straighter golf shots from the range to the course.
Table of Contents
- Quick overview
- Step 1: Diagnose the final position — where the club is at last parallel
- Step 2: Tailor the rehearsal to your swing tendency
- Step 3: Control forearm rotation — keep the club on plane
- Troubleshooting and common scenarios
- Practice checklist for straight golf shots
- Short practice plan (30 minutes)
- Key metrics and examples
- Final takeaways
- Frequently asked questions
- Next steps
Quick overview
The three elements that determine whether your golf ball starts on line are:
- Body rotation
- Arms lowering (the way your arms drop in the downswing)
- Forearm or arm rotation (what your forearms do as the club approaches impact)
When you control these three things together you create an on-plane swing and a neutral club path. The drills below teach you how to feel and train each element, then blend them into a single, repeatable motion that produces straighter golf shots.
Step 1: Diagnose the final position — where the club is at last parallel
A useful checkpoint is the moment the club shaft becomes parallel with the ground in the downswing. If the club head is outside your hands at that point, the path is likely out to in and you will slice or fade. If the club head is too far inside your hands, you will produce an in to out path and hook or draw.
Use an alignment stick or a club on the ground to represent your ball-to-target line and check where the shaft points when the club reaches last parallel. This single visual reveals whether the club is positioned to produce a neutral path or a severe curve.
The alignment-stick checkpoint shows whether the club head is lining up with the target line when the shaft is parallel to the ground. If it does, you have a much better chance of neutral ball flight.
Drill: Split-grip rehearsal (arms down + body rotation)
This drill isolates the two elements that create a good start line: a balanced amount of body rotation and the arms lowering together. The goal is to rehearse a feeling where the club shaft aligns with the ground-stick at last parallel.
- Place an alignment stick or spare club on the ground pointing at your target.
- Take the club and split your grip: top hand where it normally sits, trail hand moved down onto the metal (or shaft) so you cannot reach the ball.
- Make a full backswing and then practice bringing the arms down while adding body rotation — do not rely on only arms or only body.
- Look to match the club shaft to the alignment stick when the shaft reaches parallel with the ground.
Split-grip rehearsals give instant feedback. If the shaft sits outside your hands at last parallel, you used too much arm action. If the shaft sits behind your hands, you used too much body and not enough arm lowering. Aim for the shaft to be inline with the ground stick.
Practice prescription
- Warm up with 5 rehearsals using the split grip (no ball).
- Do 10 controlled swings with the grip reassembled and half-speed strikes to feel the delivery.
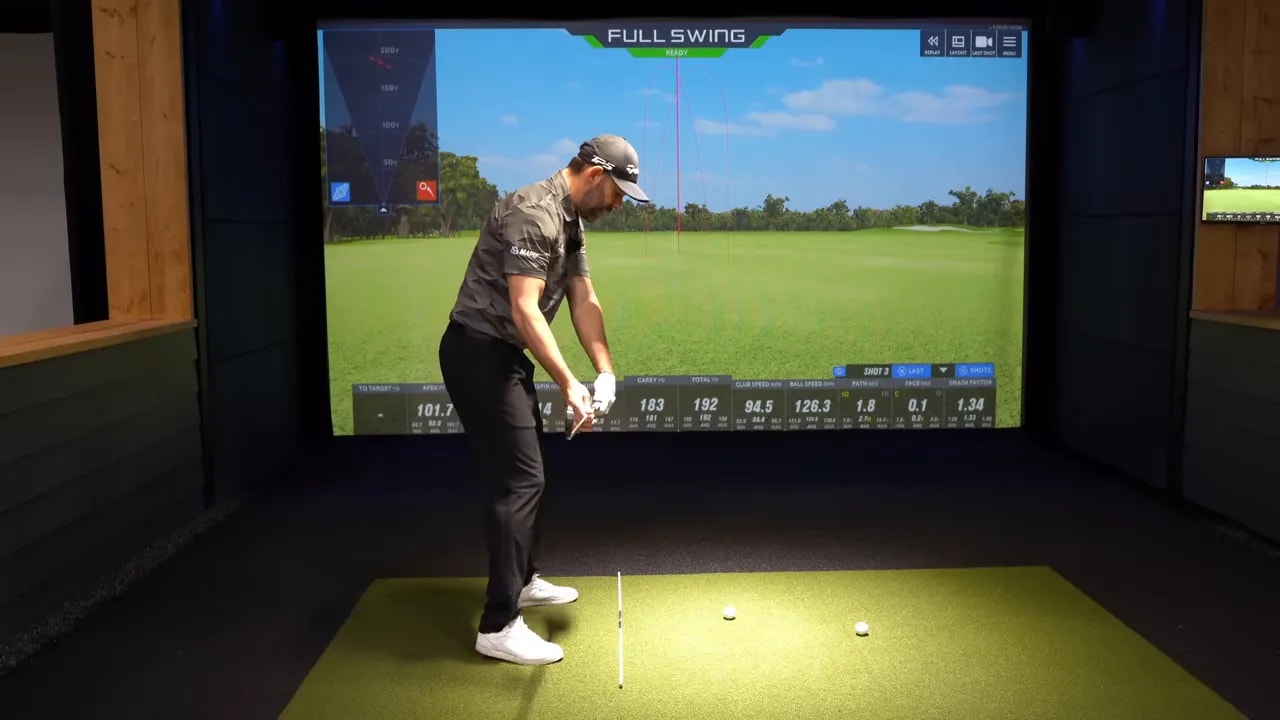
- Track where shots start using a target or alignment aid; note the path if you can (example ball flight start angles of 1.8 degrees vs 12 degrees show the difference).
This drill is powerful because it forces you to discover how much body turn versus arm lowering you actually need. That discovery will immediately make your golf ball start closer to the intended line.
Step 2: Tailor the rehearsal to your swing tendency
Every golfer has a default tendency. Some players consistently swing too much in to out. Others are habitually out to in. The split-grip rehearsal will reveal your trait. Once you know your tendency, you can bias your rehearsals to counter it.
For example, if your club path tends to be in to out so the shaft sits inside the hands at last parallel, practice rehearsals that feel slightly more body rotation and less arm drop. If your path is out to in, practice rehearsals that feel more arms-down and less body-dominant.

The coach adjusted his rehearsal to combat his into-out tendency. That slight adjustment in feel resulted in a path close to zero, even if the contact was imperfect. The aim is neutral path, not perfect strike at first.
How to fine-tune your feels
- If your shots start right or you slice, feel the club a bit more inside on the rehearsal so the club comes more underneath your hands at delivery.
- If your shots start left or hook, feel the club a bit more outside on the rehearsal so the club approaches slightly more across the ball.
- Make small changes. Rehearse 5 swings with the altered feel, then hit 5 balls and observe where the ball starts relative to the target.
The point is not to create a new, complex movement but to bias the same three elements to counter your tendency. With repeated rehearsals the new feel becomes the default and your golf ball will start closer to your intended line more often.
Step 3: Control forearm rotation — keep the club on plane
The final piece of the puzzle is forearm rotation. Even with perfect balance between body turn and arms lowering, the rotation of your lead forearm can push the club into a poor delivery angle.
If the lead forearm rotates toward the trail side as you approach impact, the club sits more behind the hands and tends to produce an in to out path. If the lead forearm rotates toward the target side, the club moves outside the hands and produces out to in.
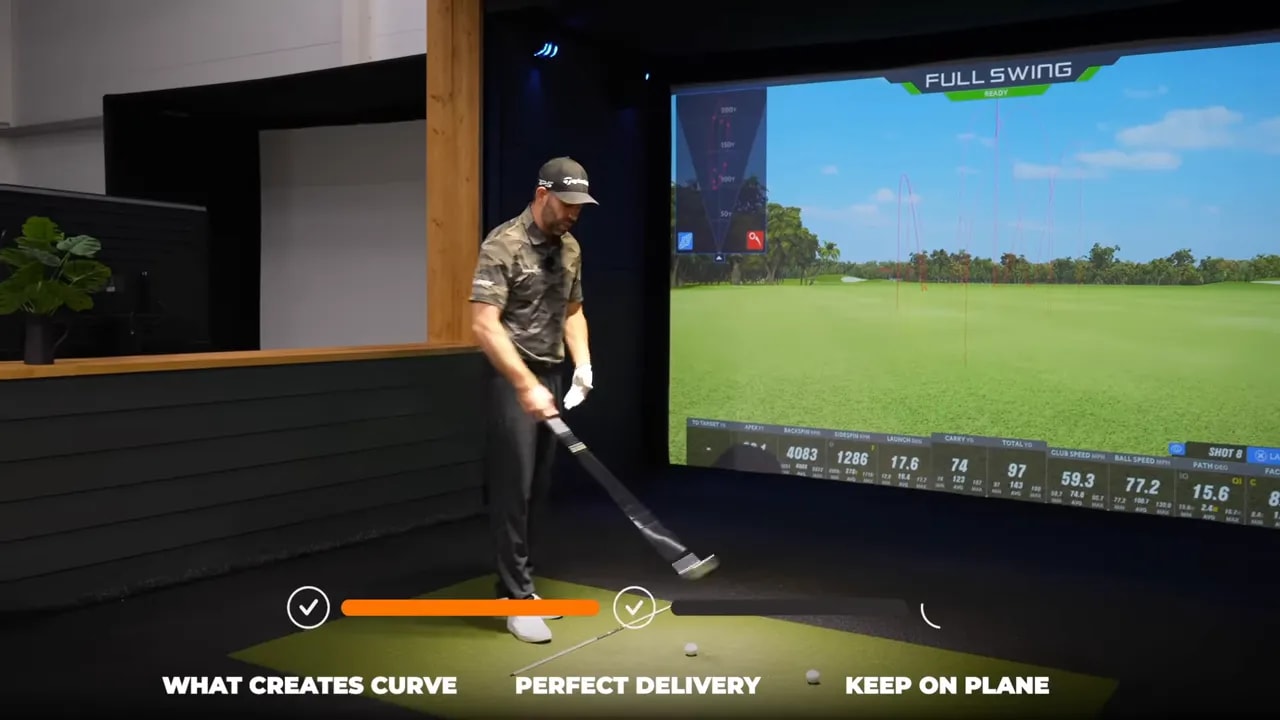
A long alignment stick held alongside the club makes the forearm action visible. Trace that stick along the ground-stick during the downswing to control the angle of the club.
Drill: Trace the alignment stick
- Hold a second alignment stick along the shaft of your club so it extends past the grip toward your lead shoulder.
- Make a backswing so the alignment stick points down toward the ground-stick on your target line.
- On the downswing, feel like you are tracing the extended stick along the ground-stick until just before the ball.
- At the ball, rotate the club so that the end points directly at the ball and the club head points at the ball too.
This drill controls the plane and the forearm rotation. It prevents steep, over-the-top moves and prevents the club from getting laid off or excessively tipped with the arms. You end up with a swing that is on plane and a club path that is neutral.

Tracing the alignment stick keeps the forearms under control and gives a clear, repeatable cue for the downswing shape.
Putting the three steps together
Combine the split-grip rehearsal with the alignment stick trace and the tailored feels from step 2. Your practice sequence might look like this:
- 5 split-grip rehearsals focusing on arms down plus body rotation.
- 5 trace-the-stick rehearsals to lock in forearm rotation and plane.
- 10 half-speed strikes blending the two feels.
- 10 full swings while noting where the ball starts and the overall path.
Use simple, objective checkpoints: is the club shaft parallel to the ground-stick at last parallel? Does the extended stick trace the ground-stick into the ball? Does the ball start on the target line or very close?

When these three elements work together you will create an on-plane swing and a neutral club path. That produces straighter golf shots with a repeatable feel.
Troubleshooting and common scenarios
1) Ball still starting right (slice or fade)
Likely cause: the club head is outside your hands at last parallel and your forearms rotate toward the target side too early.
- Fix: emphasize arms-down in split-grip rehearsals and trace the extended stick more inside along the ground-stick.
- Feel: use your lead forearm to resist turning toward the target until after the club has traced to the ball.
2) Ball starting left (hook or pull)
Likely cause: club sits too far behind your hands or your forearms rotate toward the trail side and the club gets laid off.
- Fix: rehearse with slightly more body rotation and less arms drop so the club is relatively more underneath the hands at last parallel.
- Feel: allow the extended stick to point slightly more toward the inside during the downswing trace, then rotate it to the ball at impact.
3) Good path but poor strike
Address path first. Once your path is neutral, strike will improve quickly. Keep practicing the drills and then layer in impact-focused drills like ball-first contact or low-point control.
Practice checklist for straight golf shots
- Alignment stick on the ground to represent your ball-to-target line.
- Split-grip rehearsal to feel arms down plus body rotation.
- Extended stick trace to control forearms and plane.
- Small, specific adjustments to counter your personal tendency.
- Objective tracking by noting where shots start and using numbers if available.
Short practice plan (30 minutes)
- Warm-up 5 minutes with short swings.
- 10 minutes: split-grip rehearsals and 10 half-strength strikes.
- 10 minutes: alignment-stick trace drills and 10 strikes blending both cues.
- 5 minutes: full-speed shots, track start lines and note adjustments for next session.
Repeat this plan 2 to 3 times a week. Consistent rehearsal of the three elements will retrain your default tendencies and dramatically improve the consistency of your golf ball starting line.
Key metrics and examples
Examples from practice clarify what neutral vs extreme looks like. A neutral or near-zero path might be around 1 to 2 degrees. Extreme out-to-in or in-to-out positions can be 12 to 17 degrees and will reliably produce large curves.
Use these numbers as feedback. If your tracking data shows large deviations, go back to the split-grip rehearsal and the stick trace and scale back speed until your path narrows.
Final takeaways
- Straight golf shots are about controlling a few fundamentals, not inventing new mechanics.
- The three elements to control are body rotation, arms lowering, and forearm rotation.
- Use the split-grip rehearsal and the alignment-stick trace to get fast, clear feedback.
- Tailor rehearsals to your tendency and practice with measurable checkpoints.
You do not need a swing overhaul. You need simple, repeatable cues and a practice routine that teaches your body the correct timing and shape. Control those three elements and the path will follow.
Frequently asked questions
How long will it take to see improvement in my golf ball start line?
Many golfers notice a measurable change in a single practice session when they use the split-grip rehearsal and the alignment-stick trace. To build consistency expect 2 to 6 weeks of regular practice, depending on how ingrained your current tendencies are.
Do I need special equipment to try these drills?
You only need an extra club or an alignment stick. The drills are intentionally low-tech because the best feedback is visual and kinesthetic. If you have a launch monitor, use it to measure path, but it is not required.
Can these drills fix a slice or a hook permanently?
These drills address the common root causes of severe slices and hooks by changing the delivery shape and timing. With consistent practice they can eliminate chronic curvature for many golfers. Persistent or complex swing faults may still benefit from a coach for personalized adjustments.
Should I practice these drills on the range or at home?
Start at home or on the carpet with the split-grip rehearsals to grok the feel. Progress to the range to hit real shots and observe ball flight. Use a target line and repeatable routine to transfer the feel to the course.
How do I track progress objectively?
Use alignment sticks, observe where the ball starts relative to your target, and, if possible, record club path numbers from a launch monitor. Note trends in start lines rather than expecting perfection on every shot.
Next steps
Start with a single practice session focused on the split-grip rehearsal. Use the alignment stick trace next and keep notes on ball start positions. Make one small feel change each session and track results. Over time you will build a reliable, on-plane swing and enjoy consistently straighter golf shots.
Remember: simple fundamentals practiced with purpose beat complicated fixes every time. Control body rotation, arms lowering, and forearm rotation, and you control the start line.
0 Comments