

Focus keyphrase: hips forward downswing
If you want more consistent ball striking, you need a downswing move that actually changes what happens at impact. The swing key you are looking for is simple to describe and challenging to do well: get your hips forward to start the downswing. When your hips move well forward early, your contact point moves forward too, your club approaches from the inside more easily, and your shot pattern becomes more repeatable.
Consistent ball strikers share a similar pattern. The exact upper-body movements may vary, but the lower-body timing does not. The core idea is that your hips must push forward immediately to begin the downswing, not after you have already moved too far with your upper body.
This guide walks you through the “why” and the “how” of hips forward downswing mechanics. You will learn two practical feels, two coaching checkpoints, and drills you can start using right away to reduce fat and thin shots and calm down pulls, fades, and inconsistent contact.
Step 1: Understand why hips forward downswing controls your low point
When you start the downswing, you are not only swinging the club. You are also setting where the club will hit the ground. That matters because solid iron shots require the club to approach the ball at the right height and the right forward position.
The first big reason your hips forward are non-negotiable is this: hip movement moves your low point.
In simple terms, “low point” means the spot where the club head contacts the ground as it passes through the swing. If your hips stay back, your low point stays back too. That often leads to contact behind the ball.
That is why many higher-handicap golfers who struggle with fat or thin shots often have a downswing pattern where the hips do not get forward soon enough. If the hips stay back, the club hits the turf too far back. If you get the hips forward, you help the club bottom out more forward, which supports a more repeatable sequence of ball first, then ground.
Key takeaway: hips forward downswing helps you hit the ground forward, which helps you hit ball first and produce solid contact.
Step 2: Learn the second reason: hips forward downswing helps club path and angle of attack
The downswing is also about how the club approaches the ball from the right direction. You can build a lot of consistency by matching a better approach angle and path, and hip sequencing strongly influences both.
The second big reason your hips forward are critical is that moving your hips forward helps you swing the club from low and inside. That supports:
- Shallowing the angle of attack
- Creating a more inside club path
- Reducing the tendency to come over the top
On the other hand, if your hips go too far back, the club has less opportunity to approach from the inside. From down the line, that often turns into an outside path, where the club gets “pulled” across the body. The common outcomes are:
- Pulls and fades
- Loss of distance
- Inconsistent contact
When you combine both advantages of a hips forward downswing move, you get what the original lesson describes as “ball striking utopia”:
- Low point forward
- Club approaching from low and inside
That is what most golfers want every day: solid contact, better direction, and higher-quality ball flights.
Step 3: Make two critical coaching checks before you add any drill
Getting your hips forward is the key. But the way you do it matters. Two mistakes can ruin the benefits. Before you practice any feel, set these rules in your mind.
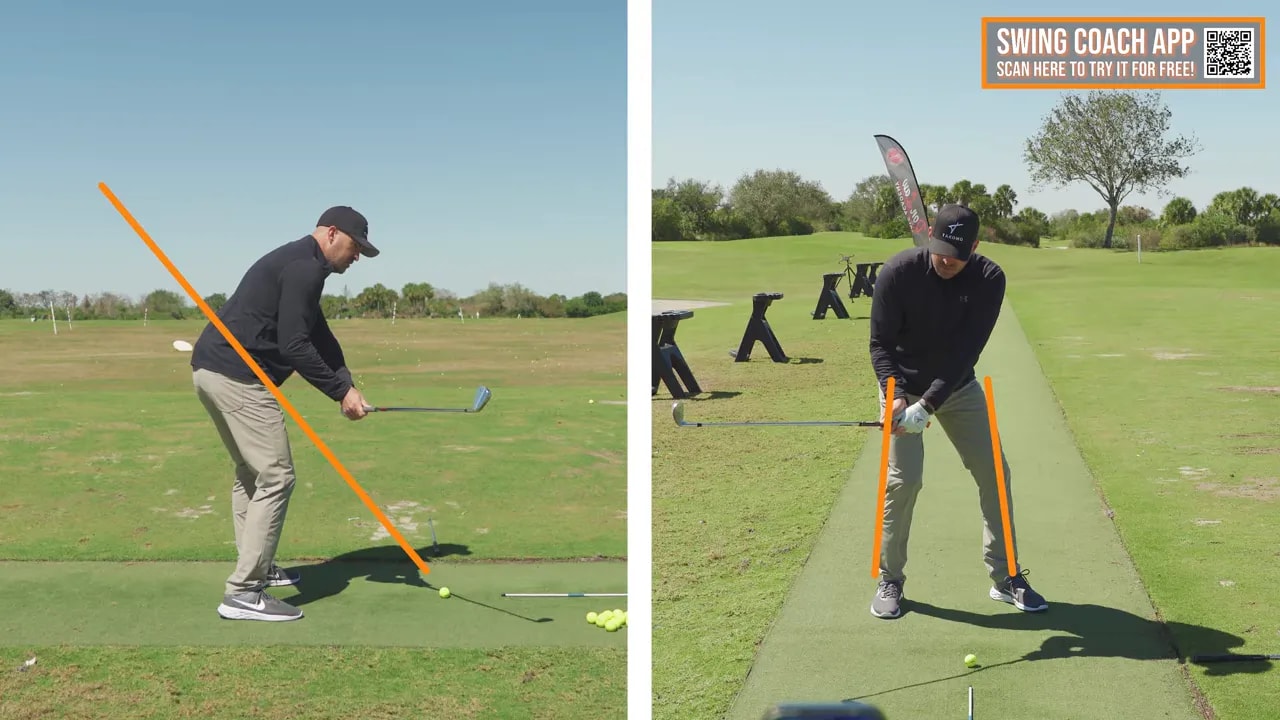
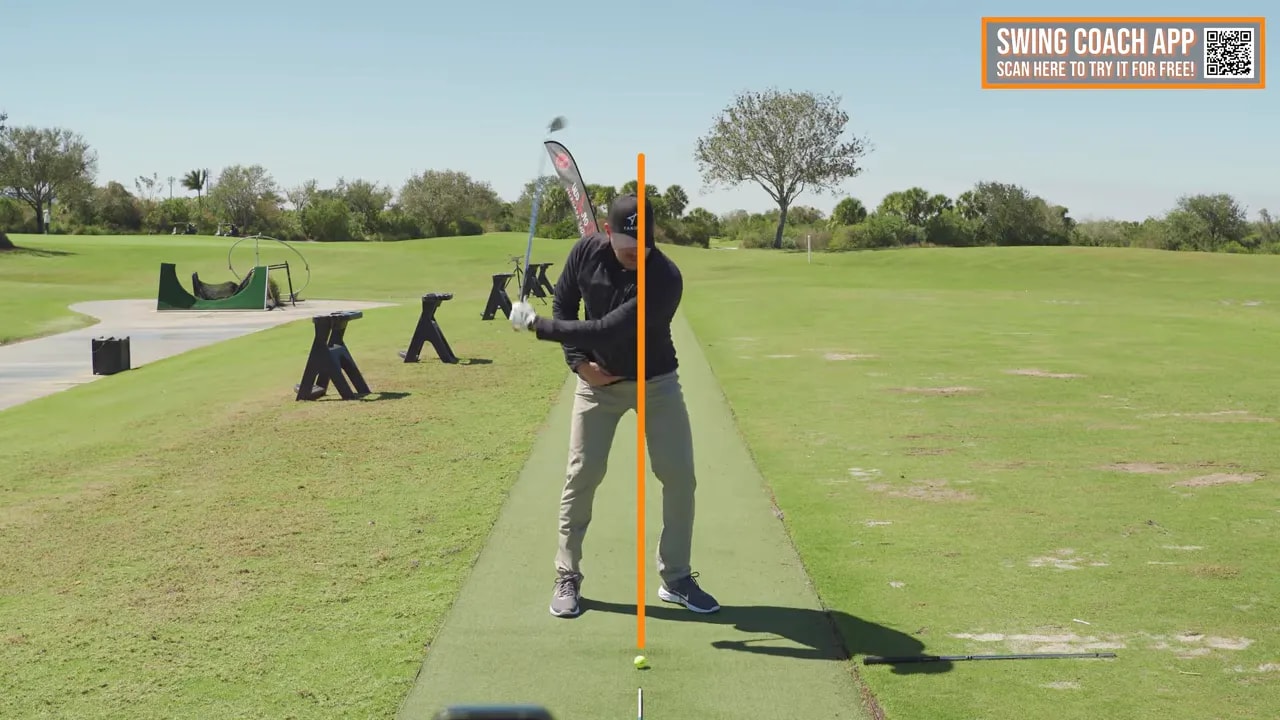
Step 3a: Keep your head back over the ball line
When your hips push forward, your head should not chase them forward right away. The best ball strikers move their lower body far forward, often several inches toward the target, but they keep their head behind the ball line until later in the downswing.
Why this matters: If your head moves forward with your hips, you can still move your low point forward, but the downswing direction can go wrong. The club can end up traveling too far out, which leads to swinging down and left and the common misses that include pulls and fades.
Rule: hips forward downswing with the head staying back over the ball line.
Step 3b: Rotate your hips, not just shift them
A second common error is “shifting” the hips forward without rotating them. You can get some low-point improvement from a raw shift, but rotation controls clubface and sequence. Without rotation, you often lose clubface control, reduce consistency, and sometimes reduce speed.
Rule: When your hips move forward, they should also rotate. That is how good players keep clubface control while still driving the lower body.
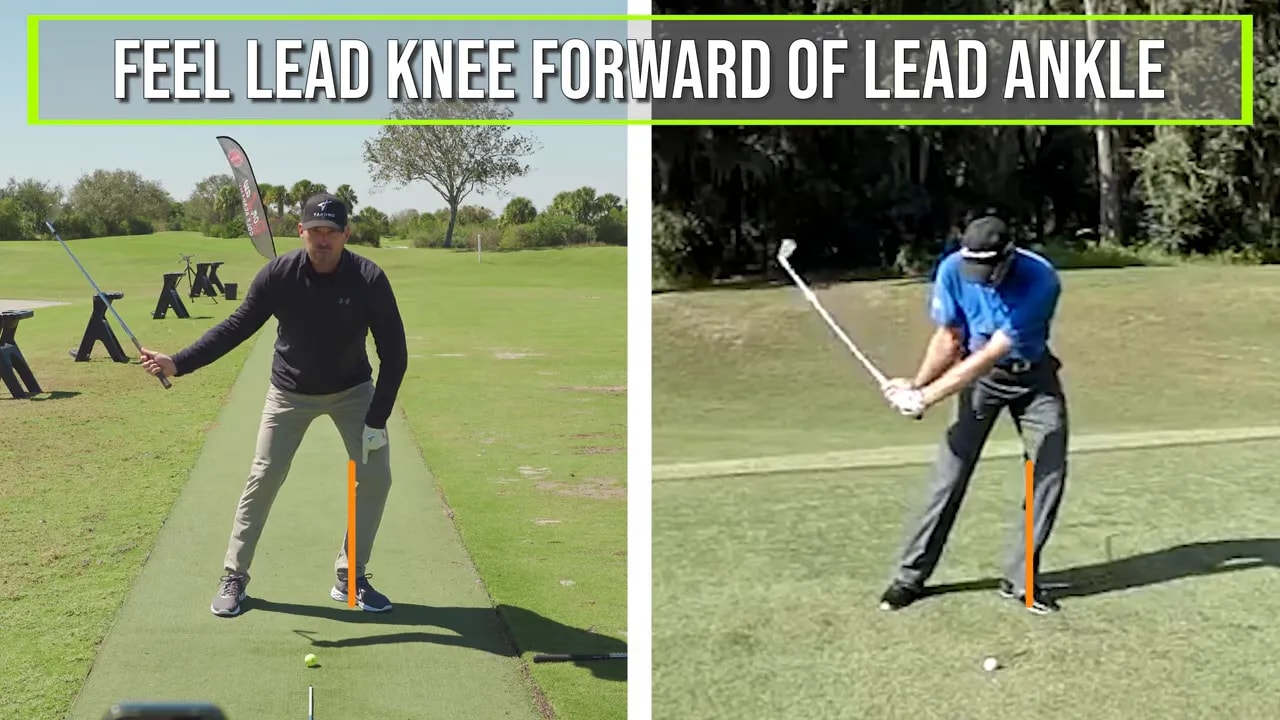
Step 4: Use the “Break the Wall” lead-side feel to start the downswing with your hips
Now you are ready for the first drill concept. The goal is to trigger hip shift and hip drive early using a simple visualization.
The lead-side feel is called “break the wall”.
Visualization: Imagine a wall placed up the left side of your leg. As you start the downswing, your goal is to break through that wall quickly.
How to feel it: Pay attention to your lead knee.
- When the downswing begins, feel the lead knee go forward of the lead ankle.
- Feel increased pressure under your left foot, especially toward the middle or ball of the foot.
- Let the lead side break the wall right away in transition.
This drill is designed specifically for early timing. It trains you to move your hips forward at the start of the downswing, which supports a forward low point and an inside path.
Practice reps: Do a few short swings, focusing only on the feeling of the lead knee forward of the lead ankle and pressure into the lead foot. Then hit a controlled iron rep with that same feel.
Ball flight cue: The better your contact quality improves, the more the strike should feel solid, and the ball flight should become steadier.
Step 5: Use “Lead side down and forward, Trail side through” to complete hip rotation
Breaking the wall helps you get the lead-side shift started. But hip drive also needs a trail-side action so you rotate through the ball rather than getting stuck early or flipping the club.
The second part of the mantra is simple:
“Lead side down and forward, trail side through.”
Here is the purpose of the trail-side feel:
- Keep the trail side from hanging back
- Encourage the lower body to rotate through the ball
- Help you maintain clubface control while keeping speed
The lesson’s trail-side visualization is this: imagine a wall along the outside area related to your trail leg. As the lead side breaks down and forward, the trail side should move away from that wall through the ball.
Common drill feel: Think about getting the club head past the golf ball. As you finish, your hips will be forward, but your head should not have fully run forward. Your shoulder should also feel down.
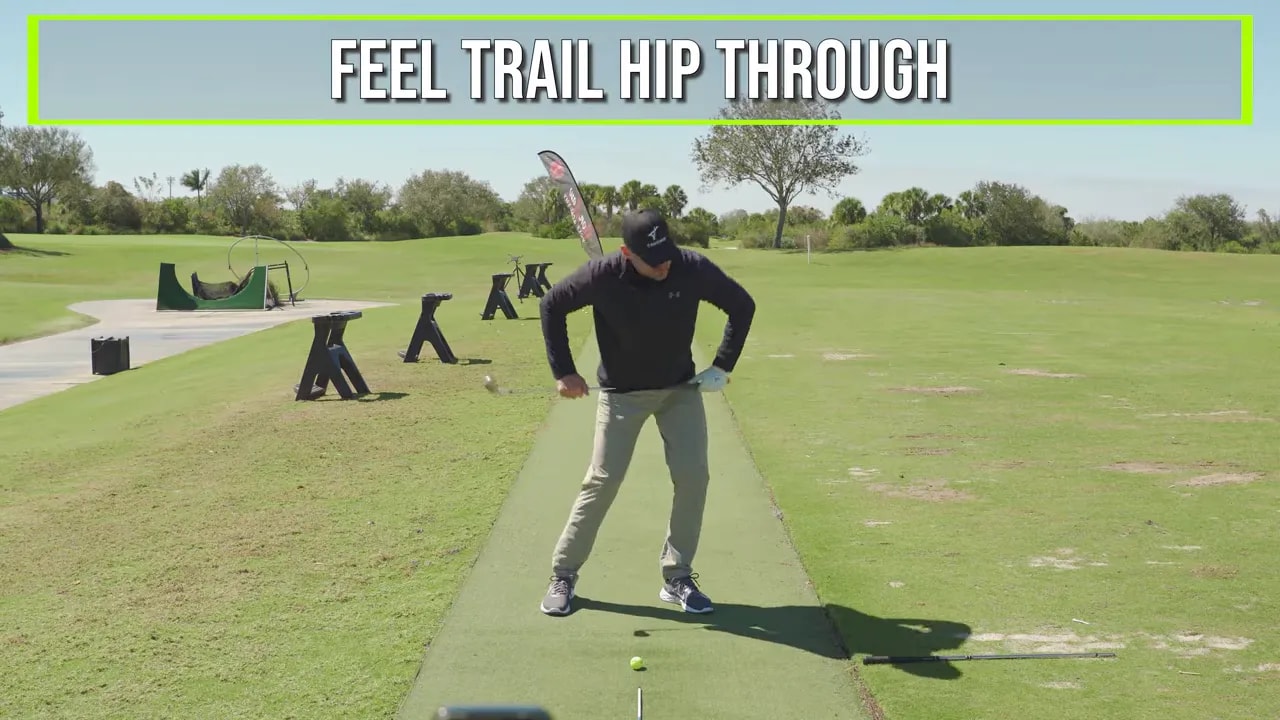
One practical way to try this: Place a club across your hips (lightly as a guide) and imagine the club head moving past the golf ball as the trail side “gets through.” Use this as a feeling tool, not a literal training constraint.
Step 6: Combine both parts into a complete sequence (hips forward downswing)
The real improvement happens when you blend both feels into one move. Your goal is not to copy a robotic pattern. Your goal is to create the right low-point and approach characteristics.
Use this combined sequence:
- Start downswing: break the wall with the lead knee, forward of the lead ankle, with pressure into the left foot.
- During transition and early downswing: keep your head staying back over the ball line.
- Through the ball: rotate and feel the trail side through using “lead side down and forward, trail side through.”
Contact goal: The club should meet the ball with a more forward low point. Direction often steadies because you are no longer forcing the club to come from the outside.
Timing goal: Your lead side breaks the wall early. You are moving your hips forward at the beginning of the downswing, not after the swing has already gone too far.
Step 7: Troubleshoot common problems using the two rules
If you still hit fat
Fat shots often mean your low point is still behind the ball. Return to the lead-side feel:
- Make sure the lead knee goes forward of the ankle immediately as the downswing starts.
- Increase left-foot pressure earlier.
- Confirm your hips forward downswing is happening at the start, not later.
If you still hit thin
Thin shots can come from too much height or not enough forward movement at the right time. Re-check your head rule:
- Keep your head from drifting too far early.
- Use the lead knee forward of the ankle feel to anchor the motion.
- Rotate the hips so the strike remains controlled rather than unstable.
If you get pulls or fades
Those patterns are consistent with an outside-to-in or over-the-top style approach. Start by protecting head position:
- Do not let the head go forward with the hips.
- Focus on inside approach created by the early lead-side break plus trail-side through feel.
Step 8: Track progress with real-time feedback
Practice quality matters, especially when you are training a move that is easy to feel incorrectly. The lesson emphasizes that many golfers can watch endless swing tips but fail to improve because feedback is missing or delayed.
One solution described is an AI-driven Swing Coach app that provides real-time feedback after each swing, including whether your hips are forward or back. The tool also color-codes hip position and can provide in-app drill guidance.

If you struggle to tell whether your hips are truly going forward at the start of the downswing, using objective feedback can shorten the time between “feels right” and “is right.”
FAQ
What does “hips forward downswing” mean in practice?
It means your lower body starts moving toward the target immediately when the downswing begins, not later. The key feels are breaking the wall early with the lead knee and keeping your head back over the ball line while your hips rotate.
Why do my shots get worse when I try to push my hips forward?
Most often you are pushing your head forward too, or you are shifting without enough hip rotation. The fix is to keep your head back over the ball line early and make sure the hips rotate as they move forward.
What is the fastest drill to start using for fat shots?
The lead-side “break the wall” feel. Focus on the lead knee going forward of the lead ankle right away as the downswing starts and pressure increasing under your left foot toward the middle or ball of the foot.
How do I stop over-the-top pulls and fades using this concept?
Use the combined mantra and head rule. Break the wall early with the lead knee, keep your head back over the ball line, then feel the trail side through so the club approaches from low and inside instead of too far out.
Do I need to copy a specific amount of hip travel from pros?
You are not copying a measurement, but the direction and timing matter. The goal is that the hips push forward to start the downswing quickly and that the head stays back while the hips rotate.
Step 9: Your take-home checklist for consistent ball striking
If you remember nothing else, remember this checklist for hips forward downswing:
- Start the downswing with your hips moving forward, immediately.
- Break the wall early with the lead knee forward of the lead ankle.
- Keep your head back over the ball line while the hips drive.
- Rotate the hips, not just shift.
- Finish with the trail side through using “lead side down and forward, trail side through.”
Once those pieces are in place, you are setting up the two mechanics that matter most for scoring: a more forward low point and a better inside approach. That is the fastest path to cleaner contact, steadier direction, and more reliable distance.
0 Comments