
Struggling with inconsistent strikes and frustrating slices on the golf course? Discover how small adjustments to your lower body and setup can revolutionize your ball striking today. Learn practical techniques that you can immediately implement to refine your swing path and enhance your game.
Content Overview
- Step 1: Identify the Real Problem — The Club Path, Not Just the Miss
- Step 2: Understand the Lower Body Mistake — Weight and Rotation Timing
- Step 3: Learn the Correct Body Ratio — Shoulders vs Hips
- Step 4: Change the Inside of the Swing First — The Body Drives the Club
- Step 5: Use a Tangible Reference — A Guide on the Floor
- Step 6: Pause, Check, and Connect — Make the Feeling Reliable
- Step 7: Feel the Swing as a Circle Around Your Body — Untwist the Circle
- Step 8: Start Slow, Then Trust the Motion — Tempo Beats Speed
- Step 9: Use Technology to Measure Progress — What the Numbers Mean
- Step 10: Fix the Toe Strike Tendency — Point the Club Where You Want to Hit
- Step 11: Trust the New Path — Let the Club Come In From the Inside
- Step 12: Rehearsal Routine You Can Follow on the Range
- Step 13: Common Troubleshooting and How to Correct It
- Step 14: Drills to Ingrain the New Hip-Led Downswing
- Step 15: How to Practice With Technology Sensibly
- Step 16: Putting It All Together on the Course
- FAQ
- Final Checklist to Fix Your Slice and Strike the Ball Cleaner
Step 1: Identify the Real Problem — The Club Path, Not Just the Miss
A frequent complaint among golfers is struggling with shots that veer off course. The primary culprit is often an incorrect club path, which dictates the ball’s trajectory and spin. Instead of only focusing on the miss, understanding and correcting your club path is vital for consistent, clean ball striking.
“The club path is the leading indicator of a solid strike, not just the number you’re seeing.”
Step 2: Understand the Lower Body Mistake — Weight and Rotation Timing
Many golfers don’t realize that improperly timed weight shifts during the swing can lead to an ineffective club path. Ensuring that your lower body transitions smoothly during the downswing is fundamental to maintaining a balance between power and direction. When your hips and shoulders are out of sync, the club’s path becomes skewed.
Step 3: Learn the Correct Body Ratio — Shoulders vs Hips
In a fluid golf swing, the shoulders and hips work together harmoniously. A good rule of thumb is that the shoulders should rotate twice as much as the hips during the backswing, contributing to a fluid motion. When the shoulders take the lead, followed by the hips, your swing becomes more naturally powerful and controlled.
Step 4: Change the Inside of the Swing First — The Body Drives the Club
By changing the initiation of your downswing from an overactive hand motion to a hip-led motion, you can effectively alter the club’s trajectory. Your lower body rotation sets the groundwork for the club’s path, creating a natural inside-out swing that reduces slicing and enhances distance.
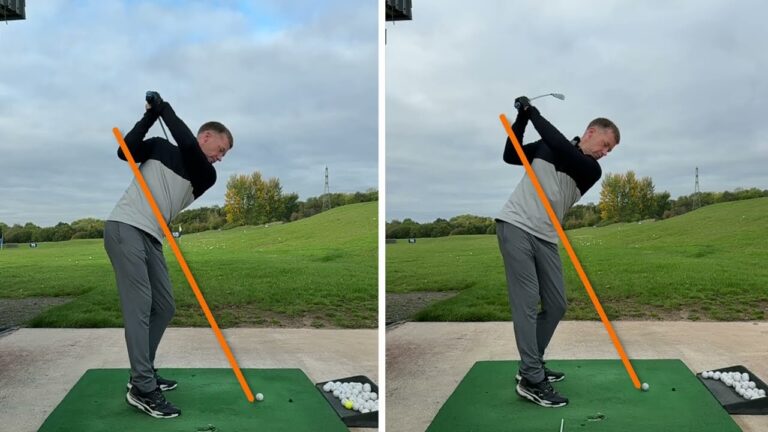
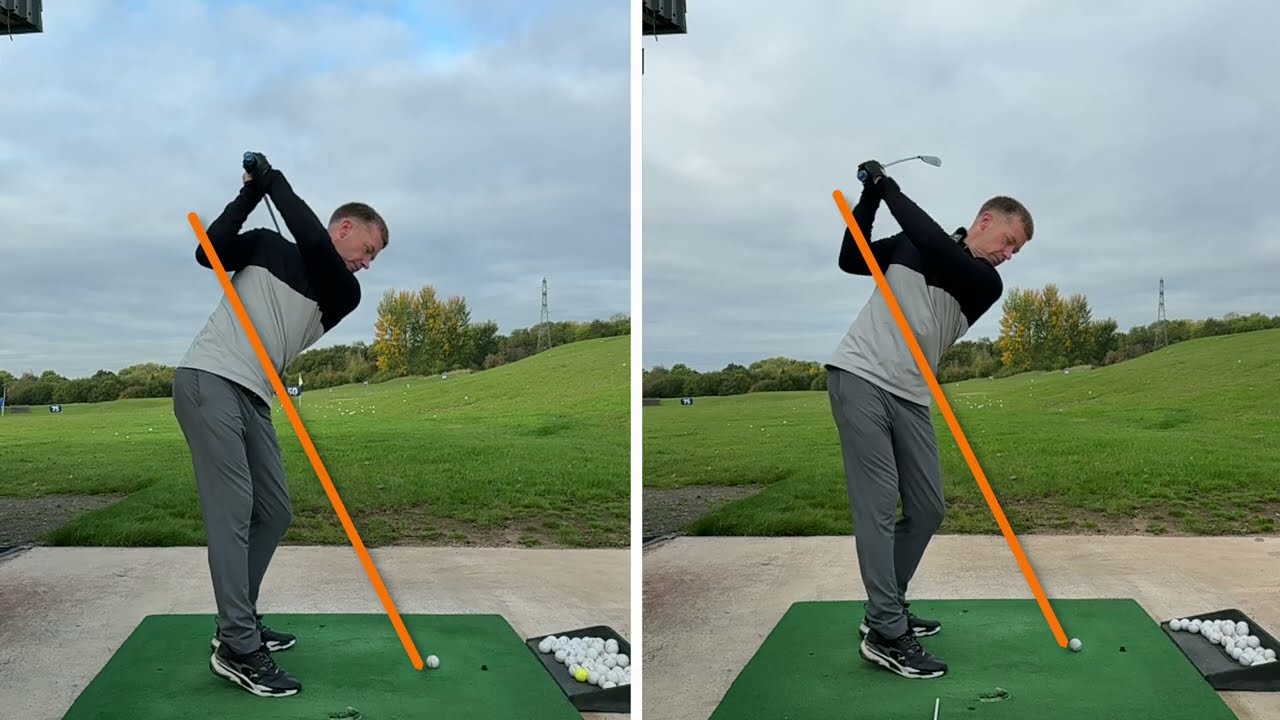
Step 5: Use a Tangible Reference — A Guide on the Floor
Placing a guide on the floor, like a stick, can help you align your swing accurately. This physical guide serves as a checkpoint for your swing to ensure that your club follows the desired path through impact. The key is to maintain a steady arc by allowing the club to trace the line naturally.
Step 6: Pause, Check, and Connect — Make the Feeling Reliable
Slowing down your swing and pausing at strategic points within the swing can be instrumental in internalizing the correct sequence. By evaluating alignment and positioning during these pauses, you can confirm that you’re on track before progressing into a full speed swing.
Step 7: Feel the Swing as a Circle Around Your Body — Untwist the Circle
Visualize your swing as a circle around your body. Aligning this circle correctly ensures that your club follows a predictable path to the ball. Proper rotation untwists this circle, leading to a more controlled, precise ball strike.
Step 8: Start Slow, Then Trust the Motion — Tempo Beats Speed
Mastery of the golf swing comes from consistency, not speed. Beginning with deliberately slower swings allows for the correct sequencing of shoulders and hips, eventually leading to improved power and distance as the proper mechanics become second nature.
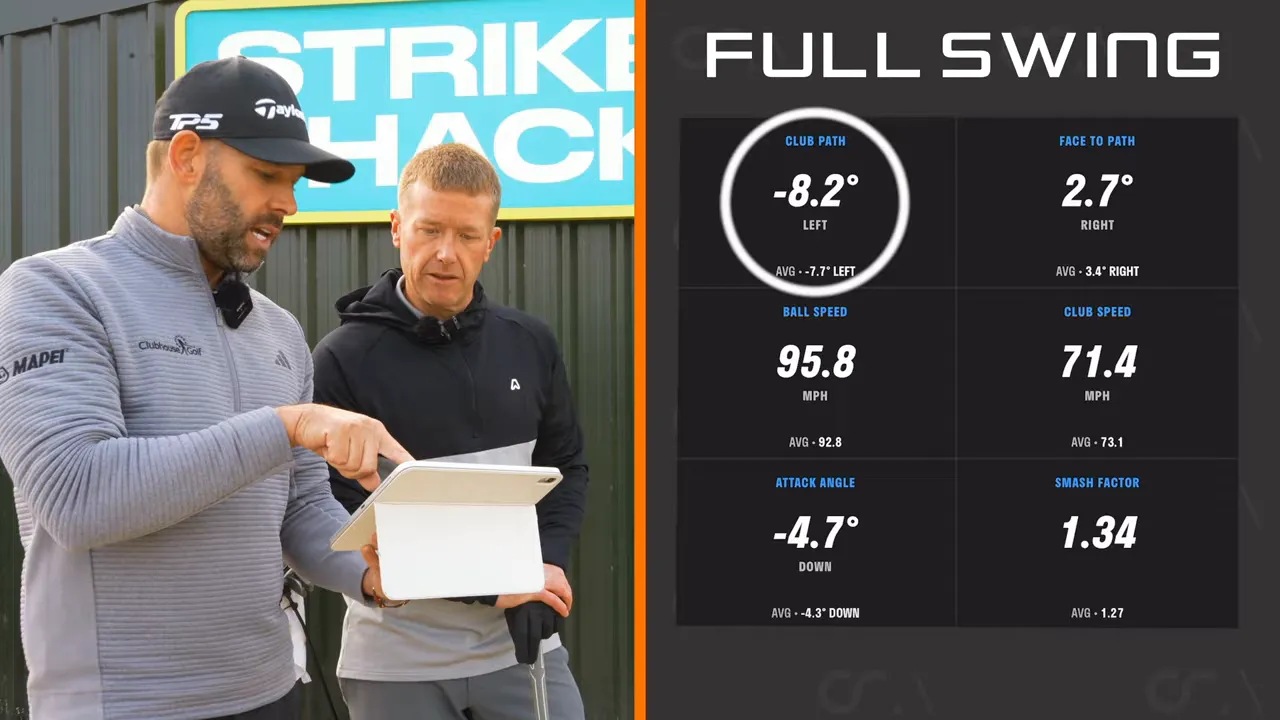
Step 9: Use Technology to Measure Progress — What the Numbers Mean
Leveraging technology, such as launch monitors or apps, can provide valuable feedback on your swing’s efficiency. These tools offer data on club path and angle, helping you gauge improvements and adjust your practice accordingly.
Step 10: Fix the Toe Strike Tendency — Point the Club Where You Want to Hit
Toe hits are often a symptom of an out-to-in swing path. To correct this, focus on an inside out club path by aligning the club face and body to the target. Practicing with visual aids can help reinforce this adjustment.
Step 11: Trust the New Path — Let the Club Come In From the Inside
Once you adjust your swing mechanics, it’s critical to trust this new path. Allowing the club to naturally follow an inside path optimizes contact and power, breaking the habit of manually correcting the club’s trajectory and leading to a more fluid and effective swing.
Step 12: Rehearsal Routine You Can Follow on the Range
- Warm up by focusing on proper weight distribution.
- Use a guide stick on the ground to track your backswing position.
- Practice slow swings to align shoulders and hips.
- Gradually build speed while maintaining smooth motion.
- Verify improvements with a launch monitor or app periodically.
- Solidify clear swing routines with single rehearsal before full swings.
Step 13: Common Troubleshooting and How to Correct It
Encountering the same issues? Troubleshoot with these tips:
- Monitor heel lifting as it’s often a sign of improper weight transition.
- Ensure your swing doesn’t rely too much on hand adjustments.
- Focus on reducing steepness by allowing a more natural handle drop.
- Let the club come into the slot rather than towing it outward.
Step 14: Drills to Ingrain the New Hip-Led Downswing
Try these drills for reinforcing the hip-led downswing:
- Paused Guide Drill: Use a stick and rehearse the swing, pausing at checkpoints to build confidence.
- Hip-Turn Drill: Start the downswing by focusing on hip rotation, ensuring the upper body follows.
- Target-Point Drill: Practice directing your club toward a specific target on the downswing to refine your swing path.
Step 15: How to Practice With Technology Sensibly
Embrace technology as a supportive tool by using these metrics to enhance feel:
- Focus on achieving a zero or slightly in-to-out club path for reducing slices.
- Monitor backswing alignment for proper hand positioning.
- Check for a shallower downswing to minimize toe hits.
Step 16: Putting It All Together on the Course
Successfully transferring practice to play involves:
- Executing a single pre-shot rehearsal focusing on rotation and trust.
- Implementing a simple mental checklist before each shot to ensure consistency.
FAQ
How quickly can I expect to see improvement in my golf ball striking?
Noticeable improvements can occur even in a single session when focusing on correct body rotation and alignment through drills. Long-term consistency will solidify these changes.
Will changing my hip rotation fix every slice in golf?
Improving hip rotation addresses one of the most common slice causes, but comprehensive correction includes grip and club face adjustments too.
What if I feel less distance after changing my swing?
Initial changes might temporarily reduce distance, but a correct swing often results in longer shots due to solid contact.
How often should I use the paused guide drill?
It’s beneficial to begin each practice with this drill until the motion feels natural and then use it as needed for maintenance.
Is technology necessary to fix this issue?
Technology is helpful for feedback but not essential; feel and video analysis can also guide improvements.
Can I practice these drills at home?
Yes, focusing on slow, intentional swings is safe and effective for indoor practice.
Final Checklist to Fix Your Slice and Strike the Ball Cleaner
- Verify your club path to ensure it’s not out-to-in.
- Encourage hip rotation, aligning shoulder and hip turns.
- Utilize floor guides for swing position checkpoints.
- Initiate downswing with rotational cues.
- Favor gradual speed increases as confidence builds.
- Use both technology and intuition for progress checks.
Enhance your ball striking by mastering body movement fundamentals. Grab a club, align with a guide, and foster trust in your improved swing path.
0 Comments