


Unlock the Secret to a Consistent Golf Swing: Transform your delivery for powerful ball striking. Many golfers struggle with inconsistency because they overlook the critical moment just before impact—the delivery. By mastering this, you can gain more control and power in your swing.
Table of Contents
- Step 1: Set a Clear Reference at Setup
- Step 2: Understand Setup vs. Delivery
- Step 3: How the Grip Should Feel
- Step 4: Proper Trail Elbow Position
- Step 5: Practice the Scissor Release Drill
- Step 6: Use a Towel and Alignment Stick
- Step 7: Practice Progression and Reps
- Common Mistakes and Fixes
- Why This Works: Biomechanical Insights
- Improve Ball Speed and Accuracy
- Sample 4-Week Practice Plan
- Troubleshooting Shanking Concerns
- Final Thoughts
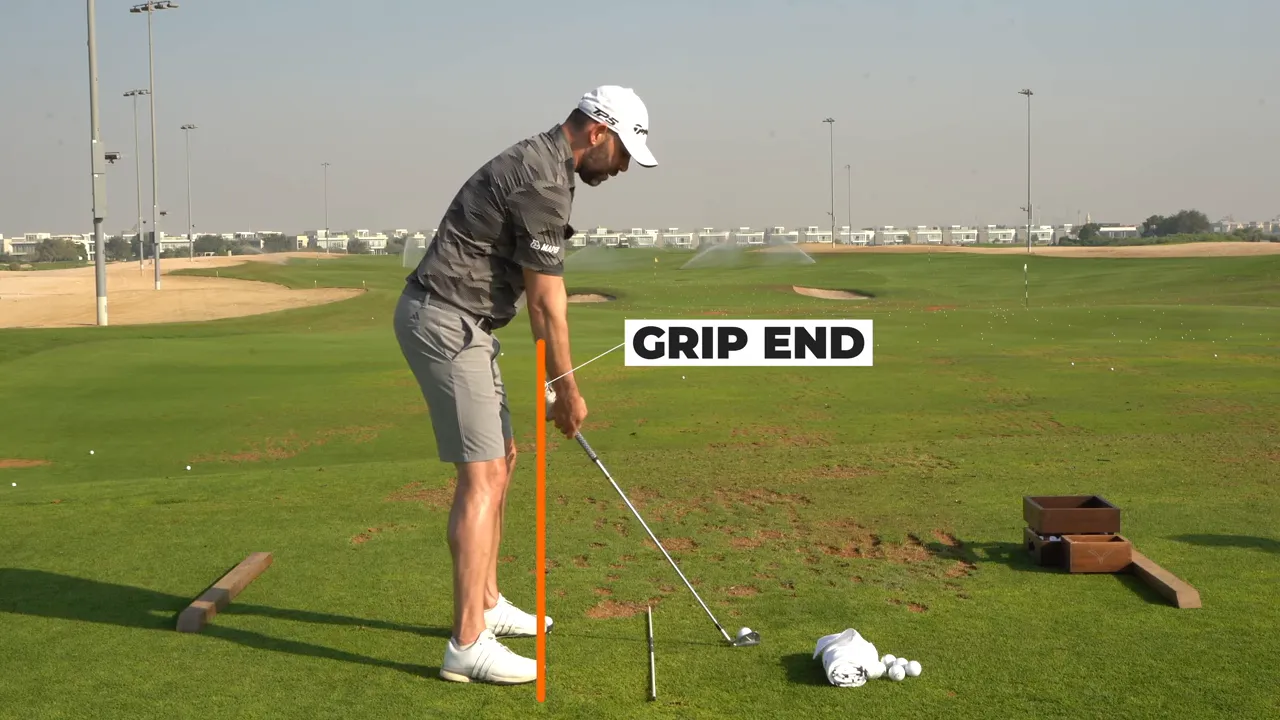
Step 1: Set a Clear Reference at Setup
Begin by setting up your shot with an alignment stick pointing at the target and a tee’d ball. Use the club grip as your visual guide. Your hands should ideally align between your heels. This setup is the starting point for effective swing delivery.
Step 2: Understand Setup vs. Delivery
The setup and delivery differ significantly. At delivery, the club shaft should be level and just pre-impact. The grip naturally shifts slightly outward from the body compared to setup due to wrist set and arm rotation.

Step 3: How the Grip Should Feel
- Create wrist set during the backswing.
- Rotate your arms towards the trail side as you progress to delivery.
- The hands should align over the alignment stick at delivery, not between the heels.
The outward grip movement is crucial for the correct release geometry, preventing common pitfalls like flipping and poor face control.

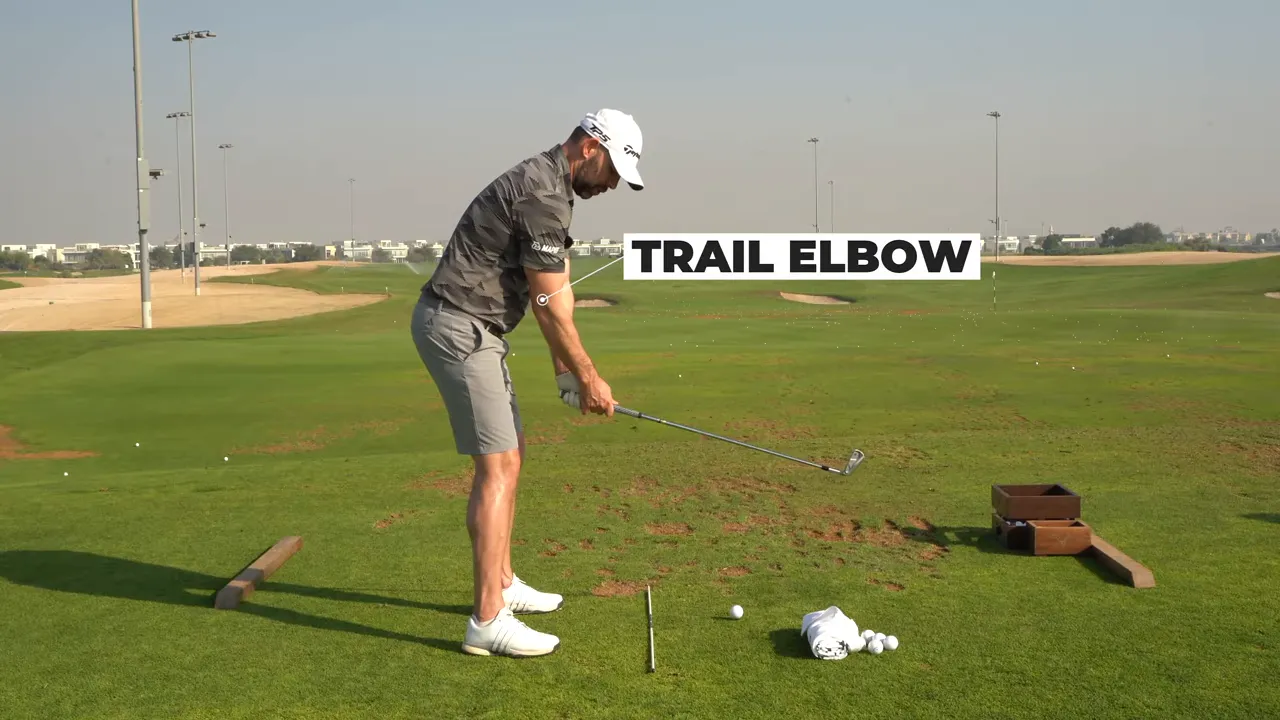
Step 4: Proper Trail Elbow Position
The trail elbow’s position is vital at delivery. It should be slightly in front of your hip, allowing the shaft to lean forward for optimal compression and control.
- Shaft lean: Creates solid compression.
- Delofting: Stabilizes shot direction.
Step 5: Practice the Scissor Release Drill
This drill helps you feel the upward and inward grip movement as the clubhead moves downward and outward.
- Set up with a full wrist set.
- Position hands slightly away at delivery.
- Adopt a split grip and initiate the scissor action.
- The lead hand pulls upward and inward, the trail hand guides outward.

Your body should naturally extend during this drill, preventing arm faults and promoting the desired motion pattern.
Step 6: Use a Towel and Alignment Stick
Adding visual and tactile feedback helps you verify your delivery and release positions:
- Place a towel near the club’s toe without touching.
- Set an alignment stick between your toes and the ball for hand alignment.

These tools aid in monitoring elbow and hand positions while ensuring no contact with the towel, which prevents shanking fears.
Step 7: Practice Progression and Reps
- Start with split grip scissor movements.
- Graduate to towel-assisted half swings.
- Add length and speed gradually, focusing on position checks.
- Finally, incorporate actual strikes, progressing from short irons.
Consistency stems from repetition and honest feedback. Utilize recording for additional analysis.
Common Mistakes and Fixes
- Trail elbow behind hip: Keep lead arm movement exaggerated to prevent blockage.
- Flipping: Focus on the grip moving upward and inward instead.
- Shanking fears: Use the towel feedback to reassure your swing path.
- Failure to extend: Encourage posture over the ball for proper hand path.
Why This Works: Biomechanical Insights
Proper hand path and elbow positioning create space and direction for the club to deliver the ball efficiently. An outward grip path at delivery optimizes compression and face stability, preventing unwanted flips.
Improve Ball Speed and Accuracy
- Increased Shaft Lean: Ensures solid compression for speed and distance.
- Face Stability: Improves shot direction, enhancing scoring and confidence.
Sample 4-Week Practice Plan
- Week 1: Daily split grip scissor focus.
- Week 2: Introduce towel/alignment stick with gradual reps.
- Week 3: Transition to full swings, using video for analysis.
- Week 4: Incorporate longer clubs, focus one session on delivery techniques.
Troubleshooting Shanking Concerns
Trust the scissor action, using towel feedback as reassurance. Initially, shots may fatten as timing adjusts, but this is not shanking.
How do I know if my trail elbow is in the right spot?
At delivery, the elbow should maintain a slight forward position with a visible gap, ensuring that the hands appear farther from the body compared to setup.
Does this apply to all clubs?
Yes, apply the same delivery principles to all clubs. With longer clubs like the driver, adjust for timing and swing arc.
How soon will I see results?
Some improvements can become evident within a few practice sessions. Consistent training will solidify muscle memory over weeks.
What coaching cues should I remember during rounds?
Keep cues simple: “Hands away at delivery,” “Trail elbow in front,” and “Grip in, club out.” These prompts help reinforce natural movements.
Final Thoughts
Enhancing your golf swing involves refining the natural release and delivery sequence. When executed well, this process enhances contact consistency, accuracy, and overall confidence on the course. Dedicate time to refining the split grip scissor drill and using feedback tools consistently for effective practice.
0 Comments