

Unlock the secret to a powerful and consistent golf swing by mastering the art of the wrist hinge takeaway. This comprehensive guide provides step-by-step instructions and proven drills to help golfers of all levels refine their technique and boost their performance on the course.
Table of Contents
- Step 1: Establish Your Leverage with Correct Posture and Grip
- Step 2: Begin with a Hip Bump and Body Turn
- Step 3: Perfecting the Push-Down and Away Hinge Direction
- Step 4: Control the Pace with Your Left Shoulder
- Step 5: Maintain Width and Connection
- Step 6: Hold Posture in the Downswing
- Step 7: Reinforce with Practice Drills
- Step 8: On-Course Checklist and Mental Cues
- Step 9: Troubleshooting Mistakes
- Step 10: Enhancing Ball Striking and Power
- Step 11: Four-Week Practice Plan
- Frequently Asked Questions
Step 1: Establish Your Leverage with Correct Posture and Grip
Your swing starts with a solid setup. Ensuring natural leverage through proper posture and grip sets a strong foundation for a successful wrist hinge takeaway. This minimizes compensations during the swing.
- Grasping Power: Position your lead hand correctly so the club sits comfortably in the base of your palm and fingers, optimizing leverage.
- Posture Essentials: Align your hips over your ankles and keep a slightly tilted, athletic spine angle.
- Steady Head: Imagine resting your chin on a glass tabletop to maintain a level head position.
Setting up like this ensures an effective angle between your lead arm and the club, crucial for a consistent wrist hinge takeaway.
Step 2: Begin with a Hip Bump and Body Turn
Avoid starting your swing with just your hands. A small hip bump toward the target initiates a coordinated body turn, setting the stage for a smooth takeaway.
- Execute a gentle hip bump to create space for arm movement.
- Rotate your body back over your right leg, letting your club naturally align over your back foot.
- Maintain low, wide hands to ensure connection between your arms and body.
This initial hip motion primes your body for an efficient takeaway.
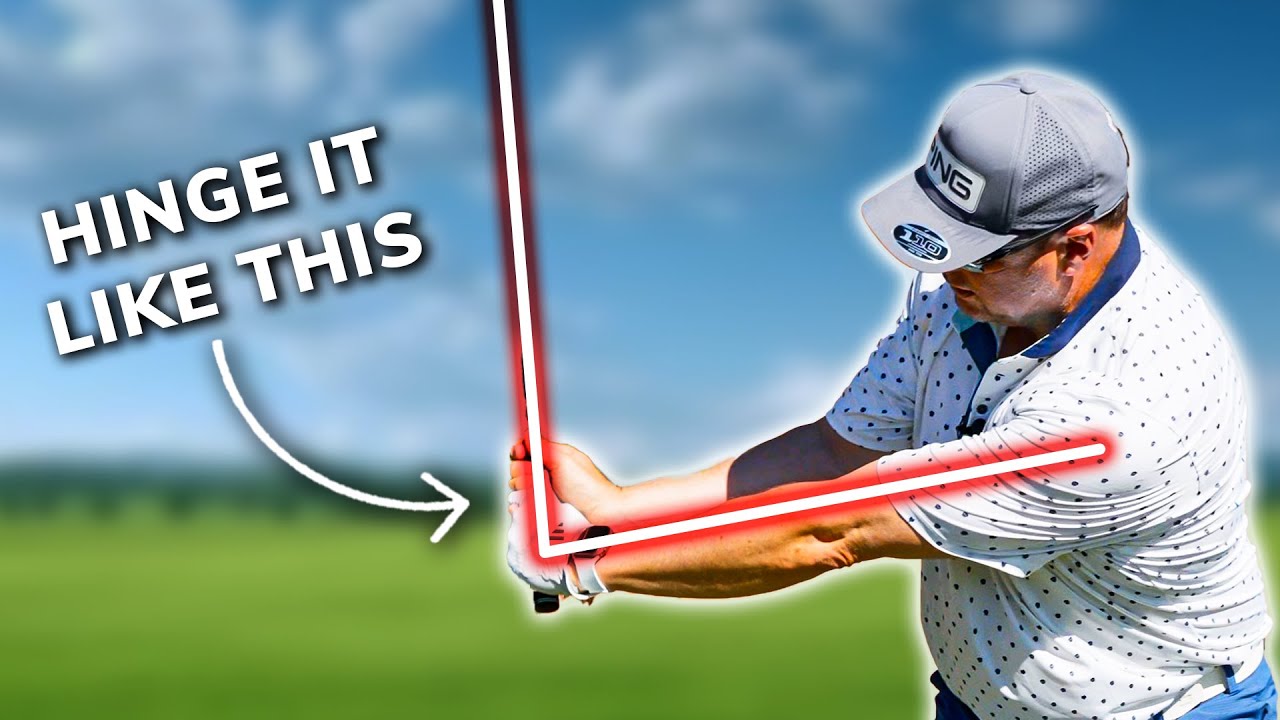
Step 3: Perfecting the Push-Down and Away Hinge Direction
The direction of your hinge is critical. Push the handle downward and away from your body to maintain leverage and structure.
- Lead with the Shoulder: Your lead shoulder guides the hands, avoiding a wrist-only approach.
- Hinge Direction: Down and away hinges promote the needed structural support between arms and torso.
- Avoid Lifting: Lifting causes a rushed hand path and impacts timing.
Picture your hands moving straight out from your body, promoting a synchronized turn and hinge.
Step 4: Control the Pace with Your Left Shoulder
The pacing set by your left shoulder keeps the swing connected. Fast hands sacrifice width and lag. Use your shoulder to slow down and guide the process smoothly.
- Guided Movement: Slow your initial movement deliberately. Use the shoulder to manage the pace.
- Positional Check: Use a mirror to ensure your body is coiling correctly without arm interference.
- Practice Drill: Use alignment sticks for directional guidance during your takeaway.
Proper pacing allows for effective loading and turn, crucial for creating dynamic swings.
Step 5: Maintain Width and Connection
Maintaining width ensures power. Keeping your hands low during the hinge preserves the swing’s radius, crucial for the dynamic downswing sequence.
- Hand Position: Ensure your hands don’t rise above the belt line during the takeaway.
- Elbow Structure: Verify the right elbow remains structured without compromising the hinge direction.
- Lead Arm-Club Geometry: Maintain a clear L, formed naturally by pushing down-and-away.
These checks ensure the swing stays connected, properly storing energy for effective release.
Step 6: Hold Posture in the Downswing
Focus on preserving posture and sequence to utilize stored energy effectively without moving the lower body toward the ball.
- Maintain Body Line: Ensure your upper body rotation leads arms without forward thrust.
- Correct Sequence: Let a smooth upper body turn lead, followed by lower body movement.
- Rhythm: A smooth swing rhythm stabilizes posture and sequence.
Practicing this sequence slowly ensures you maintain form throughout your downswing impact.
Step 7: Reinforce with Practice Drills
Drill 1: Chin on a Glass Tabletop
Keep your chin steady while swinging to avoid collapsing your setup. Continue by pushing your hands low and away.
Drill 2: Slow Guided Takeaway with Pause
- Guide the left shoulder to make a slow takeaway.
- Pause halfway for positional checks.
- Continue smoothly to the top.
This drill emphasizes the controlled shoulder-led action for consistency.
Drill 3: Alignment Stick Rail
Use alignment sticks to maintain the correct hand path during the takeaway phase, enhancing width and direction.
Drill 4: Mirror Feedback
Check body movements in a mirror, ensuring symbiosis between body and swing.
Step 8: On-Course Checklist and Mental Cues
Transfer range training to real-world play with a concise checklist and mental cues.
- Pre-shot Mantra: Repeat “Smooth takeaway, complete your backswing” to maintain focus.
- Singular Focus: Address a single cue during gameplay to mitigate issues.
- Tempo Reminder: Adjust swing tempo under stress for seamless resets.
Efficient cues provide clarity and reliability during high-pressure scenarios.
Step 9: Troubleshooting Mistakes
If issues arise, identify common problems and appropriate corrections:
- Hands Rising Too High: Emphasize pushing the handle down and away, using the left shoulder for pacing.
- Jammed Right Elbow: Focus on maintaining width, delaying wrist speed.
- Loss of Posture: Concentrate on upper body rotation and posture discipline.
- Quick Hands: Slow down the takeaway and adjust pacing with a mirror.
Identify small fixes that improve overall swing and consistency.
Step 10: Enhancing Ball Striking and Power
Repairing the wrist hinge takeaway can revolutionize your swing sequence, boosting ball striking and adding sustainable power:
- Leverage Increase: A deliberate lead arm-club L stores energy for powerful swings.
- Improved Plane: Proper hinge direction enhances club path, fostering better contact.
- Sequencing Benefits: Synchronizing hands and body optimizes power and consistency under pressure.
This foundation enhances every subsequent swing component, from leverage to ball control.
Step 11: Four-Week Practice Plan
Commit to a structured practice schedule with specific drills to solidify your wrist hinge takeaway:
- Week 1: Focus on grip, posture, and takeaway fundamentals.
- Week 2: Practice slow guided reps with alignment feedback.
- Week 3: Integrate tempo training and dynamic sequence drills.
- Week 4: Simulate course conditions, focusing on pressure management.
Within four weeks, experience noticeable improvements in accuracy, confidence, and striking ability.
Frequently Asked Questions
How do I know if my hinge is happening at the wrong pace?
Signs of a mis-paced hinge include a rushed arm wrap, loss of width, and jammed elbows. Practice slower, shoulder-paced reps for smoother dynamics.
Why does pushing down and away work better than hinging upward?
Downward hinge fosters body integration and leverage, unlike an upward movement that reduces structure and power.
What is a simple on-course cue to keep this feeling under pressure?
Repeat “smooth takeaway, complete your backswing” to remain focused on technique over force.
How long will it take to change my default takeaway?
Expect changes within four weeks with regular, mindful practice. Use drills to reinforce correct habits progressively.
Can I fix this without a coach?
Definitely, apply deliberate practice using mirror checks and alignment drills. While a coach can provide insights, self-driven improvement is possible.
Will fixing my takeaway increase my distance?
Sure, a well-executed wrist hinge improves leverage and swing sequence, fostering enhanced speed and distance.
These steps and drills lay the groundwork for excellence. A well-executed wrist hinge takeaway simplifies the swing, enhancing consistency and power.
0 Comments