

Table of Contents
- Step 1: Start with a tilted setup that primes the left side
- Step 2: Use the left shoulder trick to initiate the backswing
- Step 3: Create width with a punch-away move
- Step 4: Maintain a mid-range wrist hinge for control and speed
- Step 5: On the downswing, get the lead shoulder back to the wall — then up and back
- Step 6: Adjust the “up” feeling to fix your ball flight
- Step 7: Combine tilt, width, and up-and-back for speed and upward attack
- Common mistakes and how to fix them
- Drills that reinforce the left shoulder trick (short and effective)
- How to measure improvement
- Why this left shoulder approach mirrors top players
- Practice plan for the next 4 weeks
- Step 8: Transfer the feel to the course
- FAQ
- Final notes and quick checklist
Step 1: Start with a tilted setup that primes the left side
The foundation for a powerful, upward-driving tee shot begins before you swing. Set up so your lead side — left hip and left shoulder if you are right-handed — is slightly higher and slightly forward than your trail side.
Why this matters: a higher lead side makes an upward or level angle of attack far more likely. That upward angle of attack is one of the two non-negotiables for more driver distance. The other non-negotiable is speed. The tilted setup gives you the structural advantage to create both.
How to feel it:
- Left hip slightly forward — imagine your belt buckle a touch toward the target compared with your shirt buttons.
- Left shoulder higher than the right — small, controlled tilt; not exaggerated.
- Balanced pressure — a touch of pressure into the trail foot to prepare the coil, not to tip back.

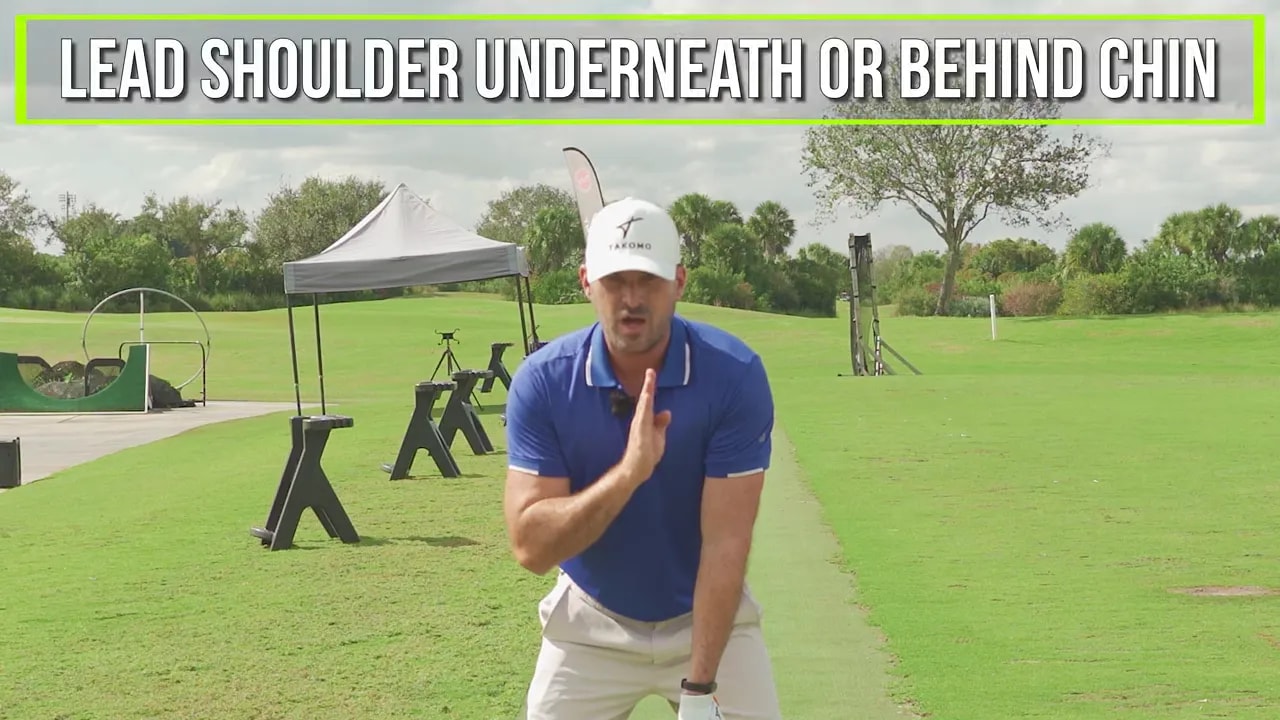
Step 2: Use the left shoulder trick to initiate the backswing
Instead of starting the backswing with your hands or wrists, start it with your left shoulder. The left shoulder should move “off the wall” behind your chin. This creates immediate width between your body and the clubhead.
What you should see and feel:
- Your left shoulder moves beneath or behind the chin line by the time your lead arm reaches parallel to the ground.
- Your lead arm remains extended and the clubhead travels farther away from your body.
- Your thumbs feel like they point back behind you, not down or toward the ground.
The common poor version is an “all-arms” backswing where the left shoulder stays put. That produces a folded arm position, less width, less speed, and a steeper attack angle that kills distance.
Step 3: Create width with a punch-away move
Once the left shoulder initiates, think of “punching” the club away from your body. This is a protraction of the shoulder — the chest and shoulder working to move the clubhead farther from the torso.
Why this works:
- More width = more potential energy to convert into clubhead speed.
- Wider arc = shallower descent for the driver, supporting an upward or level attack angle into the ball.
Drill to practice: set up an exaggerated version for feel. Push the left shoulder back under the chin and extend the left arm so the clubhead feels as far away as possible. Hold that position and make half-swings to ingrain the sensation.

Step 4: Maintain a mid-range wrist hinge for control and speed
Look for a hinge point that sits between flat to the ground and a full 90-degree wrist set — roughly halfway. This hinge supports both clubhead speed and a stable, repeatable release through impact.
Too little hinge and you lose whip. Too much and you complicate timing. The shoulder-driven backswing with an extended lead arm encourages a clean mid-hinge naturally.
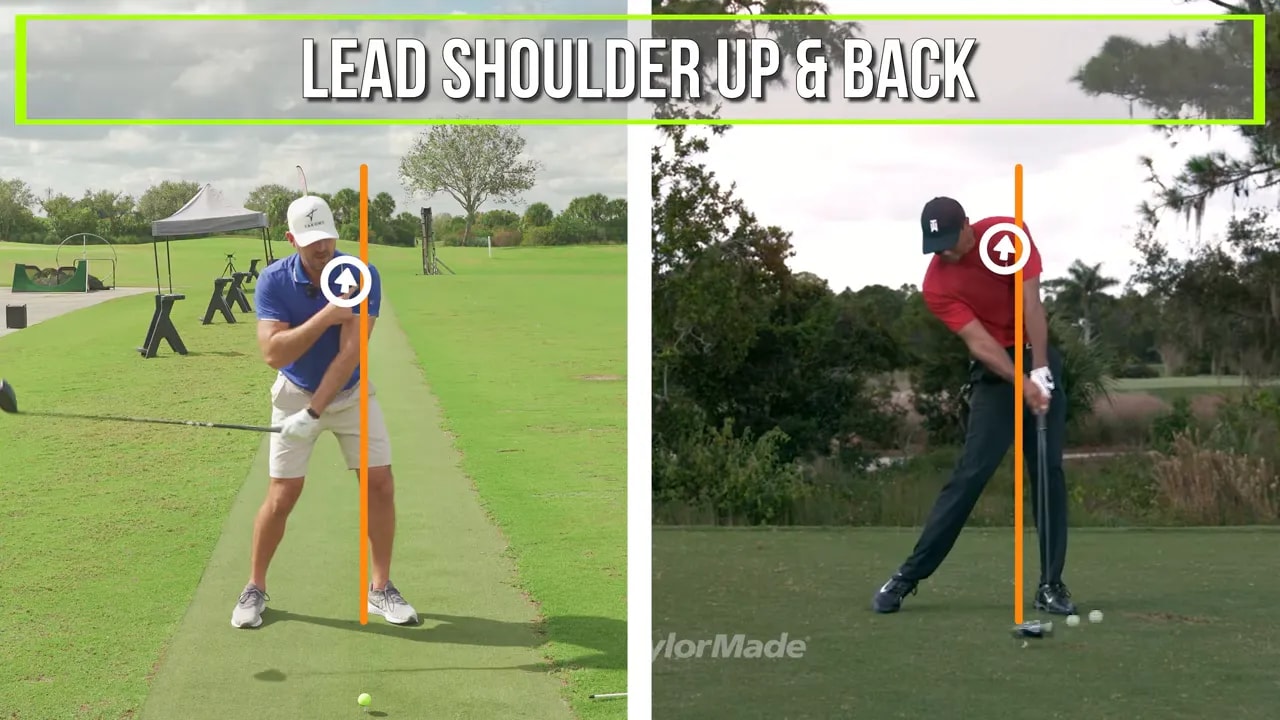
Step 5: On the downswing, get the lead shoulder back to the wall — then up and back
The path back toward impact is all lead-side driven. The left shoulder returns toward the “wall” it left at setup, but it must not push forward beyond that initial line. Instead, the left shoulder should move up and back.
The up-and-back motion accomplishes two critical things:
- Shallowing the attack angle so the club approaches the ball on a more level or slightly upward path.
- Allowing arm and club extension so you can throw the club away from your body and create speed.
Players who rush the head forward or let the lead shoulder break the wall end up hitting down on the ball, folding the arms, and losing speed and distance.
Step 6: Adjust the “up” feeling to fix your ball flight
The left shoulder move on the downswing is the single most useful knob to tune ball flight. How you feel the shoulder going up and around will change the club path and face relationship at impact.
Two practical adjustments:
- For pulls and fades (too steep, out-to-in path): hold the lead shoulder up and slightly closed as you come down. This encourages a more inside path and a face that stays closed longer through impact, producing a higher-draw bias.
- For pushes and hooks (too in-to-out or face too closed): let the left shoulder move up and a touch more to the left or around the body on the way through. That motion allows the club to “kick out” and reduces an overly closed face, producing a straighter or slightly fade-biased flight.
Both adjustments rely on the same initial setup tilt and backswing width; the difference is only the direction your lead shoulder continues during the downswing.
Step 7: Combine tilt, width, and up-and-back for speed and upward attack
Use the sequence every time you hit driver:
- Tilt left hip and shoulder up slightly at setup.
- Initiate the backswing with the left shoulder tucked behind the chin to create width.
- Hinge to a mid-angle while keeping the left arm extended.
- On the downswing, return the left shoulder to the setup wall and then lead it up and back through impact.
Emphasize two outcomes with each swing: an upward angle of attack and maximum allowable speed. Those two together are the recipe for more carry, more roll, and cleaner contact with the driver.

Practice sequence to ingrain the left shoulder trick
- Slow-motion setup check: Address the ball with left hip and shoulder slightly higher. Hold for three breaths and feel balanced.
- Shoulder-only half-swing: Make a half-swing where only the left shoulder initiates and you “punch” the club away. Stop at the top and repeat 10 reps.
- Half-swings focusing on width: Add a mid-hinge and swing down feeling for the left shoulder to return to the wall and then go up-and-back. Hit 10 balls with a 7-iron or hybrid to ingrain path.
- Driver with tempo: Move to the driver and perform 20 swings focusing on the sequence: tilt, left shoulder punch, mid-hinge, left shoulder up-and-back. Monitor ball flight and adjust the “up” direction for your flight needs.
Common mistakes and how to fix them
- Left shoulder stays on the wall at the top: Leads to narrow swing, less speed, and steep angle of attack. Fix by practicing the “punch-away” shoulder-only drill.
- Breaking the wall forward on the downswing: Creates a downward attack and forces the arms to fold. Fix by feeling the left shoulder return to the wall, then go up and back.
- Over-tilting the setup: Too much tilt can create balance issues and inconsistent contact. Keep the tilt small and repeatable.
- Relying only on the arms for speed: Arms-only swings lack the body rotation and width that generate true clubhead speed. Use the lead-side sequence to synchronize body and arms.
Drills that reinforce the left shoulder trick (short and effective)
1. The Shoulder-Under-Chin Drill
Address the ball, take the club to waist-high, and stop. Make a backswing where the lead shoulder intentionally moves under or behind the chin. Hold the top for three seconds, then make a controlled downswing with the left shoulder returning to the wall and then up-and-back. Repeat 8 to 12 times.
2. The Punch-Away Drill
Take a practice grip and make a slow backswing where your goal is to maximize the distance between your torso and the clubhead. Think of pushing the club away with your shoulder rather than pulling it with your hands. This reinforces width and the desired hinge.
3. Impact-Position Mirror Work
Use a mirror or phone camera. Make slow swings and check that by impact your head remains behind the ball and your left shoulder has moved up and back relative to the setup line. Look for an extended lead arm and a shallow club path into impact.
How to measure improvement
Track these metrics over a practice session:
- Ball flight shape — Are you seeing a higher launch with a straighter or draw-biased trend when intended?
- Smash factor — Did center strikes start producing higher carry and more roll?
- Clubhead speed — Even small increases in speed at the same or better strike location are meaningful.
- Contact consistency — Are you catching more balls on the sweet spot?
Video or launch monitor data will help validate the feeling-based changes. If you lack a launch monitor, simple observation of tighter dispersion and increased carry distance is a reliable sign of progress.
Why this left shoulder approach mirrors top players
Elite drivers of the ball share three lead-side patterns: a tilted setup, a shoulder-initiated backswing that creates width, and a downswing where the lead shoulder moves up and back rather than smashing forward. Those patterns produce a shallow attack and allow the player to extend the arms through impact and generate enormous clubhead speed.
You can copy the same structural moves in your own swing. The benefit is repeatability — the left-side sequence is less tempo dependent than timing-only swings and helps make the driver more predictable.

Practice plan for the next 4 weeks
- Week 1 — Feel and setup: Daily mirror work for 5 to 10 minutes reinforcing the tilted setup and left shoulder positioning.
- Week 2 — Backswing width: Add the Shoulder-Under-Chin and Punch-Away drills in 15-minute sessions three times a week.
- Week 3 — Integration with irons: Use 7-iron and 5-iron half-swings to ingrain the downswing up-and-back motion before moving back to driver.
- Week 4 — Driver focus and ball flight dialing: Hit 30 focused drivers per session, experimenting with “up and closed” versus “up and around” to tune ball flight for your tendencies.
Step 8: Transfer the feel to the course
Practice on the range until the feel is reliable, then test it on the course with a conservative target. Start with a 3-quarter swing and build speed as the pattern holds. Emphasize control over raw distance until you consistently hit your preferred finish.
FAQ
How does the left shoulder trick increase driver distance?
The left shoulder trick increases distance by creating two things: a more upward or level angle of attack and increased clubhead speed. The tilted setup primes an upward attack. The shoulder-initiated backswing and punch-away move create width and allow for a shallow arc. The up-and-back downswing keeps the head back and enables arm extension, converting width into speed.
Will this change help with slice or hook problems?
Yes. The same sequence can be tuned to correct different ball flights. If you slice or hit fades, feel the left shoulder go up and stay slightly closed on the downswing to encourage an inside path. If you push or hook, let the left shoulder go up and a bit around to allow the club to kick out and prevent an overly closed face. The initial tilt and width remain the same.
How much tilt is too much?
Keep the tilt small and repeatable. Over-tilting can affect balance and consistency. Aim for a subtle difference you can reproduce every setup: enough to influence angle of attack, not enough to throw off posture or comfort.
Can I practice this without a coach or launch monitor?
Yes. Mirror work, slow-motion reps, and the drills described here provide strong biofeedback. Pay attention to ball flight: increased carry and a straighter or draw-biased flight usually indicate progress. Recording your swing on phone video from down-the-line and face-on angles gives additional confirmation.
How soon will I see results?
Many golfers notice better contact and improved ball flight within a few practice sessions. Significant changes to distance and consistency generally require several weeks of focused practice. Follow the four-week practice plan to build reliable change.
Final notes and quick checklist
Before every driver swing, run this quick checklist in your head:
- Lead hip and shoulder slightly higher at setup.
- Initiate with the left shoulder moving under or behind the chin.
- Create width by extending the lead arm and feeling the clubhead punch away.
- Hinge to a mid-level wrist set; avoid extremes.
- On the downswing, bring the left shoulder back to the wall and then up and back.
- Adjust the “up” direction to correct your specific ball flight tendencies.
Practice with intent, track your ball flight, and adjust the subtle “up and closed” versus “up and around” feel to suit your swing. The left shoulder trick is a simple, repeatable lead-side habit that delivers measurable gains in distance and consistency when practiced properly.

0 Comments