

If you’re frustrated with your golf slice, consistently hitting the ball right off the tee, this guide will transform your game. Learn proven methods to straighten those drives and boost your confidence on the course.
Before you hit another ball, understand that slicing the driver is rarely just an issue of wrist speed or trying harder. It is often a connection and timing problem. Your hands are the arrow and your body is the bow. For true, straight shots, the bow must be built from the ground up. Below are practical steps to fix your driver slice, drills to practice, and course-tested tips you can use immediately.
Table of Contents
- Step 1: Build a Ground-Up Connection — Brace with the Back Foot
- Step 2: Find Rhythm and Maintain Connection
- Step 3: Stay Centered at Impact
- Step 4: Bonus — Tee It with Intention
- Practical Practice Plan
- Common Mistakes
- Track Progress
- Feel and Shot Shape Changes
- Quick Checklist
- Final Thoughts
Step 1: Build a Ground-Up Connection — Brace with the Back Foot
To fix your driver slice, start with a stable, grounded posture. If your lower body slides, the club gets away from your rotation, resulting in an open clubface at impact. Create a solid, braced platform allowing the upper body and hands to work together without losing balance.
Key takeaways:
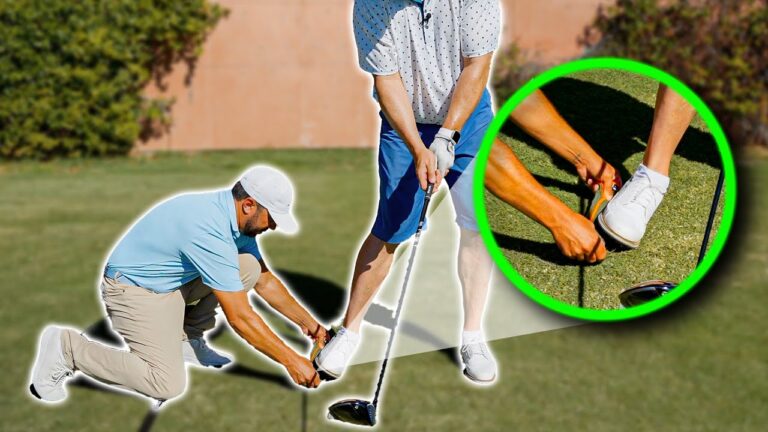
- Use a slightly wider stance, focusing on widening more with your back foot. This strengthens your brace and allows for better rotation.
- Feel the inside of your lead foot. A small rolled towel under the outside of your lead foot reminds you to build pressure into the inside and maintain post through impact.
- Maintain a slight athletic flex in both knees. You are bracing, not locking up.

How to do the rolled towel drill:
- Place a rolled towel beside the outside of your lead foot for a small wedge sensation.
- Address the ball as usual, using the towel to build pressure into the inside of the foot during the swing.
- Make several slow swings, feeling the inside of the foot getting firmer as you transition to the downswing.
- When hitting full shots, the towel encourages a more centered, controlled turn, reducing lateral sliding.
Why this works: By pressing into the inside lead foot and bracing off a stronger back leg, you reduce lateral movement and prevent reaching toward the target, which causes the hands to race ahead. Your lower body acts as a stable anchor, guiding the club along a better inside path into impact.
Step 2: Find Rhythm and Maintain Connection
Your swing’s rhythm and connection are crucial to fixing a driver slice. True power comes from a controlled build of tension into the top, then an explosive release. Speeding up your arms or cutting your turn short brings the club over the top, causing a slice.

Rhythm cues to help you:
- Think smooth takeaway. Complete your backswing to stay connected without forcing the arms.
- Use the bat-on-shoulder mental check. The torso rotates naturally if you leave a bat on your shoulder while rotating. Dropping the bat indicates lost connection.
- Transition slow to fast. Begin the downswing with hip rotation, letting the hands follow. Like a bow builds energy, then releases an arrow, your body works the same.
Practicing rhythm:
- Warm up with half swings and rotate shoulders fully. Picture your left shoulder under and past your chin, or your right shoulder behind your head at the top.
- Take medium swings with a smooth transition. Let the hips lead while the hands follow.
- Alternate three swings focusing on tempo with one regular shot on the range. This pattern syncs your feel with actual striking.
Step 3: Stay Centered at Impact
Keeping your head “in the picture frame” behind the ball fixes your driver slice. It prevents lateral sliding, stabilizes your upper body as your lower body rotates, and promotes an inside path, squaring the face at impact.
What you should feel:
- A steady pressure at your temple, ensuring your upper body doesn’t slide as your lower body rotates.
- Your lower body rotating into your left side while your upper body stays positioned relative to the ball.
- Striking the ball around its equator, producing consistent contact and tighter dispersion.
Drills to stay centered:
- Knife-to-temple drill: During slow swings, maintain contact with a light object near your temple, rotating around it rather than sliding forward.
- Visual checkpoint: At the backswing top, ensure your head stays inside the frame formed between shoulders and ball, keeping your upper body steady.
- Balance finish drill: Finish in balance, chest rotated toward target, weight on front foot. If holding your finish for three seconds is hard, you’re likely sliding.
Step 4: Bonus — Tee It with Intention
Beyond technique, consider tee height and course conditions. Minor adjustments in tee height can greatly impact uphill and downhill holes.

- Downhill tee shots: Lower the tee for reduced elements exposure and a lower trajectory, essential for downhill fairway alignment.
- Uphill tee shots: Tee higher for maximum carry, crucial on uphill holes requiring distance.
- Tee with intention: Assess each hole and adjust accordingly for better course management, minimizing risk while your improved swing executes.
Practical Practice Plan
Follow this step-by-step practice routine at the range for the next four weeks. Commit to the drills, monitor changes, and focus on quality over quantity to improve connection, rhythm, and center-of-rotation.
- Warm up with wedges and short irons: Spend 15 minutes maintaining balanced finishes and proper low point before moving to the driver.
- Use the towel drill: Spend 10 minutes with a rolled towel under your lead foot’s outside, focusing on inside-foot pressure and bracing off your back foot. Start with slow swings and gradually speed up.
- Half swings focusing on head position: Do 10 slow half swings, feeling your head steady and rotating around it, checking that your left shoulder gets under and past your chin on the way back.
- Progress to 3/4 and full swings: Keep rhythm cues in mind: smooth takeaway, complete backswing, slow to fast transition. Hit 20 drives, alternating two swings focusing on feeling with one normal drive.
- Finish with targeted shots: Simulate course conditions: select a target 200 yards away, hitting 10 controlled drives aiming for shape and control, not just distance.
Common Mistakes
Avoid typical errors that sustain the slice with these specific corrections:
- Error: Rushing the downswing. Fix: Practice a delayed, hip-led transition. Begin the downswing with the hips before the hands accelerate.
- Error: Sliding instead of rotating. Fix: Use the picture-frame head cue; rotate into your left side instead of moving laterally.
- Error: Widening equally with both feet. Fix: Widen more with your back foot for better push-off and reduced sway.
- Error: Relying on hand speed. Fix: Remember the bow-and-arrow analogy. Build tension slowly and let hand speed follow naturally from a stable base.
Track Progress
Measurable steps are essential to improving your driver and correcting a slice. Track these metrics to ensure progress:
- Alignment and ball flight: Monitor initial takeaway improvement and the ball’s path.
- Strike location: Track where on the face the ball is hit. Centered strikes move contact toward the equator, not high on the face.
- Consistency: Record how many fairways you hit in 20 drives, aiming to increase each week.
- Balance test: Holding your finish comfortably for three seconds indicates reduced sliding.
Feel and Shot Shape Changes
Expect these improvements after incorporating these changes:
- Feel more stable through impact with minimized lateral movement.
- Experience cleaner strikes through the center of the clubface, improving roll-out.
- Gain the ability to shape shots. With restored connection and rhythm, hit controlled draws or cuts purposely.
- Gain more confidence off the tee, knowing your lower body will brace and your head remains centered, leading to straighter, longer shots.
Quick Checklist
- Feet: Wider stance, more width on back foot for brace.
- Towel: Optionally use a rolled towel under your lead foot for inside-foot pressure reminder.
- Setup: Adjust ball position, keep a relaxed grip, and head in the picture frame.
- Takeaway: Smooth, complete backswing using the “bat on shoulder” cue.
- Transition: Lead with hips, then let hands follow. Build tension slowly, then release.
- Finish: Balance finish, chest aimed at target, hold for three seconds.
How long will it take to see consistent improvement when trying to fix your driver slice?
Notice improvement in your first practice session with focus on the towel drill and the head picture-frame cue. For consistent on-course performance change, practice over several weeks, following the plan and tracking metrics like strike location and fairways hit.
Is hand speed important to fix my driver slice?
Hand speed alone isn’t the issue. Trying harder often worsens the slice, causing arms to run ahead. Focus on building connection and rhythm, allowing hand speed to naturally release from a stable base.
What if I am very tall and I keep swaying more than shorter players?
Taller players may sway more visibly due to longer levers. The solution: brace with your back foot, focus on rotation over sliding, and maintain picture-frame head position. Control your low point and finish in balance.
Can I use the towel drill for wedges and irons too?
Yes, the towel drill aids low point control and avoids getting behind the ball with wedges. Slightly adjust towel position for clean downward strikes with irons and wedges.
Where should I tee the ball on uphill or downhill holes?
Tee lower on downhill holes to reduce elemental exposure and lower launch. Tee higher on uphill holes for greater carry. Always tee with intention, shaped by hole and swing.
Final Thoughts
To eliminate your driver slice, focus on these fundamentals: build a ground-up connection, restore rhythm, and maintain the picture-frame head position. Add intentional teeing on the course. Practice deliberately, monitor contact and balance, and transform your slice into powerful drives.
Incorporate the drills in this article into your daily routine, and you’ll not only eliminate your slice but also start shaping shots and consistently finding fairways.

0 Comments